
New tomato seedlings are fragile at the soil line. When a stem becomes water-soaked, narrow and unable to hold up its leaves, the cause may be damping-off, a disease complex affecting many kinds of seedlings. It is not the same as a tall tomato leaning because of weak light. Fungi and water molds can spread through contaminated potting medium and shared irrigation water, especially when crowded seedlings sit in persistently wet conditions. Because severely affected seedlings rarely recover, prevention and sanitation matter more than rescue sprays or improvised home remedies.
Recognize the Stem-Collapse Pattern Early
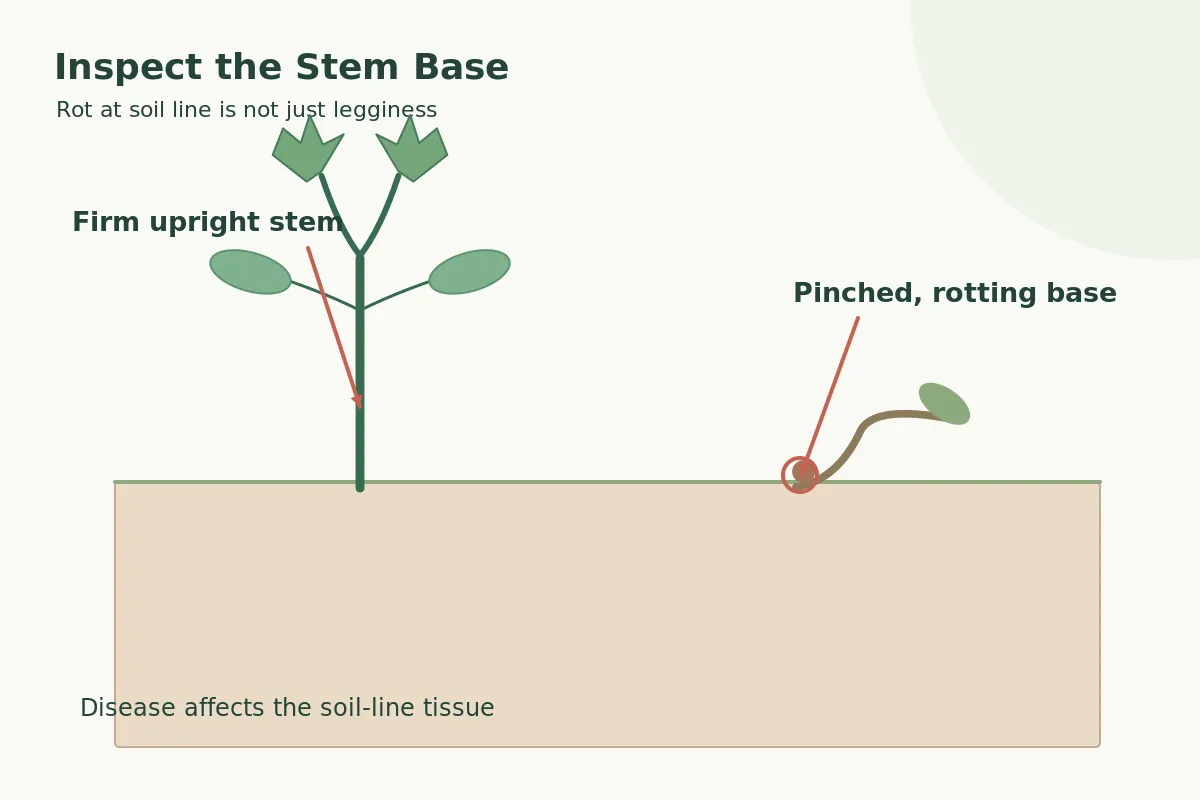
Look at the stem exactly where it meets the potting medium. Damping-off frequently produces a pinched, discolored, soft or threadlike section just at that line, followed by wilting and collapse. Some seeds rot before emerging, creating apparent gaps in a tray. University of Minnesota Extension lists water-soaked stems, gray or brown tissue and compromised roots among warning signs. A tomato leaning toward a window may instead have a long but intact pale stem due to insufficient light. Pulling every fallen seedling upright will not reverse tissue decay. Isolate suspicious flats and inspect neighboring cells for similar symptoms. For the fuller picture, see our guide to seedling damping-off.
Understand Pathogens Instead of Blaming One Fungus
Damping-off describes a group of problems rather than one single organism. Extension references include Rhizoctonia and Fusarium fungi and Pythium water molds; their preferred conditions and disease cycles are not identical. They may move with reused soil, dirty trays, tools, insects or shared splash water. Soggy conditions and slow growth raise vulnerability but do not by themselves prove a specific pathogen is present. That is why a diagnosis should combine characteristic stem injury with the growing environment rather than relying only on yellow leaves. If unusual losses repeat despite good sanitation, ask a local diagnostic lab or Extension office about submitting a sample.
Start With Clean Containers and Drainage Holes
Reuse is possible when trays are thoroughly cleaned and appropriately sanitized, but not when old roots and soil are left clinging to cell walls. Wash pots and tools first so disinfectant can reach the surfaces. Use the applicable Extension sanitation instructions and follow chemical safety directions rather than mixing household products. Every container should have working drainage holes that do not sit permanently underwater. Shallow cups with no exits can hold an unseen saturated zone even when the top looks dry. Store clean trays away from dirty tools and garden soil to avoid recontaminating them immediately before planting. Cleanliness is a simple prevention step that does not require buying elaborate equipment.
Fill Trays With Fresh Seed-Starting Medium
Avoid filling tomato seed trays with outdoor garden soil or last season’s infected potting mix. University of Minnesota recommends new, clean growing media to reduce the chance of bringing pathogens into an enclosed propagation environment. A fine-textured seed-starting medium should still drain and admit air once watered. Do not compact it hard into cells or bury seeds deeper than packet guidance. Compost can improve an outdoor bed, but unprocessed garden compost is not a substitute for a clean indoor seed-starting mix where disease prevention is the goal. Label the tomato cultivar and sowing date so slow germination is not confused with early disease.
Water for Moist Roots Rather Than Standing Water
The aim is evenly moist growing medium with oxygen available to roots, not a tray kept continuously saturated. Maryland Extension suggests waiting until the surface is nearly dry before watering again while ensuring young roots do not fully dry out. Either gentle top-watering or short bottom-watering can work when excess water is allowed to drain afterward. Remove standing water from catch trays and pay attention to the weight of a pot, not just the color of its upper surface. A sealed humidity dome can speed germination but should not create constant dripping condensation on emerged stems. Sudden overwatering cannot be offset simply by running a fan.
Give Tomato Seedlings Adequate Light and Space
Leggy seedlings bend and grow slowly when light is insufficient, and slow weak growth increases the period of vulnerability to disease. Use a suitable grow light positioned according to the fixture’s guidance, adjusted as plants increase in height. University of Minnesota describes long daily light periods for indoor seedlings rather than a brief dim window exposure. Thin overcrowded starts so leaves can develop without constantly pressing against neighbors. Make the area comfortable for seedling growth with gentle air movement, while avoiding drafts that chill the medium or dry tender shoots abruptly. Air movement complements, but cannot replace, clean soil and sound watering.

Keep Germination Temperature Suitable for Tomatoes
Tomatoes need warm enough conditions for steady germination. An overly cold wet tray can remain ungerminated for too long, encouraging the organisms associated with damping-off. Extension references include warm propagation conditions, though exact settings should follow tomato seed requirements and the equipment in use. A heating mat can be helpful during germination if monitored; excess heat and a drying outer cell create new problems. Once seedlings emerge, manage temperature, ventilation and light for compact healthy growth rather than keeping an uncovered mat at maximum output forever. Do not interpret a USDA hardiness zone as an indoor heat-mat setting or a tomato sowing date. If you want the full process, read how to prevent damping-off in indoor seedling trays.
Check Trays by Cells Instead of Flooding Everything
A large flat is rarely uniform. Edge cells may dry faster than middle cells, and seedlings at different stages absorb water differently. Lift trays and inspect several cell depths rather than pouring water into the full catch basin on a fixed schedule. Separate containers make it easier to discard a bad cell without disturbing all neighbors. Clean watering cans and keep hose ends off dirty floors, as Minnesota Extension recommends. Avoid splashing suspicious material from one tray to another. Record which cultivars and tray positions show trouble: that information can reveal an irrigation or drainage pattern even when you cannot visually identify the specific organism.
Remove Collapsed Seedlings and Suspect Medium Promptly
Once a tomato has a soft, girdled stem and has fallen over, staking it upright is unlikely to restore its vascular tissue. Remove the visibly diseased seedlings and contaminated medium rather than placing them back beside clean starts. For a widespread tray outbreak, discard the whole affected group and clean the containers according to current university sanitation instructions. Do not recycle that medium into a new indoor seed tray. Maryland Extension advises disposal of infected plants and growing mix and cleaning reused equipment. Consider whether a shared water tray or tool contacted both affected and unaffected plants, and correct the route of spread before resowing.

Distinguish Damping-Off From Stretching or Drought
A stretched tomato seedling tends to have a long thin but intact stem and leans toward insufficient light; damping-off has a visibly pinched or rotten region near the medium surface. Drought can wilt leaves while the soil is dry and stems remain firm; overwatering can cause general decline without a classic girdled lesion. Inspect the base in good light and feel the medium, but avoid touching diseased stems then clean ones without washing your hands. A magnifying lens may help, although definitive pathogen identification requires diagnostic expertise. Correct the actual condition rather than applying the same spray to every weak seedling.
Reset the Setup Before Your Next Sow
If several tomato starts failed, a thoughtful reset beats a quick replacement seed packet. Discard affected media, wash and sanitize trays using an Extension-approved method, use new medium, clear clogged drain holes and adjust your watering plan. Improve light where stretched plants dominated, and review temperature where germination remained slow. Start with fewer seeds per cell and keep a clean watering vessel. The practical success measure is an upright seedling with an intact stem, actively expanding true leaves and a developing root system. Healthy emergence cannot guarantee no disease, but removing the common risk conditions dramatically improves your chances.
Use This Quick On-Plant Decision Table
| Observation | Likely factor | Check first |
|---|---|---|
| Pinched brown stem at soil line | Damping-off possible | Remove infected media; review sanitation |
| Long unrotted pale stem | Insufficient light likely | Review lighting and distance |
| Wet heavy flat after watering | Poor drainage or excess water | Drain basin; change watering practice |
Related Guides
- Growing Tomatoes: A Step-by-Step Plan from Transplant to Harvest
- Tomato Blight Symptoms: Tell Early Blight From Late Blight First
- Tomato Blossom-End Rot: Check Water Before Calcium
- Tomato Leaf Mold: Check Leaf Undersides Before Treating Yellow Spots
- How to Tell Tomato Early Blight From Septoria Leaf Spot and Prevent Spread
How We Research and Verify Garden Instructions
The gardening procedures in this article were checked on 2026-10-25 against original university Extension and horticultural guidance: University of Minnesota Extension: symptoms, clean pots and new sterile media, adequate drainage and light, moisture prevention.; University of Maryland Extension: moisture and oxygen balance, top medium nearly dry before watering, disposal and sanitation after infection.. Our comparison preserves the differences between species, growing stages, local climates and published regional planting methods. The diagrams explain the specific physical actions described above and are instructional schematics rather than diagnostic laboratory images. When a recommendation varies between references, the article identifies the variation and asks readers to follow local guidance instead of claiming one number always fits.
Plant Safety and Independent Editorial Disclosure
This page provides independent garden education, not paid placement or a claim of commercial partnership. Review the VegWin affiliate disclosure. Handle sharp tools carefully, wear appropriate protection for the task, and keep potentially hazardous plants, cuttings and products away from children and pets. Use only treatments labeled for your particular crop and location; read full directions and food-safety intervals. When plant identity, disease or local weather makes the recommended action uncertain, a regional Cooperative Extension office can offer site-specific advice.
The stem often narrows, turns water-soaked or brown at the medium surface, and the young seedling collapses.
A seedling with a decayed, girdled stem usually cannot be rescued; focus on protecting healthy neighbors.
No. Pathogens cause the disease, while wet media, contamination and slow growth increase vulnerability.
No. Use a fresh clean propagation mix rather than bringing untreated garden soil into indoor trays.
No. Legginess is typically elongation from inadequate light; damping-off involves stem or root decay.