
Tall garden phlox (Phlox paniculata) creates upright summer flower clusters from a spreading perennial crown. When a clump grows crowded, division provides several healthy plants and an opportunity to reset spacing. The important part is not simply slicing a large root ball in half: each new section needs viable shoots or buds connected to an adequate share of living roots. Spring and late summer or early fall are appropriate windows in many regions, but hot or freezing conditions are poor times to move roots. Here is a practical method for recognizing the crown, making viable divisions, and replanting without burying the plant too deeply.
Verify that you have tall garden phlox
Tall garden phlox is a clump-forming perennial with opposite, narrow to lance-shaped green leaves and upright stems topped by large flower clusters. It is not the low evergreen carpeting Phlox subulata, and the two do not need identical handling. Phlox paniculata develops multiple shoots from its crown and a network of fibrous roots beneath. Look for that architecture in a mature clump before putting a spade into the ground. A small, healthy young plant may not need division simply because the calendar says three years. Division is most useful when the center declines, flowering weakens due to crowding, or you want to relocate and increase a well-performing plant. Our walkthrough on how to divide Shasta daisies in spring and replant healthy crowns sets out each step.
Choose spring shoots or a cool fall window
Iowa State University Extension recommends dividing garden phlox as new growth emerges in spring or in late summer to early fall. Their regional fall example is mid-August through September; those dates should not be copied into climates with very different frost timing. In spring, the short shoots reveal the active crown without presenting a tall leaf canopy that loses water rapidly. In fall, allow enough time for roots to establish before the ground freezes. Choose a cool, cloudy day and prepare the new bed first. Avoid digging a flowering plant during a heat wave, when its large stems create exceptional water demand for an injured root system. For a step-by-step method, see how to plant creeping phlox in sun or shade without root rot.
Prepare soil and the new planting space first
Identify a site with adequate light and well-drained soil before lifting the existing clump. Tall garden phlox benefits from airflow; cramming divisions between larger perennials can encourage prolonged leaf wetness and make powdery mildew management harder. Remove weeds and loosen the future root zone broadly rather than carving a narrow deep hole. The goal is for the fibrous roots to spread without folding or bunching. Water dry soil ahead of the operation if needed, then make sure the planting hole drains. Have a clean knife, digging fork or spade, a bucket of water for temporary holding, and mulch ready. Avoid treating the division like a bulb that should be buried deeply.

Lift the entire clump with roots attached
Dig in a circle beyond the outer stems, then slide the fork beneath the root mass to lift gently. Do not pull the clump by its stems or snap the crown away from the roots. Shake or rinse just enough loose soil to reveal the connection between shoots and roots. If the plant is enormous, work in sections, but retain broad root portions on the pieces you intend to save. Reject mushy, foul-smelling, or evidently dead material rather than planting it in a new spot. Keep exposed roots shaded and damp while you work. Dry wind, bright sun, and delayed replanting can damage the fine absorbing roots that a successful division must quickly replace.
Locate crown buds before making a cut
Look where green shoots, shortened stems, and root tissue meet: that transitional area is the crown. On a clump lifted in spring, small growing tips help map useful portions. Iowa State University Extension advises each division to have at least two or three shoots together with a piece of the root system. Use that as a practical minimum, not a command to make as many tiny pieces as possible. Larger divisions with plenty of attached roots generally establish with less stress. A root-only chunk without crown buds is not an equivalent garden phlox division. Equally, a leafy stem snapped off without roots does not become a viable clump merely because it looks green.
Separate sections without shredding the roots
If the clump pulls apart naturally into rooted fans, tease those apart carefully. For a tightly interlocked crown, cut with a clean, sharp knife or spade between shoots so each section retains connected crown and roots. Be deliberate: start from a visible gap, make one steady separation, and stop to inspect the pieces rather than sawing blindly across all buds. Trim badly broken roots only where necessary; keep healthy fine roots intact. Discard the oldest decayed center when appropriate and save the vigorous outer sections. Tools used on plants with signs of disease should be cleaned before contacting healthy divisions. Work on a washable surface so no viable shoots disappear under a mound of loose dirt. For the basics, see our guide: When to Divide Hostas and Keep Healthy Crown Buds and Roots.
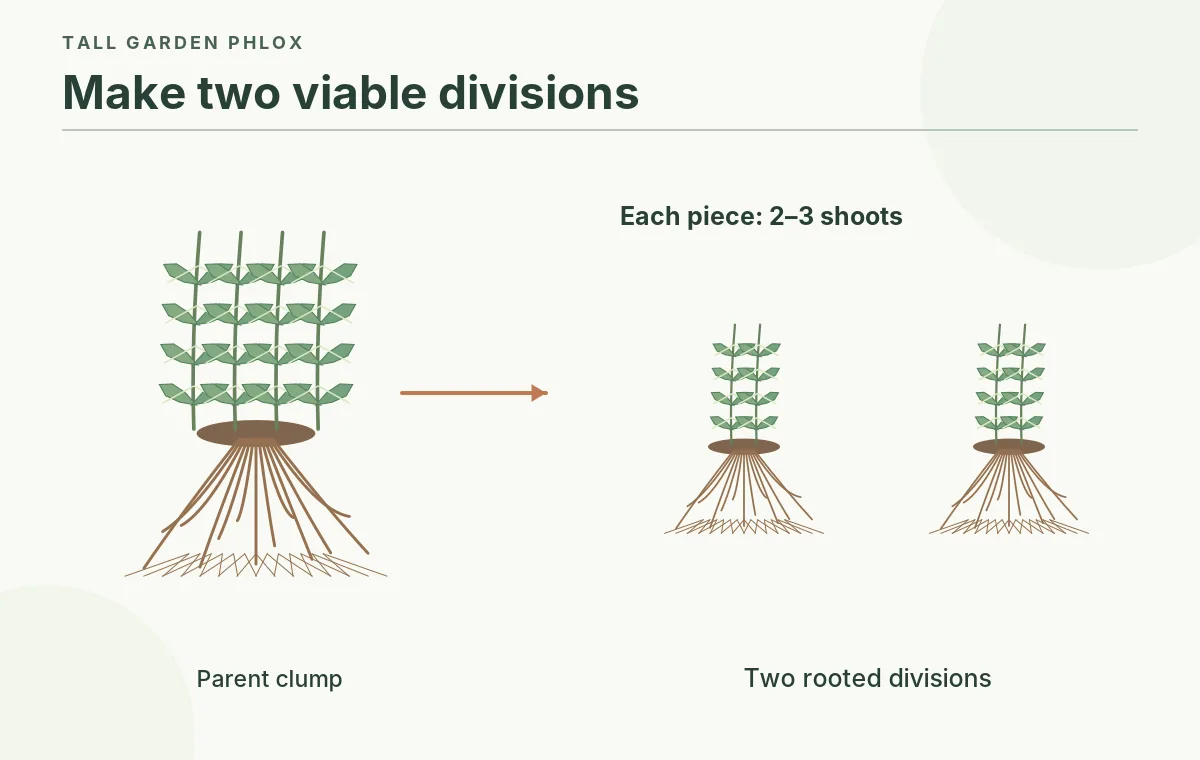
Replant each crown at its original soil level
Set each division into the prepared planting hole with the crown at approximately the same level it occupied before lifting. Fan the roots outward and downward, backfill with loosened soil, and firm gently enough to remove large air pockets without compacting the bed. The roots should be buried, but active shoot bases should not disappear far below the soil surface. A clearly visible crown is easier to identify when you set the plant upright and look from the side. Water thoroughly to settle soil around roots, then correct any sinking that pulls the crown too low. A newly divided phlox should feel stable, not be held in place by a pile of mulch pressed onto shoots. If you are starting from scratch, read When to Plant Coral Bells and Keep Heuchera Crowns Above Wet Soil.
Water new divisions and watch leaf demand
For the first growing weeks, inspect moisture a little below the surface instead of relying only on the appearance of mulch. Water when the root zone begins to dry and continue during dry spring or summer weather while roots establish. Iowa State Extension specifically stresses keeping divided phlox watered after replanting. A temporary droop in warm afternoon sun can occur, but persistent wilting with wet soil suggests poor root function, not necessarily a need to water more. Avoid high-nitrogen feeding as a substitute for root establishment. Mulch around the plant can reduce quick drying and weed competition, but hold it away from stems and the actual crown.
Adjust fall protection to your region
Iowa State advises late-fall mulch for fall-divided plants where freeze-thaw cycles can heave them from the ground, with removal in spring. Its specific insulating mulch depth applies to that cold-region context and need not be copied blindly into a mild, humid garden. In regions without repeated frozen-ground cycles, a lighter surface mulch may be enough; in wet winter soil, an overly thick layer against stems can be counterproductive. Before severe cold, confirm divisions have not lifted out of their planting holes. If frost heaving occurs, gently reset exposed crowns when soil is workable. The aim is root protection without burying shoots or keeping the crown constantly wet. For the basics, see our guide: When to Transplant Shasta Daisies Without Burying the Crown.

Do not expect division alone to cure mildew
Tall garden phlox is susceptible to powdery mildew, visible as whitish growth on leaves and stems. Division can help make room between clumps, but it cannot turn a susceptible cultivar into a resistant one. University of Wisconsin–Madison Extension describes environmental and plant factors that influence mildew on ornamentals. Favor good light, appropriate plant spacing, and watering directed toward the roots when practical. Dispose of clearly diseased, collapsed material according to local guidance; do not promise that a homemade spray will fix a recurring infection. If plants show extensive crown rot instead of a light leaf coating, avoid moving the problem into clean soil and request a diagnosis.
Related Guides
- How to Divide Autumn Joy Sedum Without Burying New Crowns
- When to Divide Agapanthus in Pots or Borders Without Losing Blooms
- When and How to Divide Siberian Irises Without Losing Healthy Fans
- When to Divide Catmint Clumps and Keep Rooted Shoots Alive
- How to Divide Bearded Irises and Replant Healthy Rhizomes
How We Research and Check Recommendations
Research checked October 23, 2026. We compared species-specific or safety guidance from the institutional sources listed below, cross-checked planting or action timing against plant biology, and distinguished evidence from reasonable garden practice. The information is for home gardening, not a site inspection or substitute for local soil tests, plant diagnosis, or food-safety rules. Local climate, cultivars, and current Extension recommendations can change the appropriate decision.
Sources reviewed: Iowa State University Extension (Division seasons and at least two to three shoots with a portion of roots.); Clemson Cooperative Extension (Garden phlox division method, rejuvenation and suitable weather.); University of Wisconsin–Madison Extension (Powdery mildew susceptibility and cultural care context for phlox.). This article does not claim a sponsorship, compensation, product endorsement, or verified affiliate relationship. Review our affiliate disclosure for site-wide policy.
It is safer in spring as shoots emerge or in a cooler late-summer/early-fall window. Avoid dividing in full bloom during extreme heat.
Iowa State Extension recommends at least two or three shoots plus a connected portion of the root system.
A root-only piece without viable crown tissue is not a reliable division. Keep crown buds attached to living roots.
Replant at approximately the original crown depth, with roots covered but shoot bases not deeply buried.
No. Wider spacing can aid airflow, but mildew management also depends on cultivar, growing conditions, and correct diagnosis.