
Stalk celery (Apium graveolens var. dulce) is easiest to manage when each decision follows something visible on the plant. This guide tracks the real leaves, growing points and transitions that matter, not an invented nationwide planting date. Use your cultivar packet and local weather to adjust the steps; a regional Extension schedule is an example for that region, not a guarantee of equal performance everywhere.
Know what a true celery seedling looks like
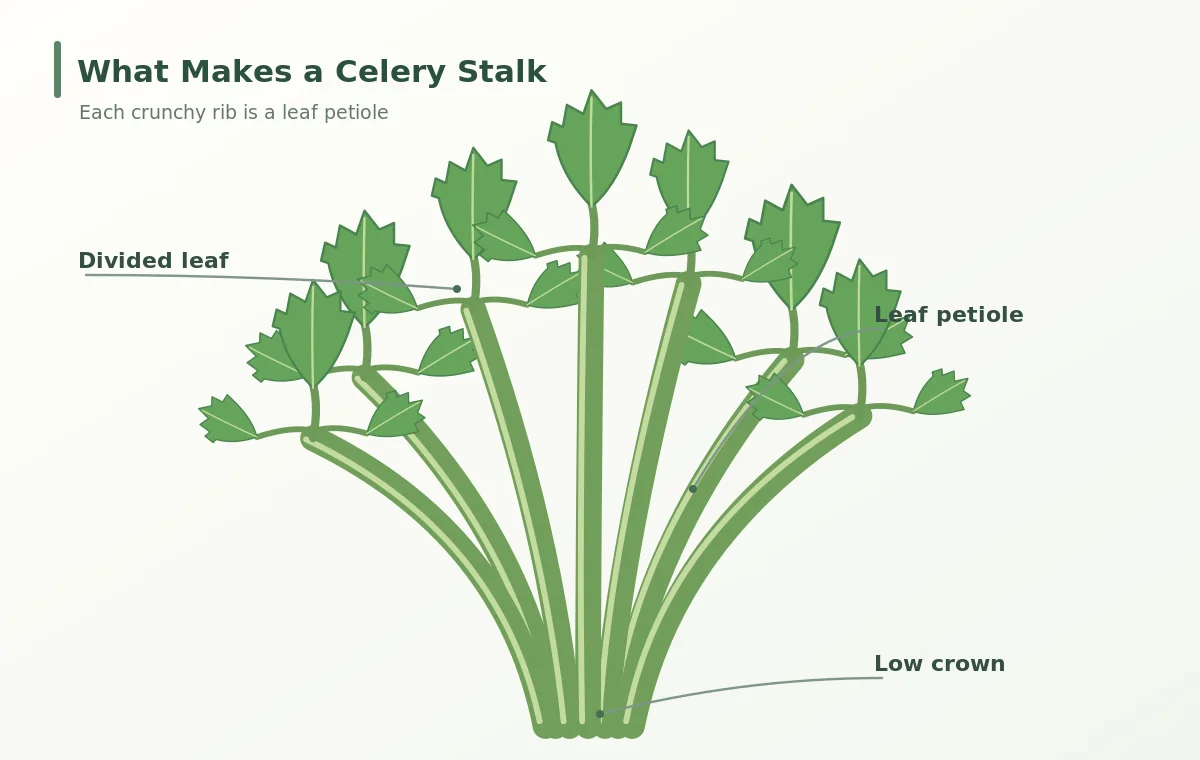
Stalk celery is Apium graveolens grown for its crisp petioles, the long ribbed leaf stalks bundled at the base. Those stalks are not independent bamboo-like stems; each carries a compound, parsley-like leafy blade toward the top. The leafy growing center stays low at the crown. Young celery looks much less dramatic than a store bunch: two small seed leaves appear first, and the divided true foliage follows later.
Do not confuse celery with celeriac, which is selected for a swollen stem base. A seed packet should identify the cultivated type and cultivar. Some celery selections are green, others more self-blanching or paler; they do not all need soil piled around them. Your first aim is to raise an unstressed leafy transplant, not to force pale ribs from a barely established seedling.
Start early but use local transplant weather
Celery develops slowly, so gardeners usually start it indoors well before outdoor planting. RHS advises early indoor sowing for its climate and setting plants outside after frost; Utah State also describes the use of transplants for a long season. Dates from Britain or Utah must not be pasted into a different US growing region. Work backward from when the garden is warm enough to avoid a prolonged chilling period, using the local forecast and transplant guidance.
Cold has a particular consequence for celery. RHS cautions that extended temperatures below about 50°F can induce bolting in young plants, leaving a seed stalk instead of a good bundle of stalks. Do not interpret a single warm afternoon as proof it is safe to plant out. If a cold spell is forecast, keep modules growing under light with appropriate moisture rather than leaving them outdoors unprotected.
Use light for the tiny seeds
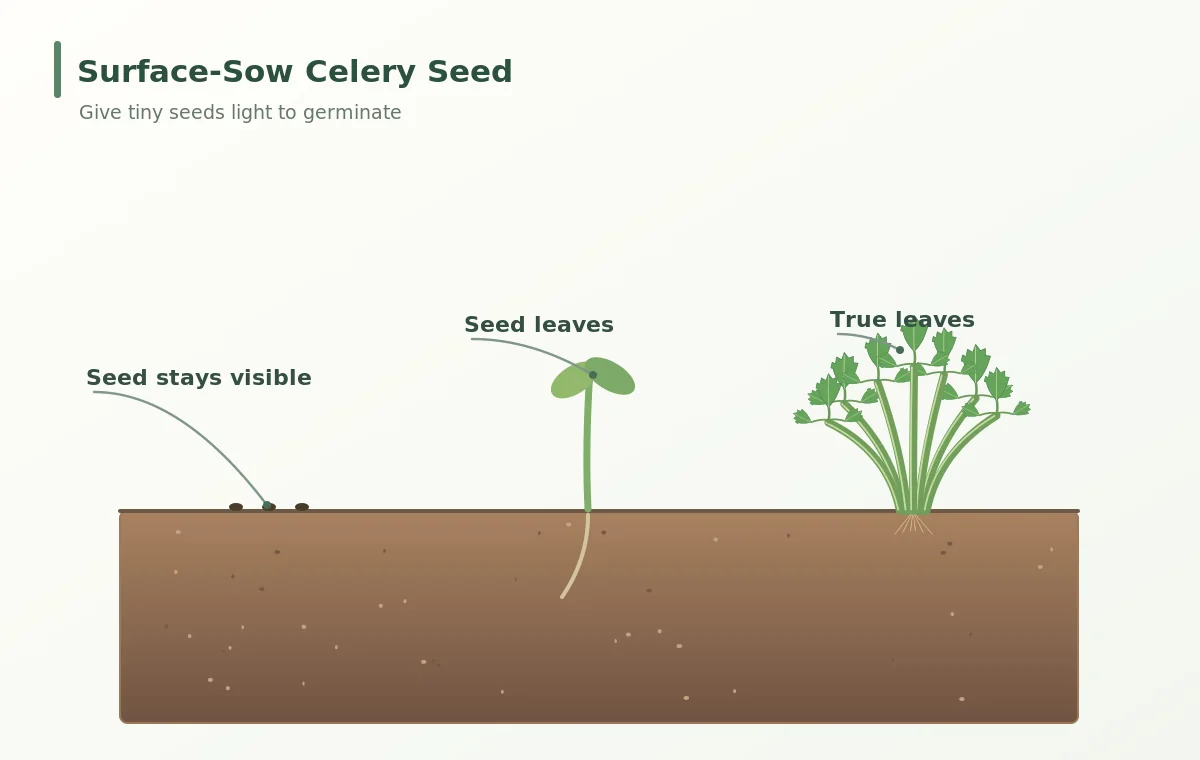
Celery seeds are very small, so heavy soil covering can hinder emergence. RHS states that seeds need light for germination and can be left at the surface, with at most a very fine dusting of sifted compost. Fill a clean tray with fresh seed-starting mix, moisten it before sowing and press the seed onto the medium. Do not draw a deep furrow. Keep containers labeled on the tray, never by putting technical labels over the actual seed diagram.
Maintain a gently moist, not waterlogged surface as the seeds germinate. A clear humidity cover can help, but remove or vent it as seedlings appear so that air circulates. RHS notes that germination can take up to three weeks and benefits from warmth. Check moisture each day rather than saturating the tray to make it grow faster. A dry crust can strand shallow-rooted seedlings; constant standing water can cause different failures.
Move from cotyledons to divided true leaves
When the first seed leaves open, position seedlings close enough to a suitable bright grow light to avoid long, weak petioles, while following lamp safety and distance instructions. The first divided, celery-like true leaves appear later. These deeply lobed leaves are a more reliable identification cue than the tiny first pair. Avoid deciding a seedling is ready to plant out just because two cotyledons are green.
As the young plants develop several true leaves, carefully separate or thin them to one plant per module. RHS recommends potting seedlings on when large enough to handle; the small root ball is easily damaged by tugging at individual fine roots. Lift with a small tool and hold by a leaf rather than crushing the tiny crown. If a tray becomes crowded, move plants before their root systems become a tightly tangled mat.
Feed roots and leaves without forcing growth
Celery appreciates a fertile medium, but concentrated fertilizer on tiny seedlings is not a shortcut. Fresh seed-starting mix may have limited nutrients; once true leaves are developing, follow a reputable seedling fertilizer label or a local Extension recommendation if supplemental feeding is needed. Watch the actual foliage and growth rate before acting. Very dark soft growth after heavy feeding is not automatically stronger than compact green seedlings.
Keep the growing mix evenly moist and drain the containers after watering. Utah State notes celery has a relatively shallow root system and requires sustained moisture after transplanting; that sensitivity starts in containers. A dry plug can stop growth quickly, but permanent saturation restricts oxygen around roots. Inspect the drainage holes. If the leaves wilt while the mix is wet, check for damaged or decaying roots before adding still more water.
Harden plants without exposing them to cold
Hardening off means gradually getting seedlings used to brighter sunlight, air movement and outdoor conditions, not subjecting them to cold stress. Start with a sheltered period outdoors on a mild day, then extend exposure as conditions allow. Do not put trays in full wind or overnight cold on the first outing. RHS specifically advises care around low temperatures because celery can switch from leaf and stalk production to early flowering after chilling.
Choose a prepared, moisture-retentive bed with drainage and a soil test to inform fertility. Move each plug with its roots intact, positioning the base at approximately its prior potting depth. Press soil around the root ball, water it in and keep the small central crown exposed. Celery petioles must emerge into air. A deep hole filled with wet soil over the crown is not blanching; it can encourage loss of the growing point.

Understand celery ribs and the correct harvest
As plants establish, new petioles rise from the center and a feathery leaf blade sits above each ribbed stalk. Water consistently during stalk expansion; drought can produce tough, disappointing growth. Certain traditional celery types are blanched with collars around the lower ribs, but RHS notes that self-blanching selections often require little extra treatment. Never cover the entire crown or the leaf blades with a soil mound just to make pale ribs.
At harvest, judge the bundle by its size, firmness, flavor and lack of pithy deterioration instead of one precise calendar day. Cut or lift according to the cultivar and intended use without dragging soil through the edible leaf bases. Remove damaged outer petioles and refrigerate promptly. Keep the center intact if taking individual outer stalks for continued growth, but do not promise repeated commercial-sized harvests from every plant.
Use symptoms to improve the next seed batch
Scant germination usually calls for inspecting the seed age, light, moisture and medium conditions before adding fertilizer. Tall weak seedlings indicate insufficient light or overly crowded modules. A premature central flower stalk is a warning of bolting; review the record of cold exposure instead of treating it as the normal celery bundle forming. Brown tips or distorted inner leaves require a closer look at moisture, roots and local disease information.
Keep records of sowing, true-leaf appearance, moving to modules and the first safe outdoor nights. That sequence helps separate a failed germination from a transplanting setback. For a small space, it is often better to raise fewer well-rooted celery plants and maintain their water supply than to fill every cell with crowding. The most important visible check remains simple: seed on the surface, divided foliage above, healthy roots below and an unburied living crown.
Related Guides
- How to Start Vegetable Seeds Indoors: Timing, Trays, and Transplant Care
- How to Start Chinese Leaf Celery From Seed for Slender Aromatic Stalks
- Growing Celery: A Moisture-First Plan for Crisp Stalks
- When to Harvest Celery: Outer Stalks or a Whole Head Without Waste
How We Research and Verify This Advice
We checked the horticultural details in these primary university and botanical-education resources on 2026-10-29: www.rhs.org.uk; extension.usu.edu. We compared their species descriptions, sowing practices, crop stages and seasonal risks with the diagrams, and separated regional dates from widely useful principles. We checked the available local archive history and publicly indexed VegWin pages for overlapping search intent; private WordPress drafts cannot be verified by public search. Consult regional Extension advice where conditions differ.
This is independent educational material, not a sponsored product recommendation. No commission relationship is asserted. Read the VegWin affiliate disclosure for the site policy. Illustrations are explanatory diagrams, not a substitute for checking an actual plant, crop label or current local safety recommendation.
RHS says celery seeds need light to germinate. Leave them on the surface or use only the lightest dusting of fine compost.
RHS notes germination can take up to about three weeks, so keep the surface gently moist without saturating it.
True leaves become lobed and divided like small celery or parsley foliage, rather than the first simple seed leaves.
No. Extended chilling can induce bolting; harden progressively during mild conditions instead.
No. Cover the roots to the previous level and leave the growing center above the soil.