
A beet “seed” is often a corky fruit cluster rather than one individual seed. That is why several seedlings may appear exactly where you planted one piece. Instead of assuming the seed packet was faulty or every sprout should be kept, decide whether you want a few small beets together or one larger, round storage root per spot. The same sowing works in ground beds and in sufficiently deep containers, provided the seedlings have light, moisture, and room to develop.
Recognize a beet seed cluster before planting
Most common garden beet packets contain irregular, tan-brown, corky seed clusters, each potentially holding more than one embryo. They look nothing like the smooth, round, uniformly sized seeds of peas. After germination, two or more tiny stems may emerge from the same point. This is a normal feature of many beet varieties, not evidence that extra seed fell into the drill. Some varieties are sold as monogerm or precision seed, so read the packet before assuming every cluster will sprout multiple shoots. Knowing the difference makes thinning less surprising and prevents unnecessary reseeding.
Prepare a bed that supports round roots
Choose a site with sun, reasonable drainage, and soil that breaks into a fine, crumbly surface. Remove large stones and dense clods rather than mixing a heavy dose of fresh manure into the seed row. The edible beet is a swollen root and hypocotyl, with a thin taproot continuing below it; a shallow tray that accommodates only leaves will not provide a good home for a mature beet. For containers choose enough depth for roots, drain holes, and a consistent moisture supply. Prepare only a short row at a time when the kitchen needs modest quantities.
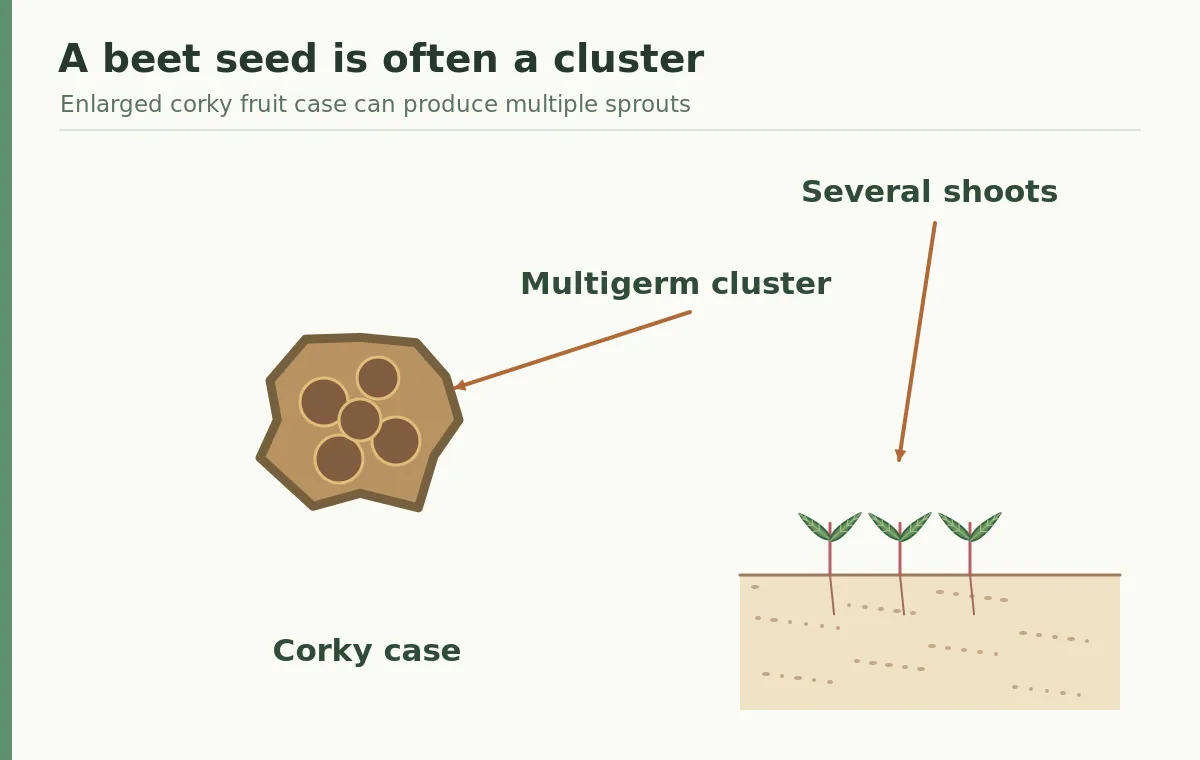
Sow the clusters at a real soil depth
Make a small furrow about one inch (2.5 cm) deep, water the base if the soil is dry, then place clusters individually instead of dropping a thick stream of seed. RHS guidance commonly uses roughly four inches (10 cm) between clusters when growing individual larger roots. Replace the soil over each cluster; a seed shown sitting on top of the ground is not the same as a seed sown one inch deep. Gently settle the surface without packing a crust over seedlings. Mark the row so that early beet shoots are not mistaken for weeds.
Thin seedlings without uprooting neighbors
Wait until you can clearly distinguish the strongest seedlings in a cluster. If you want one full-size beet per position, leave one sound plant and remove nearby extras. Snipping unwanted small stems near the soil line reduces the risk of tugging a neighbor’s taproot, although careful pulling is also used in ordinary bed thinning. For baby beets you may intentionally grow a small group, but expect smaller roots, different harvest timing, and greater competition. A cluster of three sprouts does not turn into one giant beet. Water after thinning and avoid smothering the survivors with mulch.
Tell beet leaves from weeds and chard
New beet seedlings first carry simple seed leaves; their later leaves become broader and show a strong central vein, often reddish on red-rooted varieties. Beets and Swiss chard are closely related forms of Beta vulgaris, so the foliage can look familiar. Use the marked row and seedling position, not just red leaf stems, as your identification method. An obvious swollen root appears later after the young plant has established a leaf canopy. Avoid digging up seedlings repeatedly to check progress: that inspection can damage the very root you want to grow.
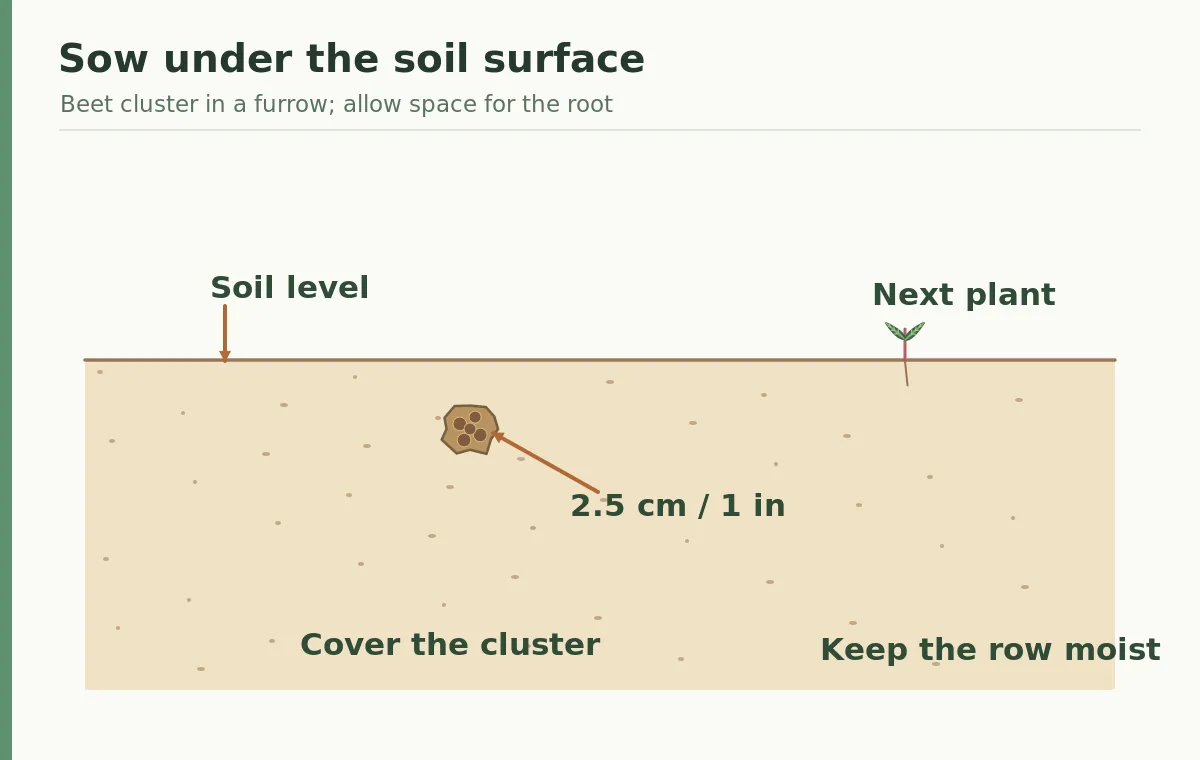
Keep moisture consistent while roots swell
Newly sown seed needs moisture near the surface to germinate. Once leaves expand, the root zone should remain reasonably even, not alternately dusty and saturated. Water thoroughly when needed and allow excess moisture to drain; do not interpret a dry-looking surface alone as proof the entire root zone is dry. Weed carefully while the beet plants are small. Overcrowding, prolonged dryness, and uneven growth are more useful things to investigate than adding fertilizer by habit. Use a soil test when deciding whether a nutrient amendment is necessary.
Harvest based on root size rather than date
Beets can be lifted at a young stage or allowed to enlarge. The right harvest stage depends on variety and your cooking preference; do not wait for every root to become very large. Gently push back a small amount of surface soil to estimate the shoulder diameter instead of pulling plants just to peek. Lift roots carefully, keeping the remaining plants undisturbed. If you harvest alternate plants in a crowded row, those left behind may gain space, provided the roots and foliage have not already become tangled. Keep beet leaves only if healthy and appropriately cleaned.
Diagnose crowding and weak emergence
Several shoots at one point are normal for multigerm seed; yellow, thin stems in an entire row point more toward inadequate light, crowding, or stress. A hard surface crust can block emergence even where seed was viable. Bare gaps can reflect poor moisture or seed quality, while irregular roots may have hit stones or been damaged. Check the actual seed depth and soil texture before blaming a named cultivar. If pests are suspected, look for the insect or characteristic feeding injury before selecting an intervention. Favor locally recommended integrated pest management approaches.
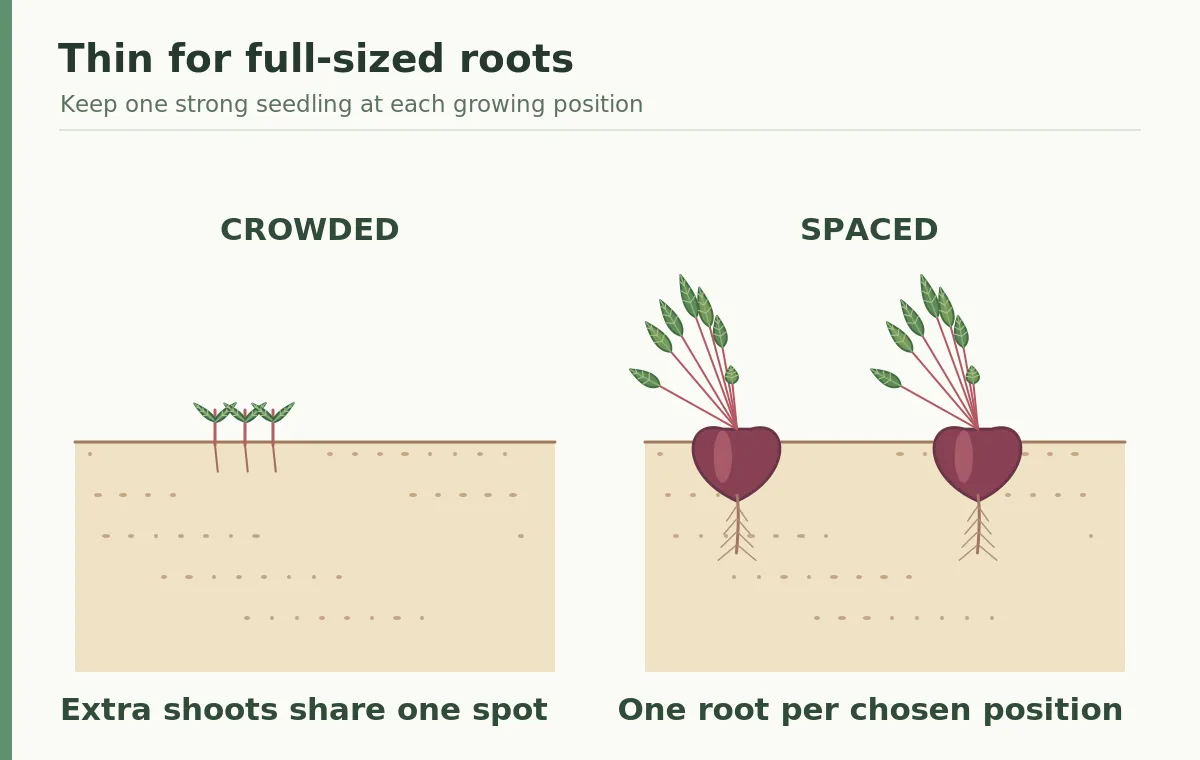
Use a small succession sowing plan
Rather than planting a huge packet in one afternoon, sow another short row when the first is growing reliably and local conditions still favor the crop. Check the seed packet and regional advice for suitable sowing seasons, since a spring date from one country does not translate to every climate. Early sowing in cold soil may be slow, while hot and dry conditions can stress tender seedlings. Record the variety, sowing date, thinning date, and first useful root size. A simple four-column notebook can reveal whether spacing or seasonal timing mattered most in your bed.
Related Guides
- Direct Sowing Seeds Outdoors: A Crop-by-Crop Success Checklist
- How to Grow Golden Beets From Seed and Thin Crowded Seed Clusters
- How to Grow Sugar Beets From Seed Without Crowding Their White Roots
- Growing Beets: Thin Seed Clusters for Tender Roots and Greens
- How to Thin Beet Seedling Clusters Without Damaging Neighboring Roots
How We Research and Verify Growing Advice
For this article we compared visible plant anatomy with topic-specific advice from www.rhs.org.uk, www.rhs.org.uk. Published recommendations explain general crop behavior, but your local weather, cultivar, soil and garden history govern the final decisions. We verified the sources on October 28, 2026. No commercial sponsor paid for or approved this article.
We do not present any product as a confirmed affiliate purchase. See the affiliate disclosure for site policy. Before applying pest controls, inspect the actual cause and seek local Cooperative Extension integrated pest management advice. Illustration arrows indicate the intended botanical position rather than replacing observation of your own plant.
Many ordinary beet seed pieces are multigerm clusters containing more than one true seed.
A common RHS recommendation is about 2.5 cm (1 inch) deep; follow the variety packet and local conditions.
Thin to one plant for an individual larger root, or deliberately leave a small cluster for baby beets.
Yes, use a container with sufficient root depth, drainage, light, and evenly moist growing medium.
Young modules can be transplanted with minimal disturbance, but direct sowing avoids separating delicate roots.