
Potatoes in grow bags (Solanum tuberosum) needs a growth-stage approach rather than an imported calendar. This guide is organized around the actual plant organs a gardener can inspect, conditions that affect the next step, and common errors that illustrations can make deceptively simple. Use the species name on your seed or planting material, local extension guidance and weather observations for final decisions. The drawings describe typical anatomy, not a promise that every cultivar has identical colors, size, maturity time or yield.
Choose an opaque draining bag rather than a sealed sack
A fabric grow bag works only if it drains excess water and holds enough loose medium for roots and new tubers. Penn State describes large opaque, food-safe containers with drainage; a purpose-made fabric bag is one option. Use intact bags made for planting rather than bags that once contained industrial chemicals. Light passing through thin material can green tubers against the wall, so opaque sides matter.
Place the bag on a surface that permits water to exit instead of blocking its base against a solid puddle. A low broad grow bag can dry or tip faster than a deep stable container. Keep access around the rim for hilling, and avoid a location where runoff would enter a living space. The visible foliage needs good sunlight, but newly formed potatoes themselves must stay dark.
Understand which underground parts become potatoes
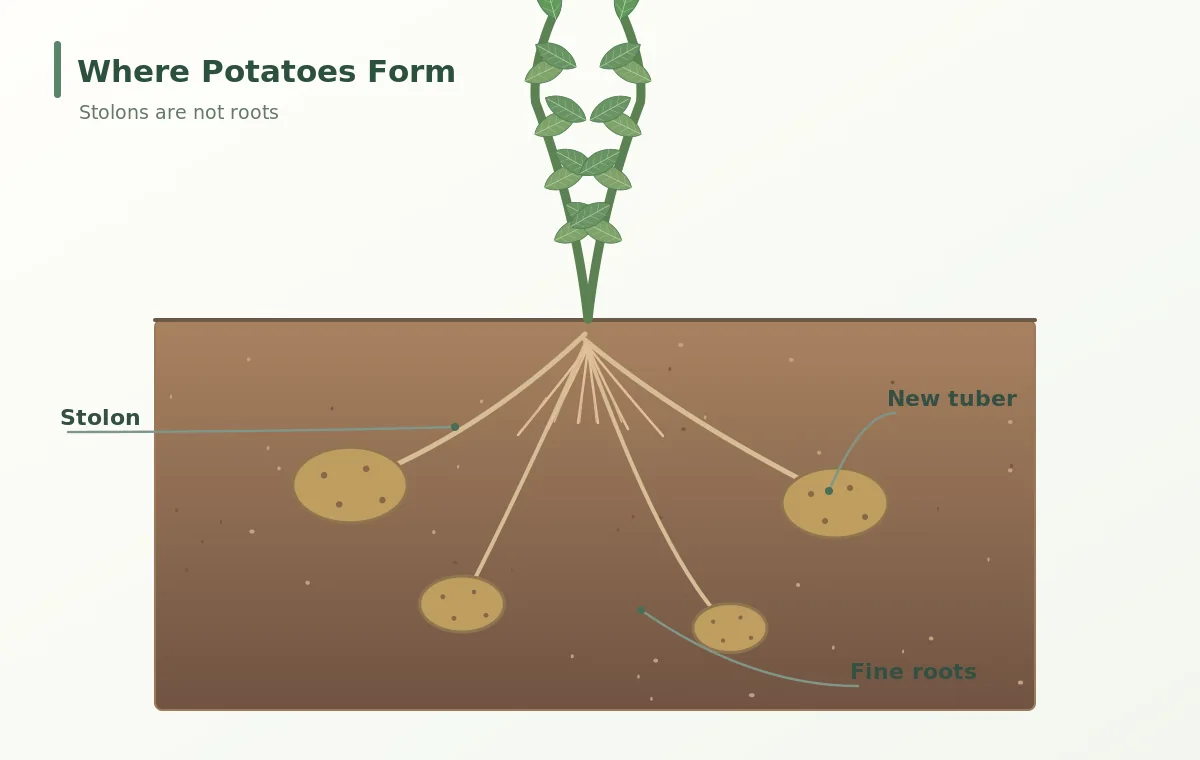
The potato is a swollen stem tuber, not a root. Seed tubers have eyes, which are buds that form stems. New edible tubers enlarge at the tips of slender underground stolons emerging from buried stems, while fibrous roots branch separately into the potting mix. Drawn diagrams that attach all potatoes directly as beads on roots are botanically wrong.
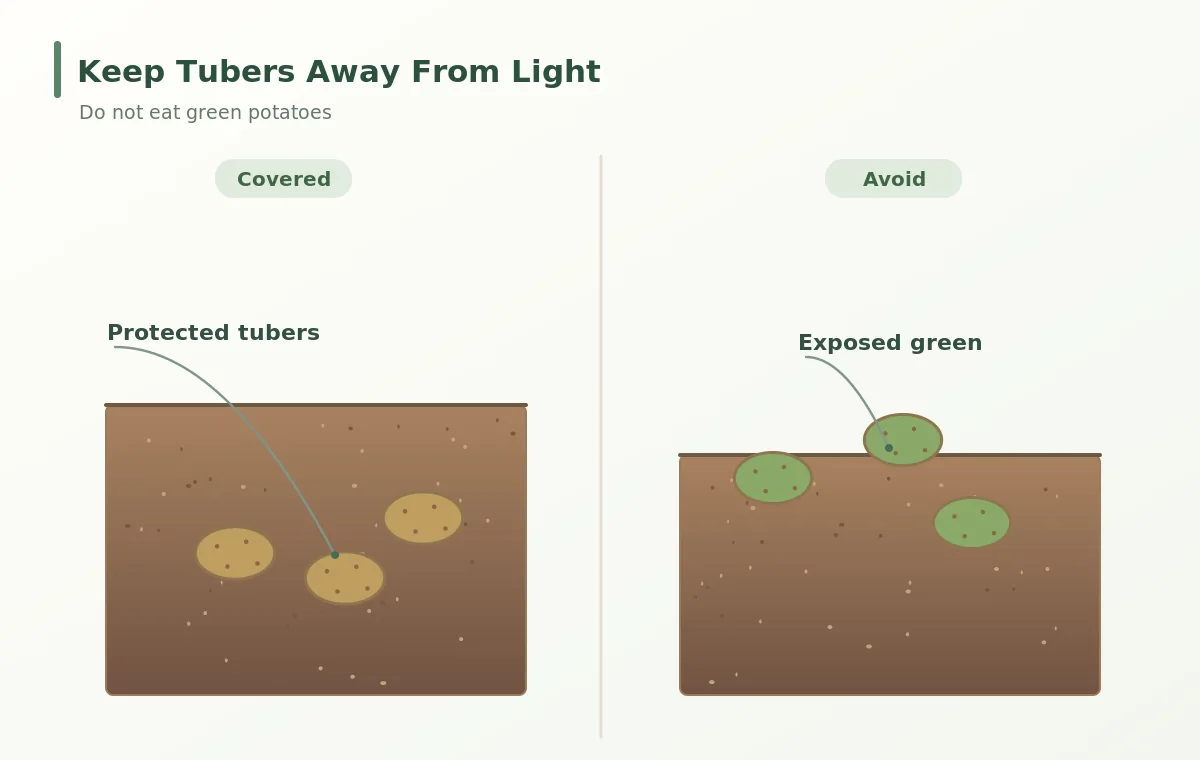
Inspect certified disease-free seed potatoes and choose sound pieces. Large tubers may be cut into seed pieces with viable eyes using local seed-handling guidance, but avoid grocery tubers with uncertain disease history or sprout treatment. Never intentionally use green, bitter or diseased potatoes for consumption. Sprouts and green tissues contain potentially harmful glycoalkaloids; keeping tubers covered is a food-safety step as well as a crop-quality measure.
Start with a shallow layer and eyes facing up
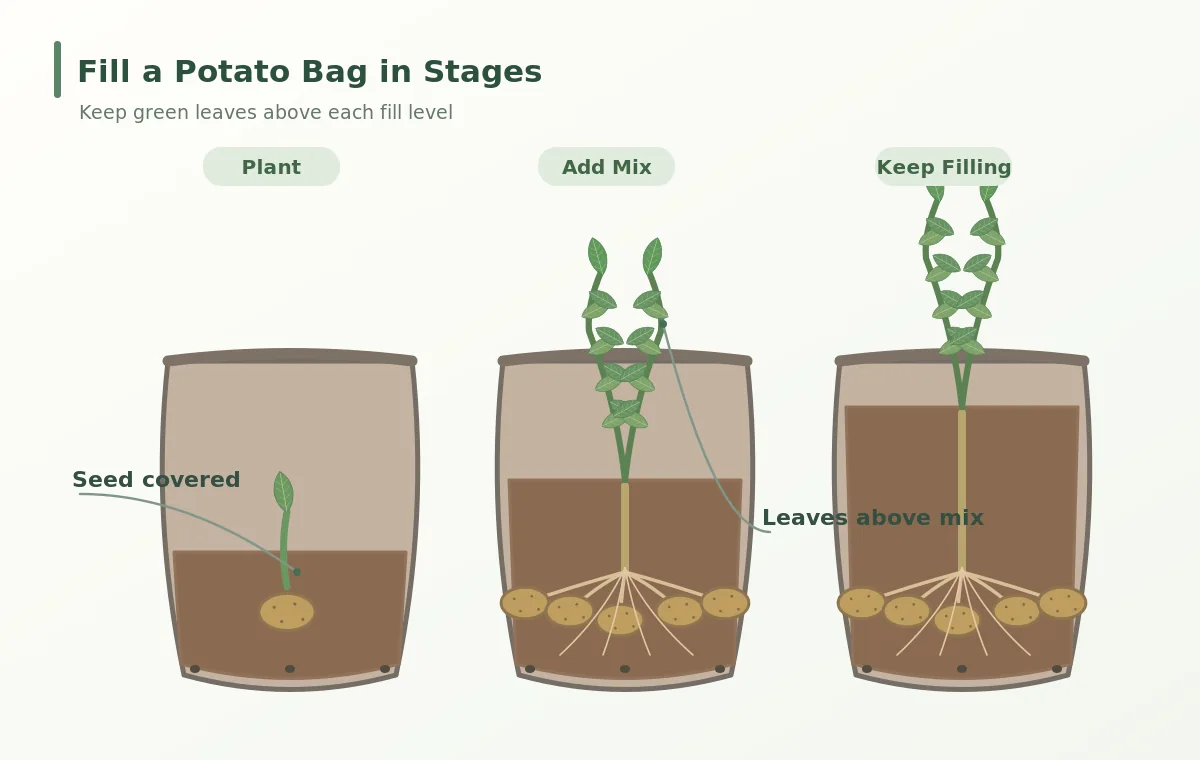
Penn State describes starting a bag with about four inches of potting mixture, placing seed tubers with the eyes upward and covering with roughly three more inches of mixture. That is a documented example, not an instruction to bury seed pieces at the bottom of every bag geometry. A deep pile of wet mix placed on top immediately can slow emergence and restrict oxygen.
Use clean container mix amended as recommended rather than dense garden soil. Space seed tubers so each shoot can develop leaves instead of creating a forest of competing stems. Water the fresh medium evenly and allow drainage; do not leave the bag standing in water. The shoot should rise toward daylight while the entire seed piece remains below the temporary soil line.
Hill growing stems in successive stages
As green stems lengthen, add fresh mix around their lower portions while leaving plenty of live leaves exposed. Repeat as the plants grow until the mix reaches the safe fill level near the top of the bag. Penn State explains this gradual filling; Minnesota Extension explains why covering underground stolons protects new tubers from light. There is no need to bury the entire leafy canopy after every handful of growth.
In the cutaway view, draw the original seed tuber deeper than the later new tubers and show the stolons branching from buried stems. Soil fills the bag progressively; roots occupy the moist medium below. If a new potato breaks the surface, cover it gently. Never expose tubers to sunlight merely to inspect their size every day.
Balance water, heat and drainage
Fabric sides accelerate evaporation, so inspect moisture several inches down before watering. Saturate the root zone without leaving water trapped inside a saucer. During tuber set and swelling, wide swings between drought and saturation can reduce yield and contribute to growth defects. In hot weather, the edges of a dark fabric bag can heat up strongly; position the bag to keep the underground root zone from overheating while foliage gets light.
Yellow lower leaves may reflect age, moisture stress or a pest problem. Check leaves and stems, drainage holes and recent weather before diagnosing blight. Do not soak foliage every evening when a low nozzle or careful root-zone watering would work. A soil test or container-fertilizer label should guide feeding; excessive nitrogen can produce foliage at the expense of tuber development.
Protect against beetles and disease
Inspect leaf undersides for orange-yellow clusters of potato beetle eggs and look for larval chewing. Penn State discusses Colorado potato beetles as a significant pest; identify the insect locally before choosing mechanical removal or other integrated pest management controls. A few holes do not automatically call for spraying. Keep bags spaced so leaves dry and airflow remains available.
A plant with rapidly expanding dark lesions, stem collapse or soft, rotting tubers needs more caution. Do not compost clearly diseased potato material without knowing the disease and your local disposal guidance. Choose certified seed and discard damaged tubers. Rotate crops even when using bags by replacing used mix responsibly, rather than assuming a container eliminates every soilborne disease.
Harvest without exposing or damaging new tubers
Small new potatoes can sometimes be harvested once the plant has made useful tubers, while main-crop potatoes are generally lifted as foliage finishes its season. Follow the cultivar and observe the plant; no single number of days is valid for every variety and climate. For storage potatoes, allow skins to firm after maturity and follow local curing guidance rather than washing and packing thin-skinned tubers immediately.
To harvest, stop adding soil, spread a clean sheet or shallow tub and gently empty the bag. Separate tubers from stolons and roots without scraping them hard against a rough surface. Sort out any green, severely damaged or diseased potatoes. Even a potato that grew above a soil line briefly can contain compounds that make it unsuitable to eat; do not present peeling a deeply green potato as a guaranteed fix.
Solve common bag failures and try a better second crop
Tall plants with few potatoes may have had crowded seed pieces, excessive feeding, hot roots or inconsistent water. Tubers exposed along the rim mean the hilling level was insufficient or the medium settled. Sour-smelling mix and blackened seed pieces point toward poor drainage or decay; adding fertilizer will not correct a waterlogged container.
After harvest, record the variety, bag dimensions, number of seed pieces and how much mix was added at each hilling. Next season change one variable at a time. Wash and dry reusable bags thoroughly and replace contaminated or diseased material when indicated. Grow bags make the crop accessible, but they do not magically remove weather, water or food-safety requirements.
Related Guides
- Potato Grow Bags: Manage Drainage, Hilling and Harvests
- Growing Potatoes at Home: Seed Tubers, Hilling, and Safe Harvests
- How to Grow Purple Potatoes in Containers Without Exposing the Tubers
- How to Chit Seed Potatoes With Eyes Up for Short, Sturdy Sprouts
- How to Plant Seed Potatoes and Hill Soil to Prevent Green Tubers
How We Research and Verify This Advice
We cross-checked the plant anatomy, planting stages and handling recommendations against these published horticultural sources, accessed 2026-10-29: extension.psu.edu; extension.umn.edu. Regional schedules in a source are examples for the source region, not universal dates. We separately checked nearby VegWin archive topics and publicly indexed pages, but hidden WordPress drafts are not visible in public results. Always prioritize local weather, cultivar guidance and current local Extension advice.
No sponsorship, paid partnership or affiliate product is promoted here. See the VegWin affiliate disclosure. The illustrations explain the intended crop and action; real plants vary and require an individual check for disease, pests, ripeness, and safety before any harvest.
Start with a shallow layer and cover the seed tubers, then add more medium as leafy shoots grow; Penn State describes a staged method.
No. New tubers form on underground stolons from stems, while fibrous roots have a separate job.
Light reached them. Keep tubers covered in an opaque bag and do not eat green tubers.
Yes. Excess water must be able to leave the growing medium.
No. Add soil around the lower stems but leave ample healthy foliage above the medium.