
Use certified purple seed potatoes, an adequately sized container, and staged soil additions to protect developing tubers from sunlight. This guide focuses on plant parts you can identify with your eyes, season-specific decisions, and how to correct the mistakes that matter most.
Pick a Purple Cultivar and Healthy Seed Stock
Purple potatoes are cultivars of Solanum tuberosum, not a separate crop with a radically different planting method. Some have blue-purple skins but paler interiors; others show purple flesh when sliced. Buy certified disease-free seed potatoes from a trusted source and check the cultivar description for mature size, flesh color and approximate season length. Do not assume a dark skin guarantees a uniform violet interior. True potato seeds inside occasional tomato-like berries will not reliably reproduce the original cultivar.
Inspect each seed tuber for firm tissue and obvious eyes. Small whole certified seed potatoes can be used directly; larger stock can be divided following supplier and regional Extension advice, with sound pieces and living buds. Avoid grocery tubers because they can introduce disease even when they look clean. Treat potatoes and their green parts carefully: leaves, stems and fruits are not edible, and tubers turned green by light should not be eaten. Pick a planting period that avoids frozen soil and prolonged hot weather.
Select an Opaque Pot With Real Drainage
A large, opaque, food-safe container or sturdy grow bag gives developing tubers darkness and room. Penn State describes ten- to fifteen-gallon containers as one usable option; choose fewer seed pieces when the pot is smaller rather than packing many plants together. Ensure drainage holes actually work. Transparent bins expose the crop to light, and a decorative cachepot with water standing below a grow bag can suffocate roots. Place the container where it receives strong light without baking against a heat-reflecting wall.
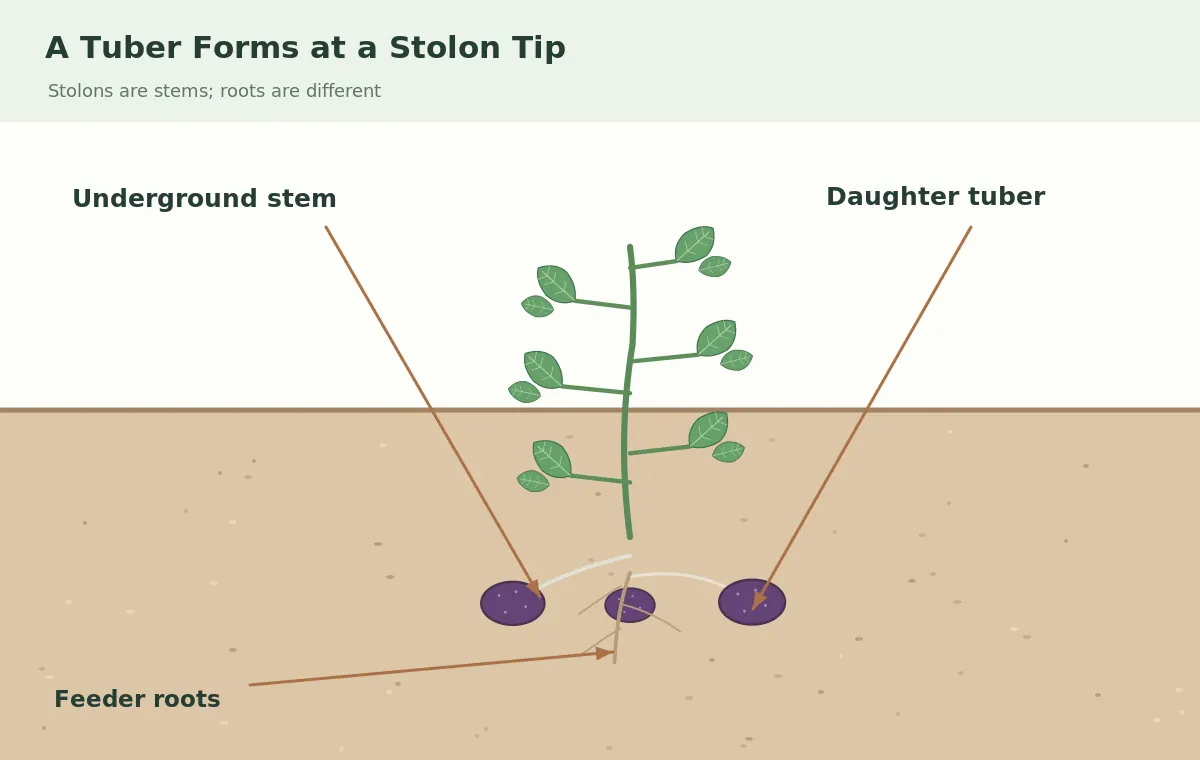
Use a loose container mix rather than heavy garden soil and leave space at the top for adding more material later. Water enough to moisten the root zone, then let surplus flow out; a surface that looks dry may conceal soggy material near the base. A wide, stable container is safer in wind than a narrow tower. The pictured cutaway shows the seed tuber buried low, white feeder roots in the mix, and separate short stolons ending in new tubers. New potatoes are modified stems, not ordinary roots.
Plant Buds Up and Build the Fill in Stages
Begin with a modest layer of suitable mix in the base of the pot. Set certified seed pieces with viable eyes oriented so shoots can rise naturally; for cut seed pieces, the wounded side typically goes downward after appropriate drying. Cover with the depth indicated by the seed supplier or Extension recommendation. Penn State gives an example using roughly four inches of initial mix and about three inches above the seed pieces. This is an example, not a universal recipe for every cultivar or vessel.
Once green shoots have grown well above the surface, add more medium around their lower stems while deliberately leaving healthy foliage exposed to light. Repeat in reasonable stages until the container reaches its useful fill level. Do not bury the entire plant or keep adding an infinitely tall sleeve: new tubers form near the planted stem region rather than all along limitless vertical space. In the action diagram, the growing point remains above the added soil while purple daughter tubers remain completely shaded.

Water Evenly While Stems and Tubers Develop
Containers can swing from soaked to bone dry faster than garden beds. Test moisture below the surface and compare the weight of a watered pot with one beginning to dry. Keep moisture reasonably even during tuber growth; both drought and waterlogging can reduce quality. Avoid leaving trays full of standing water after heavy rain. The roots need oxygen, so adding another layer of soggy compost does not compensate for missing drainage. Water the potting mix, not just the leaf canopy, when practical.
Potatoes prefer relatively cool growing conditions; Maryland Extension notes that very high soil temperatures suppress tuber development. Move an easily portable pot away from a scorching wall if summer heat becomes excessive, but do not expect dense shade to give a strong crop. Feed only as indicated by potting-mix guidance or a soil or media test, not a fictional universal fertilizer dose. Excess nitrogen may produce lush foliage without solving a cramped or overheated root zone.
Read Foliage and Protect Tubers From Light
Healthy potato vines typically bear compound leaves with several oval leaflets along a central stalk. Check both leaf surfaces for pests and lesions rather than diagnosing a disease from one yellow leaf. If foliage becomes spotted, rapidly blighted or collapsed, seek regional Extension diagnosis before applying any product. Remove badly diseased tops only under suitable advice; do not compost suspicious infected material without knowing the local recommendation. Keep plant debris out of walkways so containers drain freely.
During watering, soil settling can uncover a developing tuber near the surface. Cover it promptly with opaque mix or mulch without smothering the shoot tips. Exposed potatoes may green and build up potentially harmful glycoalkaloids. The comparison image contrasts a protected purple tuber connected to a stolon with a light-exposed green patch. Purple pigment does not make a tuber immune to greening. This is one reason a visually attractive clear-wall display is a poor way to finish edible potatoes.
Harvest Without Spearing the New Potatoes
The correct harvest time depends on whether you want tender new potatoes or mature storage tubers. Early sampling may be possible after flowering, whereas storage potatoes develop tougher skin as vines naturally die back. Do not rely on a single calendar day; cultivar, local weather and growing conditions alter the schedule. Avoid digging wet media, which sticks to skins and can encourage damage. Stop lifting the pot by fragile plant stems and instead tip or empty it onto a clean tarp.
Brush soil away carefully by hand and locate the stolons and attached daughter tubers before separating them. Do not cut through the crop with a sharp spade merely to save time. Sort out any green, spoiled or badly damaged tubers; keep storage potatoes protected from bright light. Follow local food safety and curing advice appropriate to your harvest stage. Never use the small green potato-like fruits that sometimes form above ground as a substitute for edible tubers.

Record What Worked Before the Next Container Crop
After emptying the pot, compare production with its actual mix volume, number of seed pieces, irrigation pattern and time of year. A small harvest from a packed container does not necessarily indicate poor seed genetics. Review crowding, drainage and temperature before adding more fertilizer. Potatoes share disease risks with other nightshade crops, so avoid casually reusing suspect growing medium for another susceptible crop. Clean reusable containers and discard diseased residues responsibly.
A realistic crop goal is a healthy plant and sound tubers, not an internet photograph of potatoes pouring from a skyscraper tower. Note the difference between purple skin and purple flesh in the harvested cultivar, especially if saving photos for identification. For future sowing, return to certified disease-free seed stock rather than assuming home-saved edible potatoes remain free from viruses. The four diagrams together show source tuber, underground stolons, incremental soil cover and safe inspection at harvest.
Related Guides
- Growing Potatoes at Home: Seed Tubers, Hilling, and Safe Harvests
- Potato Grow Bags: Manage Drainage, Hilling and Harvests
- How to Plant Seed Potatoes and Hill Soil to Prevent Green Tubers
- How to Chit Seed Potatoes With Eyes Up for Short, Sturdy Sprouts
- How to Identify Colorado Potato Beetle Eggs and Larvae on Potato Leaves
How We Research and Verify Botanical Details
Authoritative sources reviewed October 27, 2026: extension.psu.edu: Penn State documents opaque draining containers, seed tubers, and staged additions of growing medium. extension.umd.edu: Maryland Extension explains tubers on stolons, hilling to shield light, certified seed potatoes, and limits of tall towers. extension.umd.edu: Maryland Extension explains container drainage, growing volume and changing moisture demand. These practical illustrations simplify plant structures without implying exact scale or universal planting dates. Where cultivar, weather, locality or seed stock changes the result, follow local Extension and supplier guidance.
This independent educational guide contains no paid product placement. Read our affiliate disclosure. Check local regulations and registered product labels before any pesticide use; use integrated pest management and an accurate diagnosis first.
Certified disease-free seed potatoes are safer because market potatoes may carry symptomless diseases.
No. They are swollen stem structures at the ends of underground stolons.
Opaque containers are preferable to prevent light-induced greening of tubers.
No. Add mix around lower stems while keeping healthy foliage and growing points exposed.
No. Green patches still indicate exposure to light; do not eat green or spoiled tubers.