
Young okra pods are picked green and tender for cooking; pods saved for seed must follow a completely different timetable. A mature seed pod becomes firm, woody, brown and dry, with seams that can begin to split. The goal is to leave selected healthy pods long enough for hard seeds to develop, then collect them before rain or shattering sends the seeds onto the soil.
Choose a Healthy Plant and a Few Pods
Okra, Abelmoschus esculentus, bears five-petaled hibiscus-like flowers that develop into distinctive ridged pods. Young edible pods are typically green or another cultivar color and relatively soft. For planting seed, reserve a small number of healthy pods on a vigorous plant and let them finish maturing. Mark these pods so someone does not harvest them during the normal tender-pod picking round. The seed crop uses resources that might otherwise support fresh pods.
For a named heirloom variety, keep variety labels accurate and consider pollination isolation. UC Master Gardeners note that okra can be pollinated by insects, so a saved lot might not reproduce the exact characteristics of its parent when other okra varieties flower nearby. Avoid choosing only a single odd-shaped or unhealthy pod as your representative parent stock. A flower or pod with damage, mold or severe disease is not a good starting point.

Watch the Ridges Turn Woody and Brown
A mature okra seed pod becomes large, tough, dry and often brown, rather than being tender enough to cook. Its length alone is not a reliable signal of fully developed seeds; weather, cultivar and pod position affect size. Wait until the wall is woody and the seeds inside have hardened. Illinois Extension describes harvesting pods when they turn brown and begin to split along their seams. Inspect them frequently as they near this stage.
The pod’s longitudinal ridges and seams are important. As drying progresses, some of those seams can open, releasing round, hard seeds. The World Vegetable Center warns about this shattering loss and recommends harvesting fully mature brown pods before they scatter. Do not postpone collection until every pod stands wide open. In a rainy period, inspect more closely for mold and damaged pods rather than forcing a calendar date.
Clip Dry Pods Before Seeds Scatter
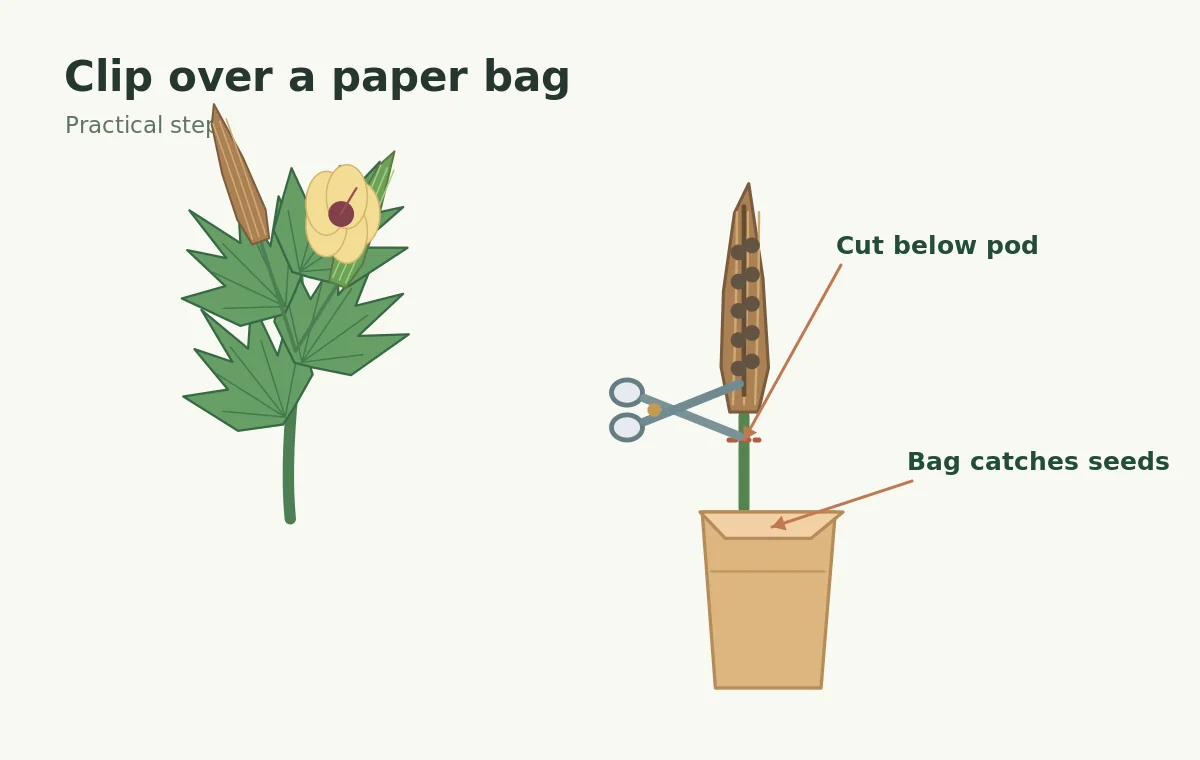
Place a clean tray or paper bag below a dry, seed-ready pod and clip its stalk with pruners or scissors. Hold the pod gently so the seam does not spring open over the soil. If it is nearly splitting, slipping it into a bag before cutting reduces loss. Avoid pulling a dry pod off the stem with a forceful twist, which can tear branches and scatter seeds. The action illustration highlights the dry seam and the collecting bag.
Keep pods from different varieties in separate labeled bags. Do not add wet stems or leaves to a closed pile of dry pods, because trapped moisture can encourage mold. Move the collection to a dry, ventilated space promptly. Any pod that is still green and flexible needs more maturity assessment; artificial drying may dry its wall without producing fully developed seed. Do not blend those immature samples with sound brown pods.
Open the Pod and Examine Hard Seeds
Once fully dry, the woody pod usually separates along its natural lengthwise seams. Work over a shallow tray and split it open by hand, then rub out the round seeds. Remove fibrous pod pieces and dust. Good mature seed is hard, not pale and squishy. Do not use a blender or crush the pod with heavy force; intact hard seeds are easy to collect by hand from a small home harvest.
Look for holes, mold, insect damage or shriveled seeds and reject poor material. If a pod has been wet and started to rot, do not mix it with clean seed. The diagram distinguishes a fibrous dry pod wall, the long seam and the seeds within its chambers. The exact number of ribs and seeds varies across cultivars; the core principle is to identify the dry woody fruit rather than a tender edible pod.
Give Seeds an Additional Drying Period
Spread shelled seed in a single layer on a clean tray or breathable screen in a shaded, dry place with airflow. UC Master Gardener guidance includes additional drying after collection, because the pod can feel dry while residual moisture remains in seed or debris. Do not expose a damp batch to an airtight jar immediately. Check for any remaining soft seeds and remove them rather than assuming they will all improve during storage.
Once completely dry, package in clearly labeled envelopes or suitable dry storage containers. Include the variety, harvest year and any isolation notes. Keep storage conditions cool, dark and dry and protected from insects and rodents. A labeled seed lot makes it possible to compare results the following year; an unlabeled jar of okra seeds cannot tell you whether an unexpected pod shape is genetic, weather-related or simply another variety.
Avoid Saving From Hybrids or Diseased Pods
Seed from an F1 hybrid may grow, but its offspring will not necessarily reproduce the parent’s traits. If you want consistent plants, save from a known open-pollinated variety with suitable isolation and healthy parents. Even with open-pollinated seed, crossing can occur; written records matter. Avoid collecting from heavily diseased plants and sanitize trays and tools before processing clean material.
If insects are boring holes in dried pods or foliage has unusual mottling and wilt, identify the problem rather than spraying the seed harvest automatically. Consult local Extension integrated pest management information before choosing controls, and follow registered labels. Do not use food-preservation recipes as seed treatment instructions. The goal is sound dry planting seed, not a claim that a homemade chemical soak will guarantee disease-free germination.
Compare Tender Harvest and Seed Harvest
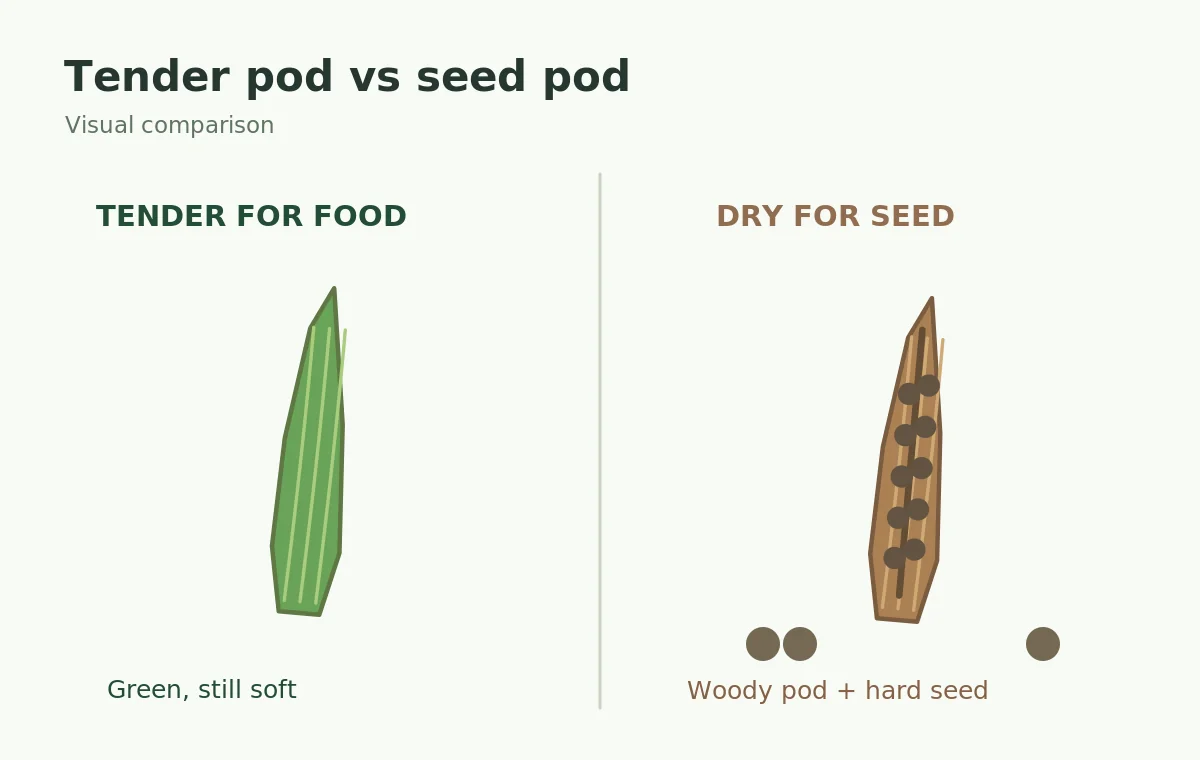
For the kitchen, harvest small tender okra pods repeatedly before they become fibrous. For next year’s garden, deliberately leave marked pods until woody and brown. These approaches cannot be collapsed into one harvest stage: the soft green seeds in a cooking pod are usually not fully mature. Our comparison panel shows a flexible green pod beside a mature ribbed brown pod opening along its seam, with hard seeds nearby.
Store enough seed for a modest germination test before committing to a large planting. A simple trial in appropriate warm sowing conditions can reveal whether the lot is viable, but it does not prove that it remained true to a variety after cross-pollination. Record plant health, collection weather, and the drying method. A careful, repeatable small batch is more useful than a large quantity of poorly dried seeds.
Related Guides
- Growing Okra: Warm-Soil Planting and Tender Pod Harvest Guide
- When to Harvest Okra for Tender Pods Instead of Tough Ones
- How to Start Okra From Seed After the Soil Warms
How We Research and Verify Plant Details
Sources reviewed October 28, 2026: extension.illinois.edu — Illinois Extension explains leaving pods to brown and split before shelling and thoroughly drying okra seeds. ucanr.edu — UC Master Gardeners describe mature hard dry okra pods, additional drying, and possible insect cross-pollination. seedsavers.org — Seed Savers Exchange distinguishes mature dry okra pods and hard seed from immature edible pods, and recommends complete drying. epakag.ucdavis.edu — The World Vegetable Center seed-saving guide warns that mature dry okra pods can shatter at their seams and spill seed. Our illustrations simplify plant structures for practical decisions rather than claiming exact scale or universal climate dates. Refer to your local Cooperative Extension for local growing conditions and cultivar-specific guidance.
This independently written educational guide contains no paid product placement. Read the VegWin affiliate disclosure. Where pests or disease are involved, identify the issue first and follow local integrated pest management guidance and registered product labels.
Usually not reliably. Choose pods deliberately matured until woody and brown.
When it is fully brown and mature but before its splitting seams spill the seeds.
Mature seed should be hard and dry rather than soft or easily crushed.
Not reliably. F1 hybrids can segregate in the next generation.
Yes. Spread them in a thin layer and store only when completely dry.