
Disclosure: This article offers independent educational guidance, not a paid endorsement or a verified affiliate recommendation. See our affiliate disclosure. Local Extension resources, plant variety, regional conditions and product labels take precedence over general examples.
You carried your seedling trays outside, and now the leaves have pale patches, curled margins or sudden drooping. Is that normal acclimation, sunburn, a cold injury, a watering mistake or a pest? A generic seven-day hardening schedule does not answer the urgent question of what to do with an already stressed plant. This page starts after a problem has occurred.
For an ordinary step-by-step outdoor transition, use an existing complete hardening-off guide. Here the practical task is symptom triage: compare exposed and sheltered leaves, look at the timing of the weather event, inspect soil moisture, protect surviving growing points and decide whether the plant is recovering. The exact species and local forecast remain essential. Our guide to hardening off plants covers a safe step-by-step outdoor transition.
Separate Sudden Exposure Injury From Other Problems
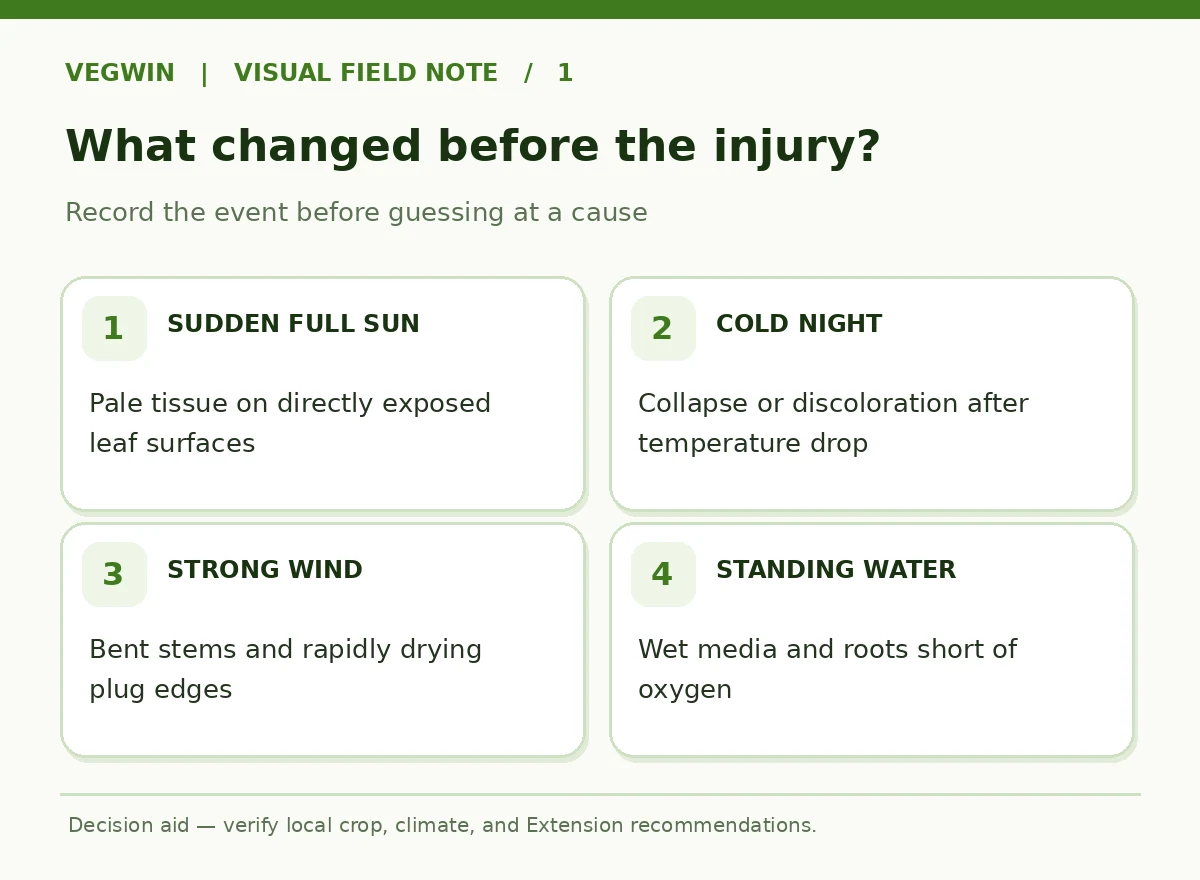
Note the last two days of exposure before interpreting a leaf. Was the tray moved from indoor LEDs to full midday sun? Did a cold night follow? Was the wind unusually strong or did heavy rain saturate the cells? A sudden uniform problem across many trays after one event is evidence for an environmental cause, but it does not prove the absence of disease.
Inspect sun-facing and shaded portions of the same plant. University of Maryland Extension describes sunscald as tan or white damaged areas that coincide with direct exposure; affected tissue does not revert to green. In contrast, widespread soft collapse after freezing or significant chilling warrants looking at plant temperature tolerance and stem condition. Insect feeding and disease lesions follow different patterns and should be confirmed separately.
Photograph both sides of several leaves and the tray position before changing conditions. This preserves the evidence needed to tell heat, light, water, cold and infection apart. If stems have dark girdling at the media surface, treat that as a different diagnostic pathway rather than assuming wind or sun.
Recognize Sunscald and Protect Surviving Growth
Bleached, papery leaf patches appearing after sudden unfiltered light are consistent with sunscald, especially when protected leaves remain green. Maryland Extension explains that indoor-grown transplants may not be prepared for the additional outdoor radiation and heat. A scorched area is already damaged tissue; the goal is to keep the plant stable while new healthy leaves develop. For the fuller picture, see our guide “Sweet Potato Slips”.
Move the tray to bright shade or filtered light and shield it from strong midday sun. Inspect moisture in the actual root ball: dry cells need measured water, but soggy cells should not be flooded. Avoid strong fertilizer mixtures or foliar concoctions; neither can turn a white scar green again. New growth and a firm upright stem are better signs of recovery.
New Hampshire Extension’s 2025 response to sunburned cucumber seedlings noted that affected leaf edges might die back while healthy new leaves could emerge. That is a possibility, not a survival guarantee. A severely wilted or collapsing plant deserves immediate shelter and closer evaluation.
Check Cold Injury Before Increasing Outdoor Time
Tender vegetable seedlings may be harmed by an unexpected cold night even when the tray looked fine earlier. Compare overnight temperatures with the tolerance of the specific crop. Maryland’s hardening guidance cautions against exposing tender seedlings to wind and temperatures below 45°F, while its current transplant advice distinguishes crop groups for overnight protection. For a step-by-step method, see how to harden off seedlings when spring weather keeps changing.
If exposed tissue is water-soaked, limp or discolored after freezing, bring the tray into a protected suitable location and wait for the extent of injury to become clear. Avoid pruning all apparently damaged leaves immediately; watch whether the growing tip remains sound. Do not try to reverse freeze injury with a large fertilizer application or abruptly place stressed plants under blazing sun.
Cold stress differs among cabbage, lettuce, tomatoes, peppers and cucurbits. It also depends on how acclimated a plant is and whether the root media froze. If you do not know the crop’s safe thresholds, consult local Extension and hold the plants protected rather than copying somebody else’s nighttime rule.
| Observation / option | What to verify | Practical decision |
|---|---|---|
| Tan / white sun-facing patches | Abrupt full sun exposure | Shelter in filtered light; watch new leaves |
| Soft collapse after cold night | Chill or frost possible | Move to crop-safe protection; reassess growing point |
| Dry cell and edge-tray wilt | Root medium drying quickly | Rehydrate root zone, shield from wind |
| Wet saucer and wilt | Saturated oxygen-poor root medium | Drain; inspect roots and media |
| Stem pinched near media | Possible disease or mechanical injury | Seek diagnosis; do not call it routine hardening |
Evaluate Wind, Drying and Wet Trays Separately
Wind changes the exposure of indoor-grown leaves and increases drying. Tender stems may bend or leaves may tear. Physically bruised tissue will not magically rebuild, but the seedling can continue if its growing point and roots remain healthy. Use a sheltered position for the next test period and anchor trays so they cannot tip or sit in pooled water.
A light tray can dry faster outdoors, especially at its edges. Check cells individually; a wet top may still conceal an unevenly wetted root ball. The opposite problem is as common: rainwater trapped in saucers can displace air in the root medium and lead to stress. Remove standing water and ensure drainage rather than imposing a universal daily watering rule.
If only one tray is affected, consider its placement, soil mix, root development or shade pattern. If every tray was exposed to the same sunburst, that distribution changes the likely cause. Keep observations separate so the response addresses the actual exposure instead of creating additional stress. For the next step, our guide “Vegetable Transplanting” explains how to set out strong seedlings without root stress.

Choose Pause, Resume or Replace Using New Growth
Pause outdoor exposure when plants are drooping persistently, rapidly bleaching, or showing cold damage. Keep them in a protected bright place appropriate to the crop and check the root zone. Resume only after plants hold themselves upright, soil moisture is under control and new leaves appear healthy. Return with gentler light and wind exposure than the conditions that injured them.
Some lower leaves may remain scarred while new growth is normal; that is not a reason by itself to discard a plant. However, a dead growing point, stem collapse, expanding disease-like lesions or progressive wilt despite suitable root conditions can make replacement more realistic than waiting. If the crop is valuable, a regional diagnostic service can help assess disease risk.
Keep the next attempt observable and short enough that you can retrieve the tray if conditions change. A preset hourly chart is useful only if plants and weather permit.
Log the Injury Event Before Trying Again
In a notebook record crop, variety, date, previous indoor light, first outdoor exposure length, weather, nighttime minimum, tray moisture and whether symptoms were on sun-facing tissue. Mark plants that are improving and those that continue to fail. This allows you to link injuries to an event without assuming cause from appearance alone.
Change one exposure variable at a time when possible. If you increase time, sun intensity and wind simultaneously, it will be difficult to know why the next tray failed. Evidence-based hardening gradually increases exposure while avoiding extreme stress; Penn State Extension cautions that deprivation of nutrition or water is not a harmless shortcut.
After recovery, use your crop-specific hardening and planting guidance for the remaining transition. Do not publish a separate general hardening-off schedule merely because this troubleshooting page shares the phrase with another article. If it does not provide a genuinely distinct answer to searchers, the correct editorial action is to merge these diagnostics into the existing page.

Related Guides
- How to Start Vegetable Seeds Indoors: Timing, Trays, and Transplant Care
- How to Harden Off and Transplant Pepper Seedlings at the Right Depth
How We Research and Apply Local Exceptions
We keep claims traceable to crop biology and site conditions; we do not treat a hardiness zone as an annual planting calendar or presume every cultivar reacts alike. Original diagrams illustrate decision logic rather than experimental data. This page only serves diagnosis and recovery of damaged seedlings, not the timetable.
Sources reviewed 2026-10-20: University of Maryland Extension — Sunscald on Vegetable Leaves; University of New Hampshire Extension — Hardening Seedlings; University of Maryland Extension — Hardening Off Vegetable Seedlings; University of Maryland Extension — Planting Vegetable Transplants; Penn State Extension — Seed and Seedling Biology. Each source supports the specific factual points recorded in this article’s metadata. These sources are independent educational institutions, not product partners. Recommendations and guidance may be updated; consult your regional Cooperative Extension office for local conditions and read the VegWin disclosure for the site’s commercial policy.
No. Already bleached or papery tissue will not repair itself, but a surviving seedling may produce healthy new leaves.
Pause the stressful exposure, inspect roots and growing points, and resume gradually only once the seedling is stable and weather is suitable.
Sunscald often follows sudden sun and affects directly exposed tissue; progressive lesions, stem pinching or unexplained spread need separate diagnosis.
Do not use an unverified concentrated feed as a rescue. Support normal moisture and crop-appropriate growing conditions, and follow any existing soil-test or labeled nutrient guidance.
Yes. This guide diagnoses damage after exposure; the full progressive acclimation schedule is a separate intent and should not be duplicated.