
Snow peas (Pisum sativum) produce thin edible pods while the peas inside are still tiny. That makes them different from shelling peas and from rounded sugar snap peas. They also have a cool-season schedule: University of Minnesota Extension recommends planting as soon as thawed soil is workable, while Utah State notes that hot conditions reduce flower and pod performance. A simple support at sowing time keeps climbing stems off wet soil and makes pods easy to spot. The most useful harvest indicator is a pod that has reached its expected length but remains flat, with only small seed bumps. Follow the steps below to match the trellis to variety height and avoid a late, tough harvest.
Choose Snow Pea Seed Rather Than Sugar Snaps
Check the packet for “snow pea” or “edible pod” along with the mature pod shape. Snow peas are often relatively flat, with tiny seeds visible inside at harvest; snap peas are thicker and juicy when rounded. Minnesota Extension distinguishes these harvest stages clearly. Look for the mature height and whether the variety is a short bush type or a climbing vine. A tall pea needing a trellis is not automatically more productive in every tiny garden. Some edible-pod varieties have a tough string along the seam that must be removed before eating, so the packet’s stringless claim can guide your choice. If you want the full process, read how to choose a pea trellis for bush and climbing peas.
Plant While the Soil Is Cool but Workable
Early planting is useful because pea seedlings grow in cool weather and production declines in hot conditions. Minnesota Extension says to sow as soon as the soil has thawed and become workable. Utah State notes that seed germination improves above about 40°F, while good growth occurs in cool conditions. Avoid tamping seeds into mud or assuming a fixed USDA winter-hardiness zone supplies an exact sowing date. In regions with gentle autumn weather, a fall crop may be practical if there is enough time before severe freeze; in climates with abrupt hot springs, prioritize the earliest suitable spring window.
Prepare Drained Soil Without Excess Nitrogen
Peas prefer a reasonably fertile, well-drained bed in good light. Incorporate mature organic matter if soil structure needs improvement, but do not assume the crop requires high nitrogen feeding. Peas can form nitrogen-fixing nodules under suitable biological conditions and Utah State warns that excess added nitrogen promotes leaf growth at the expense of pods. Use a soil test when deciding on amendments. Remove weeds and loosen the planting strip without compacting the bed. If a previous pea crop had root rot, rotate to another location and improve drainage before reseeding; a waterlogged seedbed can destroy even fresh seed.

Place Trellis Posts Before the Young Roots Spread
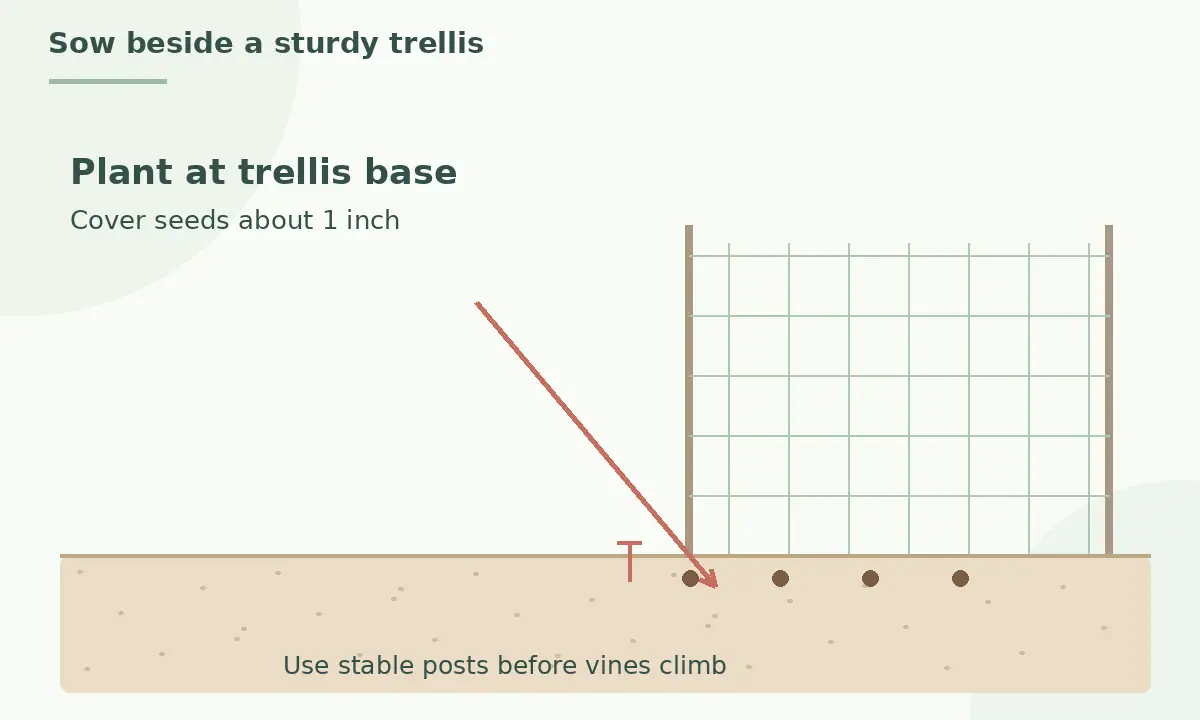
Tall snow pea varieties attach by curling tendrils rather than wrapping entire stems like pole beans. Install stakes and pea netting before sowing or while seedlings are tiny. A well-braced lightweight net held between two posts is often sufficient for garden peas, according to Minnesota Extension. Keep the lowest accessible mesh close to the seed row so tendrils find it. Fasten the support firmly enough to resist spring wind without sharp ends at eye level. Short bush types may support one another in wide rows, but a modest mesh often makes harvesting easier and reduces stems lying on damp soil.
Sow Intact Seeds at an Even Depth
Minnesota Extension recommends covering pea seed with about one inch of soil. Follow the specific packet spacing for the chosen bush or vining form, and set a row close to the trellis without placing seeds directly against a post footing. Utah State gives 1–2 inches between seeds for a typical row, while Minnesota describes different arrangements for narrow and wide rows; there is no single correct spacing for every setup. Keep seed whole: cracked peas often fail to germinate in cold wet soil. Firm lightly after sowing, water gently if dry and mark the sowing date.
Guide Tendrils Rather Than Tying Every Stem
When shoots grow toward the mesh, lift a loose tendril gently onto the support or tuck an unsupported vine into a nearby opening. Avoid tight wire twists that rub or choke a soft stem. Minnesota Extension recommends weaving tips gently through the openings as climbing plants lengthen. Inspect after strong winds and reposition the stems while flexible, not after a heavy knot of vines has formed. A support need not be decorated or complicated; it must simply carry vines, flowers and pods without collapsing. Keep the adjacent path accessible because mature snow peas produce pods on both sides of a healthy row.
Water Soil Consistently Without Wetting Vines
In a rainy spring, snow peas may need little supplemental irrigation; in dry weather, they need a steady supply especially when flowering. Utah State warns that heat and drought can reduce yield and toughen pods. Aim water at the soil instead of spraying foliage whenever practical, and let excess water drain. A light mulch after seedlings establish can moderate soil moisture and discourage weeds. Do not cultivate deeply beside roots or apply heavy extra fertilizer simply because leaves look pale for a day. Check the soil and root health before deciding whether a nutrient issue actually exists.
Watch Flowers and Pods as Temperatures Rise
Pea flowers appear before pods and can abort under dry or hot conditions. Minnesota notes that plants may stop producing pods when temperatures become very high, while Utah State stresses the sensitivity of flowering plants to water stress. Keep plants supported and pick ripe pods often so they do not remain hidden inside the vines. Unusually hot spells may shorten the entire production window, which is one reason a regional calendar is not enough. If a plant wilts despite damp ground, examine roots and stem bases for disease rather than increasing irrigation automatically. Removing weeds improves access and air movement around the row.
Harvest Flat Pods at Their Full Typical Length
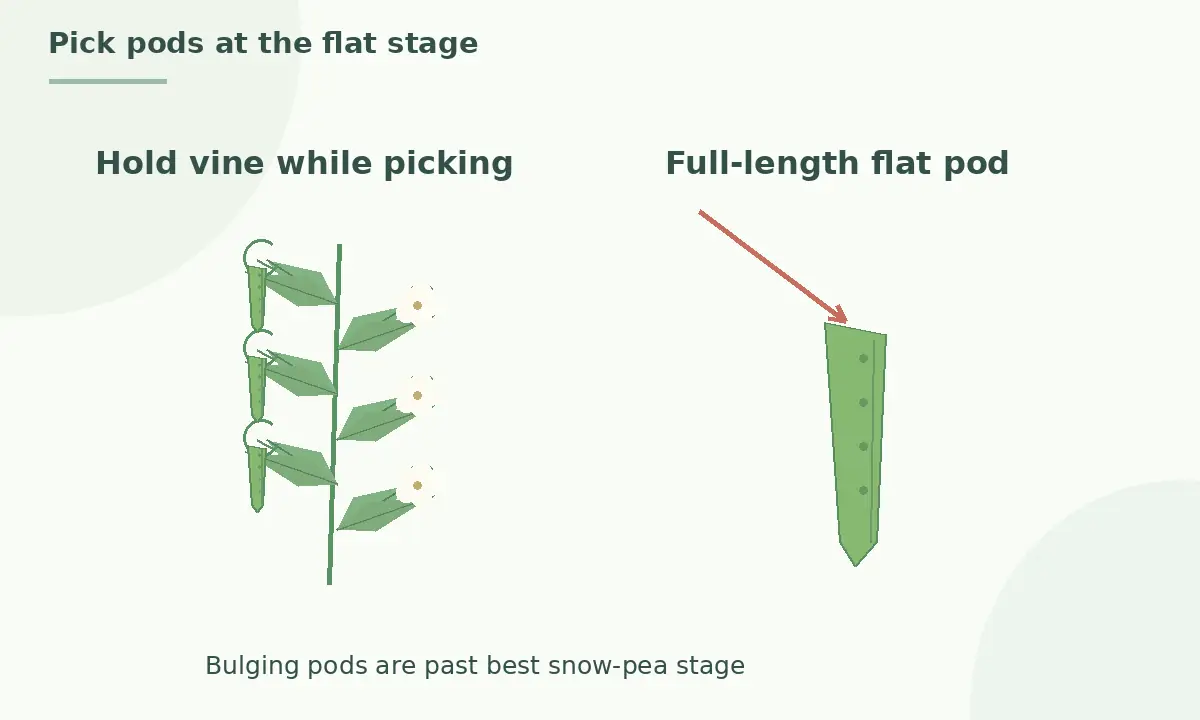
Pick snow pea pods when they match the packet’s expected length but are still thin, with only tiny outlines of seeds inside. Minnesota Extension explicitly contrasts this with snap peas, whose pods are picked plumper. Hold the vine with one hand and remove the pod with the other to avoid tearing a productive stem. Check vines every day or two during heavy production and taste one sample for tenderness. Pods left too long become fibrous and starchy. A snow pea that is exceptionally thin and half length may be immature, while a bulging pea-filled pod is usually beyond the best flat-pod stage. Our guide to growing peas covers how to choose snow, snap, or shelling and pick them right.
Cool the Harvest and Plan the Next Bed
Fresh peas lose sweetness quickly after picking. Bring the pods out of the sun, sort out damaged ones, and refrigerate promptly; Utah State’s vegetable guide recommends prompt chilling for edible pod peas. Remove strings where appropriate before cooking. At the end of production, compost healthy vine material in accordance with your normal practice and clean the trellis before a new crop. Rotating peas with unrelated vegetables can reduce accumulated soil problems. Record which variety climbed easily, when harvest began and whether heat shortened yield. Those observations provide a better planting plan for next season than a universal list of lucky planting dates. For the fuller picture, see our guide to growing green beans.
Related Guides
- Direct Sowing Seeds Outdoors: A Crop-by-Crop Success Checklist
- How to Grow Snow Peas on a Trellis and Pick Flat Tender Pods
How We Research and Verify Garden Recommendations
For this guide we reviewed the specifically cited university Extension, research garden and specialist horticultural resources and compared recommendations for the identified species, growing stage and climate constraints. Sources were checked October 24, 2026. We separated observed or published guidance from universal promises, cross-checked potentially harmful details and documented where local Extension advice is required. The drawings teach botanical structure and actions; they are not photographs of a controlled trial. VegWin has not personally tested every method across all climates.
Sources and Editorial Disclosure
Sources checked October 24, 2026: University of Minnesota Extension — Minnesota Extension: planting in workable cool soil, 1-inch depth, vine support, and flat snow pea harvest.; Utah State University Extension — Utah State Extension: cool soil, early planting, trellises, watering and heat sensitivity.; University of Minnesota Extension — Minnesota Extension: trellis construction and gently guiding climbing pea vines.; Utah State University Extension — Utah State Vegetable Guide: edible-pod pea harvest every few days, immediate cooling.. These organizations do not endorse this publication.
Disclosure: No paid product recommendation, sponsor, or affiliate arrangement was verified for this guide. See the VegWin affiliate disclosure. Use locally appropriate guidance and follow the applicable product label if a product is discussed.
University of Minnesota Extension recommends covering pea seeds with about one inch of soil.
Young plants tolerate light frosts, but flowering plants and developing pods are more vulnerable.
Not always, but light support can improve air movement and make harvesting easier.
When full length but still flat, with only tiny peas showing inside the thin pod.
Hot weather, drought and other stresses can interrupt flowering or pod development; inspect conditions.