
Culinary thyme makes a compact, woody-based mound of short shoots carrying many tiny opposite leaves. You can replace an aging straggly plant by rooting pieces of fresh growth rather than trying to rescue every bare old branch. Success depends on selecting the right stem, placing its lower section in an airy moist medium, and keeping the leaves above the surface where they can function without rotting.
Recognize a Genuine Culinary Thyme Shoot
Thymus vulgaris carries small oval gray-green leaves, typically in opposite pairs, along thin, often four-angled stems that become woody with age. It is a low herb rather than a large-leaved mint or a grass. Select a named culinary thyme from a reliable source rather than assuming every creeping ornamental thyme has the same kitchen qualities. Look closely for live green growing tips and tiny paired leaves. The drawing shows an actual twig with short internodes, not a generic broadleaf cutting with oversized foliage. Its base may be firm but its tip should remain flexible.
Choose the Season and Plant Material
RHS advises taking 5–7.5 cm softwood thyme cuttings in late spring or summer; semi-ripe pieces can also be used later in summer. Choose fresh, healthy, non-flowering shoots when available. Avoid collecting from stems with visible disease, deep insect damage or drought-induced collapse. Very old hard wood may be less responsive and takes longer to root. Work when the mother plant has adequate moisture, and prepare pieces promptly to reduce wilting. The right shoot matters more than cutting a large number of random branches to compensate for poor material.

Cut Just Below a Leaf Node
Use a clean sharp snip to remove a short tip with several leaf pairs. Find a node where two small leaves attach opposite each other. Make the lower final cut just below a suitable node, and leave an upper portion with enough foliage to power growth. Do not crush the narrow stem between blunt scissors. The illustrated cutting shows a true node and internode, with the tool at the correct lower cut position. Rooting may occur along the stem, but preparing a healthy node close to the medium is a reliable practical reference.
Clear the Lower Stem of Leaves
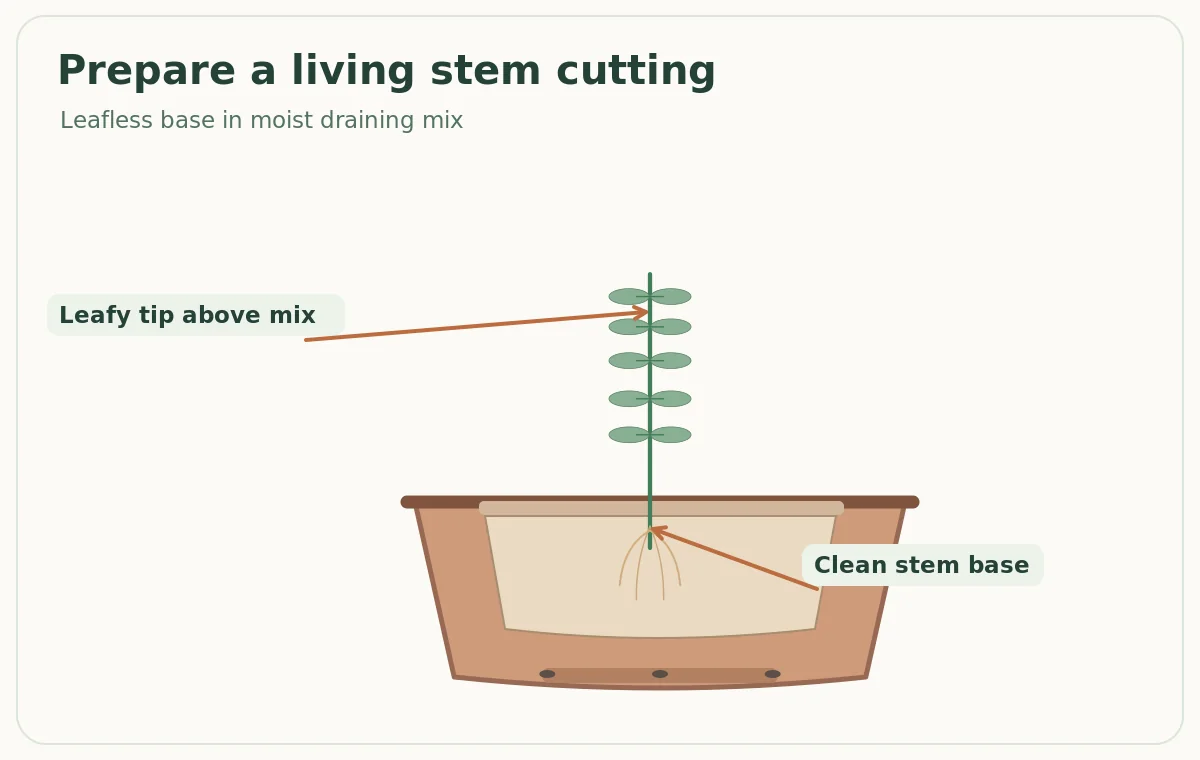
Strip only the tiny leaf pairs that would otherwise be below the propagation medium. Buried leaves often decay and make the stem base difficult to keep healthy. Keep several pairs higher on the shoot, reducing excess foliage only if it is crowding the propagator. A thornless, delicate thyme tip needs gentle fingers; peeling bark from the entire stem is not required. If the piece is already too short to leave foliage above the soil, choose a longer shoot instead. The diagram identifies the clean insertion zone and green upper leaves separately.
Use an Airy Potting Medium and Real Drainage
Fill a small container with freely draining propagation mix, such as a suitable peat-free cutting compost with added horticultural grit according to the product instructions. Make a hole with a dibber rather than forcing the slender stem into compacted material. Insert the cleaned base so the leafless lower section sits inside the mix, then firm lightly to make contact. The growing tip and remaining leaves must stay above the surface. Check that water can run out of the bottom; thyme dislikes permanently saturated soil, a problem that becomes worse in cool weather.
Provide Light Without Scorching New Cuttings
Place the freshly potted cutting in bright light out of harsh direct sun while it has no roots. This reduces the demand on the tiny stem before it can take up water. A propagator or loose cover can moderate moisture loss, but allow ventilation and promptly remove any gray, mushy or fallen leaves. Keep the medium lightly moist, not flooded. A cutting standing upright for two days is not proof of rooting. If leaves collapse, check whether the shoot was too soft, the medium too dry, or the cover excessively hot.
Wait for Real Roots Before Potting On
Rooting time varies with the season, shoot age, temperatures and medium. Avoid pulling the cutting out every morning to inspect the base; the fragile new roots are easily broken. Look for fresh tip growth and a gentle resistance when checking only occasionally. When several roots are present, move the young plant into a small draining pot and maintain the original depth. Acclimate gradually to lower humidity and brighter light instead of taking a covered cutting straight into exposed sun and wind. An unrooted piece needs more time, not heavy fertilizer.
Compare Cuttings With Layering and Division
Not every thyme variety grows in the same form. A low creeping plant may already have naturally rooted stems that can be separated carefully, while a mound of woody culinary thyme is often renewed by tip cuttings. RHS also describes simple layering and division for appropriate thyme plants. Layering keeps the stem attached to the parent while it roots; a prepared cutting becomes independent immediately and therefore demands closer moisture monitoring. Choose the technique that matches visible growth habit instead of forcing a compact woody plant into large divisions without sufficient roots.
Keep the New Plant Compact and Dry-Footed
After establishment, give culinary thyme a sunny place and well-drained soil or compost. Trim leafy tips modestly to encourage branching and kitchen harvests, but avoid severe cuts into bare old stems that may not reshoot. Do not keep the pot continuously wet merely because the cutting initially needed humidity. When the surface dries and roots are established, water according to actual container weight and weather. The aim is a compact mound of tiny aromatic leaves with an aerated root system, not lush soft growth caused by excessive watering and feeding.

Diagnose Failure by Looking at the Stem Base
A blackening base usually calls for checking wet medium, poor drainage, dirty tools or buried leaf debris. Crisp foliage may reflect inadequate water uptake or too much direct sun before root formation. If the shoot remains firm but does not root, give suitable conditions more time rather than repeatedly transplanting it. Cut another healthy short softwood tip when the parent plant is actively growing. The comparison panel shows a clean rooted stem and a waterlogged decomposing base, so you can tell the difference before moving the pot or changing the watering routine.
Related Guides
- Growing Herbs by Type: Water, Harvest, and Winter Survival Guide
- Growing Culinary Thyme in Pots: Drainage, Sunlight, and Careful Watering
- How to Root Spearmint Cuttings in Water and Pot Them Without Rot
- How to Root Mint Cuttings in Water With Leaves Above the Waterline
How We Research and Check Plant Care Advice
We compare the visible plant structures and suggested actions with published horticultural guidance rather than treating a decorative diagram as proof. Useful starting points for this specific topic include www.rhs.org.uk and www.rhs.org.uk and extension.illinois.edu. Recommendations must still be adjusted for species or cultivar, weather, local season and conditions of the site. We do not claim that a named company sponsors this article.
This article contains no commissioned product recommendations or affiliate promotions. For the site policy, see our affiliate disclosure. The illustrations explain garden decisions but do not replace inspection of your actual plant. When a photo or symptom does not match, check local Cooperative Extension information before using tools, fertilizers or pest controls.
RHS suggests about 5–7.5 cm for softwood thyme cuttings.
No. Remove only leaves that would sit below the rooting medium.
New flexible or semi-ripe growth is usually preferable to a very old hard branch.
No. Use a free-draining medium and keep it lightly moist during rooting.
Move it after roots have formed and it is ready to handle without damage.