
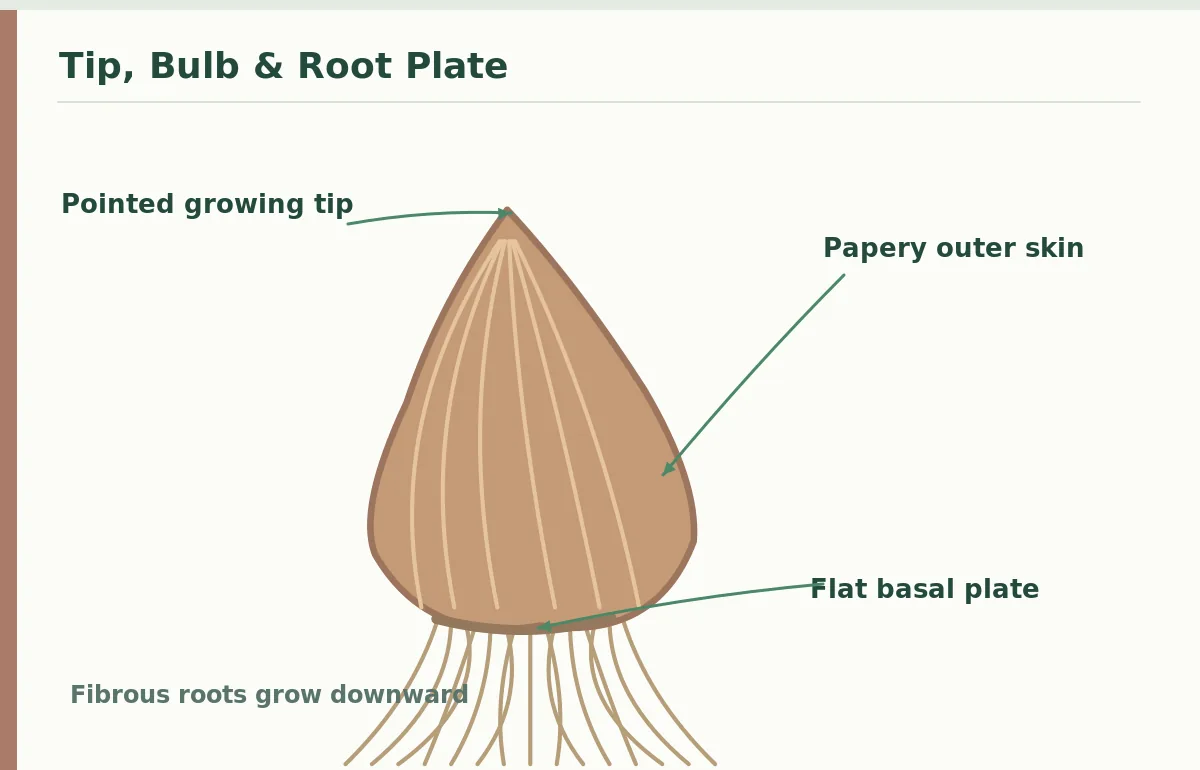
A shallot set is a small immature bulb in the Allium cepa Aggregatum Group, not an onion seed or a garlic clove. Its pointed, often narrow neck is the upper end where shoots will emerge. The bottom has a relatively flat basal plate, sometimes with short dried root remains. New fibrous roots originate from that basal plate. The skin is usually papery and may be copper, reddish or pale depending on cultivar.
Find the Pointed Tip and Flat Basal Plate
Hold one healthy set vertically and inspect both ends before planting. A bulb is made of layered swollen leaf bases around a short stem at the basal plate, so the outside may look like an ordinary small onion. The key diagram puts the green shoot at the pointed top and roots at the bottom; an upside-down set is not a recommended planting arrangement even if some bulbs can eventually correct their growth direction.
Choose Sound Bulbs Before Preparing a Bed
Use clean, firm sets free from soft necks, spreading lesions and mold. Shallots supplied as a clump may need to be separated into individual planting bulbs. RHS notes that sets are a convenient way to grow shallots and that one planted set may make a cluster. The number of daughter bulbs varies by cultivar and conditions, so one small set should not be promised a particular harvest count.
Discard severely damaged bulbs and keep varieties labeled. If a set has already produced a long shoot, handle it carefully rather than snapping the growing tip off. Sort out exceptionally shriveled material. Choose your planting time from a suitable local Extension calendar and the variety supplied; shallot daylength and cold responses differ, which makes generic planting dates unreliable across the country.
Prepare Open, Well-Drained Soil
Shallots do best in sun and soil that is loose enough for shallow roots and clustered bulbs to expand. RHS emphasizes good drainage and warns against wet ground that encourages rot. Work in finished compost beforehand when useful for soil structure, but avoid placing a layer of fresh manure directly against the basal plate. In a heavy soil garden, a raised bed or container with drainage may be easier to manage.
Rake a level planting surface, clear weeds and check whether rainfall leaves water pooling. Avoid a deep planting trench that later fills with wet material. Allium leaves are narrow and do not suppress weeds as well as a broad-leafed crop, so a clean starting bed matters. Regional recommendations for spacing vary; follow the cultivar label while allowing several inches between individual sets for the daughter bulbs.
Plant the Set Upright Near the Soil Surface
Push the base of each bulb into crumbly soil with the basal plate directed downward. RHS advises setting the bulb so its pointed tip is just showing at the surface. University of Florida IFAS also describes leaving the growing point exposed. The illustration shows a true soil line crossing near the top of the bulb rather than through the middle of the green leaf shoot. Fine roots extend down into the soil.
Firm the surrounding soil without crushing the bulb or creating a bowl that holds water over its neck. If your local Extension uses slightly deeper planting to suit a region or production method, follow that specific advice rather than mixing it with this shallow garden-set diagram. The essential anatomical rule stays constant: top shoot points up, flat root plate down.

Leave Space for a Cluster, Not Just One Bulb
Shallot sets can form multiple side-by-side daughter bulbs as the plant grows. RHS contrasts this with many seed-grown shallot plants that initially form one bulb, depending on the sowing method. Crowding sets closely to mimic a dense onion seedling row can prevent bulbs from having enough room. Give each set a planting position rather than placing an intact mature cluster into one tiny hole.
Watch how narrow leaves emerge from each set and how the plant base gradually swells. The soil should not be continually mounded over developing new bulbs. University of Florida guidance notes that the growing point should be above the surface, and different varieties may expose some shoulders as bulbs expand. Do not infer that exposed necks always mean erosion or a need to bury the crop deeper.
Water for Roots Without Waterlogging Necks
Water after planting to settle soil around the basal plate and establish root contact. Subsequent irrigation should respond to actual rainfall, soil moisture and plant growth. Shallow-rooted alliums compete poorly when weeds are allowed to grow beside them, so cultivate cautiously. Pull small weeds by hand or use a shallow tool without slicing the developing bulbs and roots.
Repeated sogginess and poor airflow can lead to bulb and neck problems. Do not assume yellow leaves always mean insufficient fertilizer; they can reflect normal maturation, disease, drought or saturated soil at different stages. Diagnose the environment first. If disease symptoms are spreading, seek region-specific Extension guidance and follow current labels for any registered control product.

Recognize Leaf Growth and Bulb Formation
Healthy shoots emerge as relatively narrow allium leaves from the bulb neck. With time, daughter bulbs expand around the planted set to make the familiar clustered harvest. Oregon State University notes that shallot bulb formation responds to daylength and temperature and that variety makes a difference. This is why planting calendars and expectations from one growing region cannot be applied unchanged to another.
Do not cut all leaves early if the goal is mature bulbs; the foliage is the plant’s main photosynthetic tissue. Remove visible competing weeds and observe leaf color through the season. A flowering stalk can divert resources and is treated as a concern in some set-grown crops; RHS suggests removing flowering stalks. Keep notes about the variety and whether it produced one or multiple daughter bulbs.
Lift and Cure Only After Real Maturity
When the crop reaches maturity, the leaves generally begin yellowing and falling over. RHS recommends carefully lifting the clusters and avoiding bruises. That is a separate harvest stage from clipping a few green shallot tops. Use a hand fork a little distance from the bulbs rather than stabbing directly through the cluster. Gently separate healthy daughter bulbs after lifting and inspect for rot.
Curing and storage depend on drying conditions, airflow and bulb soundness. Never pack wet fresh bulbs into an airtight container. The planting demonstration ends with a realistic bulb cluster, not an oversized single root. For future seasons, save only clean sound planting stock and recheck local planting recommendations because cultivar suitability and winter wetness vary by region.
Related Guides
- How to Grow Shallots From Sets or Seeds and Cure Bulbs
- When to Harvest Shallots and Cure the Bulbs for Reliable Storage
How We Research This Guide
We compared plant anatomy and practical harvest or planting instructions against www.rhs.org.uk; gardeningsolutions.ifas.ufl.edu; agsci.oregonstate.edu. These sources support the crop distinctions illustrated here. Always adapt planting timing and plant health decisions to your local climate and cultivar.
This is independently written educational gardening information, not a paid promotion. Review our affiliate disclosure. No pesticide or food-preservation procedure is endorsed; use local Extension guidance for high-stakes decisions.
The flattened basal root plate goes down; the pointed neck or growing tip points up.
For common garden sets, RHS advises planting so the tip just shows at the soil surface; adapt to regional guidance.
Yes. Separate healthy individual sets before planting so each has room to form daughter bulbs.
Check drainage, planting depth and starting bulb health before guessing at a disease or adding chemicals.
No. Shallots raised from individual seeds and those planted from sets differ in initial growth and potential clump formation.