
A shallot clump may have several glossy bulbs tucked under a fan of grasslike leaves, but those bulbs are not ready for the pantry just because they look large. For shallots grown for dry storage, the useful signal is the plant slowing down: leaves turn yellow, tops soften and fall, and outer bulb skins begin to mature. Utah State Extension advises harvesting dry shallots after their tops fall over. This guide explains what to watch for, how to lift a cluster without slicing it, and why curing is a separate step from simply washing the harvest. The timetable varies by cultivar, spring or fall planting, and weather.
Recognize a Mature Shallot Cluster Above the Soil
Shallots belong to the onion group, but a planted set may divide into several attached bulbs. Look at the whole plant before choosing the harvest date. A cluster ready for dry-bulb use commonly has yellowing foliage and several tops naturally reclining rather than fresh upright green growth. The bulb shoulders may be visible at the soil line. Do not pull green leaves over by hand to imitate maturity: forced bending may damage tissue without improving bulb keeping quality. A few yellow leaf tips caused by drought or disease do not prove that the entire clump is mature. Dig a sample if foliage changes look unusual, and inspect whether distinct bulbs have developed proper skins.
Use the Crop and Local Weather Instead of a Calendar
A fall-planted shallot in a mild-winter region and a spring-planted shallot in a colder garden cannot follow identical harvest dates. Variety, bulb set size, temperature and day length influence maturity. A hardiness zone describes winter cold, not the date that the tops should fall. Utah State Extension explicitly uses top collapse as its cue for harvesting dry shallots. If heavy rain is forecast when most leaves have lodged, choose a workable dry interval and monitor quickly. If the foliage is still predominantly healthy and upright, allow further growth unless rot, extreme weather or a pest problem makes lifting more prudent.
Distinguish Normal Yellowing From Trouble in the Bed
Uniform fading and natural lodging near the end of growth are different from isolated wilted shoots, soft necks or foul-smelling bulbs. Onion maggots and rot can also cause yellowing before the crop is mature. Check for decay near the base, uneven collapse across plants, and slimy or water-soaked scales. If a diseased clump is discovered, keep it separate from sound shallots rather than storing everything in one mesh bag. Avoid walking on soaked soil or dragging roots through mud when you can postpone lifting safely. A healthy dry shallot should become firmer and more papery as curing progresses, not soft and leaking.

Loosen the Soil and Lift Whole Clusters Gently
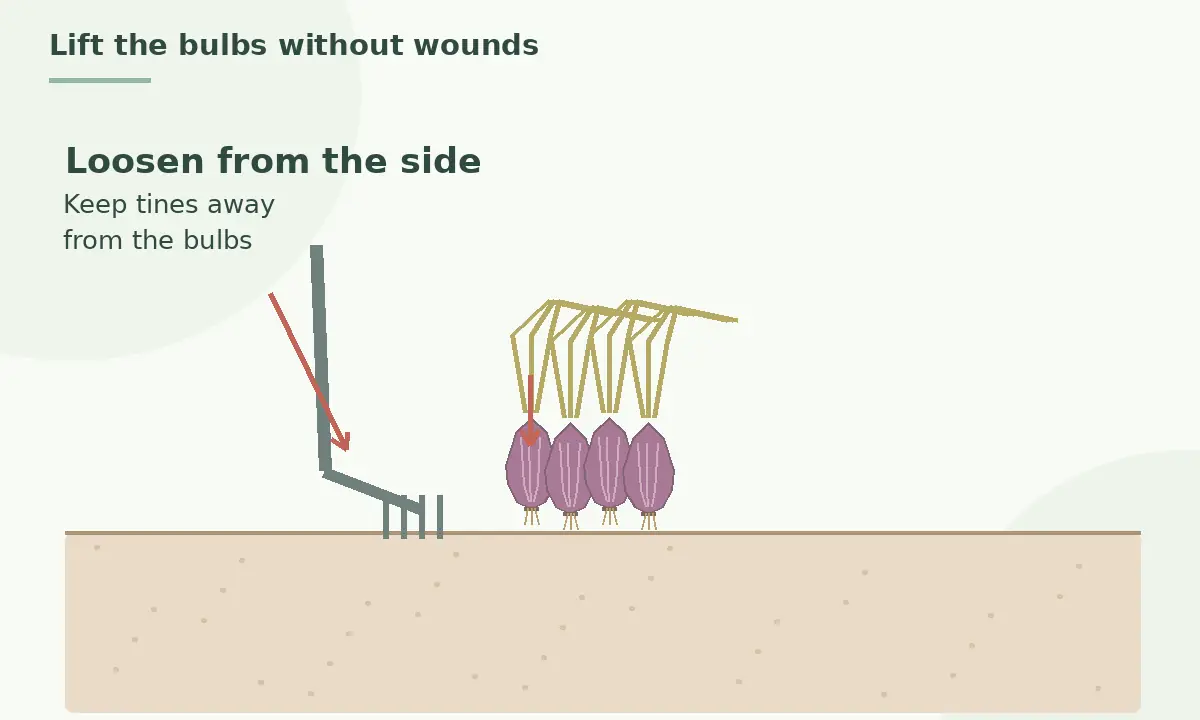
Use a garden fork or narrow spade outside the footprint of the bulb cluster; insert the tool far enough away that its tines cannot spear a hidden bulb. Lift the soil below, then ease the cluster upward by its base. Avoid using the leaves as a rope to pull against compacted soil. Shake off only loose, dry earth and leave attached skins in place. Small bruises are easy to miss when a bulb is covered in soil but can turn into storage rot. If the cluster separates without force, keep its individual bulbs together on a tray so you can identify damaged ones before the curing stage.
Choose a Drying Place With Air Movement and Shade
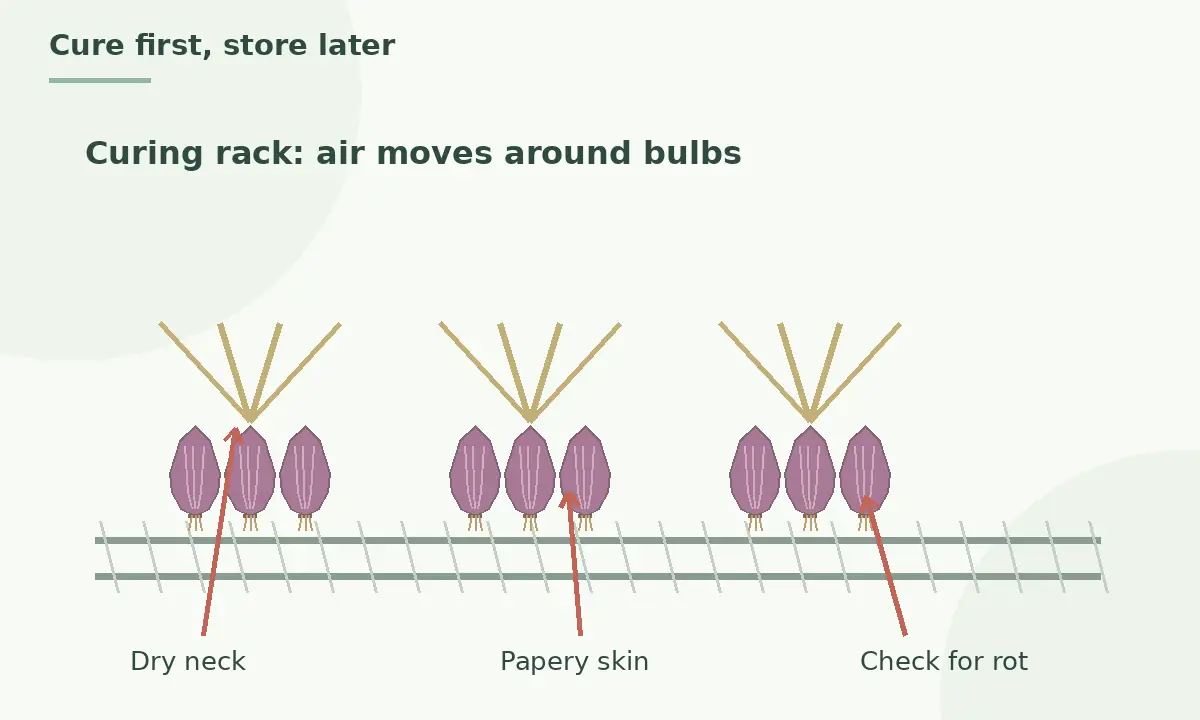
Utah State describes field curing for roughly one to two weeks where conditions are reliably dry. That is an option, not an instruction to leave bulbs exposed to repeated rain or damp nights. In a humid or stormy climate, move the unwashed bulbs beneath a roof into a well-ventilated protected area. Spread clusters in a single loose layer on screens, slats or racks; keep them off a wet concrete floor. Minnesota Extension similarly emphasizes warm, dry conditions and air movement for curing alliums. Keep plants away from standing water and avoid a sealed plastic tote that traps their moisture against the necks and skins.
Check the Dry Neck and Papery Outer Skin Before Storage
The finish line is physical, not a number of days. A cured shallot feels firm, has dry outer scales and has a neck that is no longer thick and damp. Utah State recommends letting bulbs and leaves become fully dry and papery. Examine several bulbs from different spots in the rack: those nearest a fan or opening may dry before bulbs in the middle. Keep curing if neck tissue is still moist. Do not peel away every protective layer to make the bulbs look polished, and do not rinse them before long-term storage. Dry brushing after curing removes soil without rewetting the protective outer skin.
Trim and Sort the Bulbs Only Once They Are Cured
After the necks have dried, remove excess foliage with clean scissors, leaving a short stem rather than cutting directly into the bulb. Utah State suggests leaving about two inches if cutting off tops. Roots can be lightly shortened once dry, but avoid gouging the basal plate. Sort bulbs into sound, firm specimens for storage and separate groups with cuts, bruises, thin exposed flesh or questionable necks. Use the latter promptly only if clearly sound for eating; discard anything with signs of rot. Reserve healthy, true-to-type bulbs for replanting only when their sourcing and local disease status make that appropriate.
Store Shallots Cool and Dry Without Sealing Them
A cured shallot is a dry-storage vegetable. Utah State lists cool temperatures around 32–40°F for shallots with dry conditions; actual household storage often fluctuates. Choose a frost-free space that is consistently cool, dark, airy and not damp. Mesh bags, shallow perforated trays and slatted boxes are better than closed plastic bags. Keep bulbs away from wet vegetables and inspect them periodically for softened patches or sprouting. A warm pantry may be fine for short-term kitchen use but often encourages sprouting sooner. Storage life varies by cultivar and how well the neck and skin cured, so do not promise a fixed number of months. Our walkthrough on how to grow shallots from sets or seeds and cure bulbs sets out each step.
Keep Fresh Green Shallots Separate From Dry Bulbs
You may harvest a tender immature shallot for immediate cooking, but that is a different product from a cured storage bulb. Green shallots have juicy tops and a wetter neck, so store them as perishable produce and use them promptly. Do not blend them into a tray of fully cured shallots: the added moisture can accelerate spoilage. If only a few clumps remain green, leave them growing or remove them as fresh vegetables, depending on seasonal conditions. Labeling a kitchen container “fresh” or “cured” prevents accidental mixing when several relatives of the onion family are harvested together.
Record Three Observations for a Better Next Harvest
For a useful garden record, photograph the crop when about half the tops begin reclining, note the date you actually lifted it and record when the necks finally dried. Add cultivar, planting season, recent rainfall and whether bulbs were dried indoors or under cover. This is more transferable to your own garden than copying another gardener’s single harvest date. Next season, compare how individual plantings respond to weather, but still inspect each clump. If many bulbs fail in storage, look backward at physical damage during lifting, poor curing airflow or excessive moisture rather than automatically blaming the variety.
Related Guides
How We Research and Verify Garden Recommendations
Our editorial review compared the listed university Extension and specialist horticultural guidance for the identified species, growing stage and practical question. We checked the source pages on October 24, 2026, distinguished field trial results from universal instructions and noted when cultivar or local weather may change an outcome. The instructional artwork was created to explain morphology and gardening actions, not copied from published photos or presented as evidence of a particular experiment. We have not run a controlled garden trial for this specific article; readers should use local Cooperative Extension assistance for uncertain symptoms or regional restrictions.
Sources and Editorial Disclosure
Sources reviewed October 24, 2026: Utah State University Extension — Utah State Extension: tops falling over, lifting clusters, drying until papery, and cool dry storage.; University of Minnesota Extension — University of Minnesota Extension: bulb crop harvest after lodging, avoiding injury, and warm ventilated curing.; Utah State University Extension — Utah State Extension: shallots belong to the cold, dry storage group; reject decaying bulbs.. Source links do not mean these organizations endorse VegWin.
Disclosure: No sponsorship or affiliate payment for a specific product has been verified for this article. Site information is available at VegWin Affiliate Disclosure. Follow current local regulations and the instructions for your cultivar or any registered product.
For long storage, wait for tops to decline and lodge naturally; green shallots can be picked separately for prompt kitchen use.
Avoid washing storage bulbs. Brush off dry dirt after curing to preserve dry skins and reduce added moisture.
Look for firm bulbs, papery outer scales and thoroughly dry necks rather than counting days alone.
Use an airy sheltered rack instead. Field drying is appropriate only when the weather stays reliably dry.
Injuries, uncured necks, damp storage or underlying disease may contribute; remove affected bulbs promptly.