
How to Harvest Swiss Chard Outer Leaves starts with recognizing the right plant parts, not with rushing to cut or treat. An image showing those parts can keep a simple gardening job from becoming a costly mistake. This guide focuses on one distinct task and explains what to examine, which action to take, and when to delay. Conditions vary by cultivar, season and region, so always compare the instructions with the plant in front of you. The university and horticultural sources linked below inform the specific steps; they are not evidence that every garden will respond on the same schedule. Follow the diagrams together with the text, and stop if the living plant does not match the identification described.
Find the Crown Before You Touch a Leaf
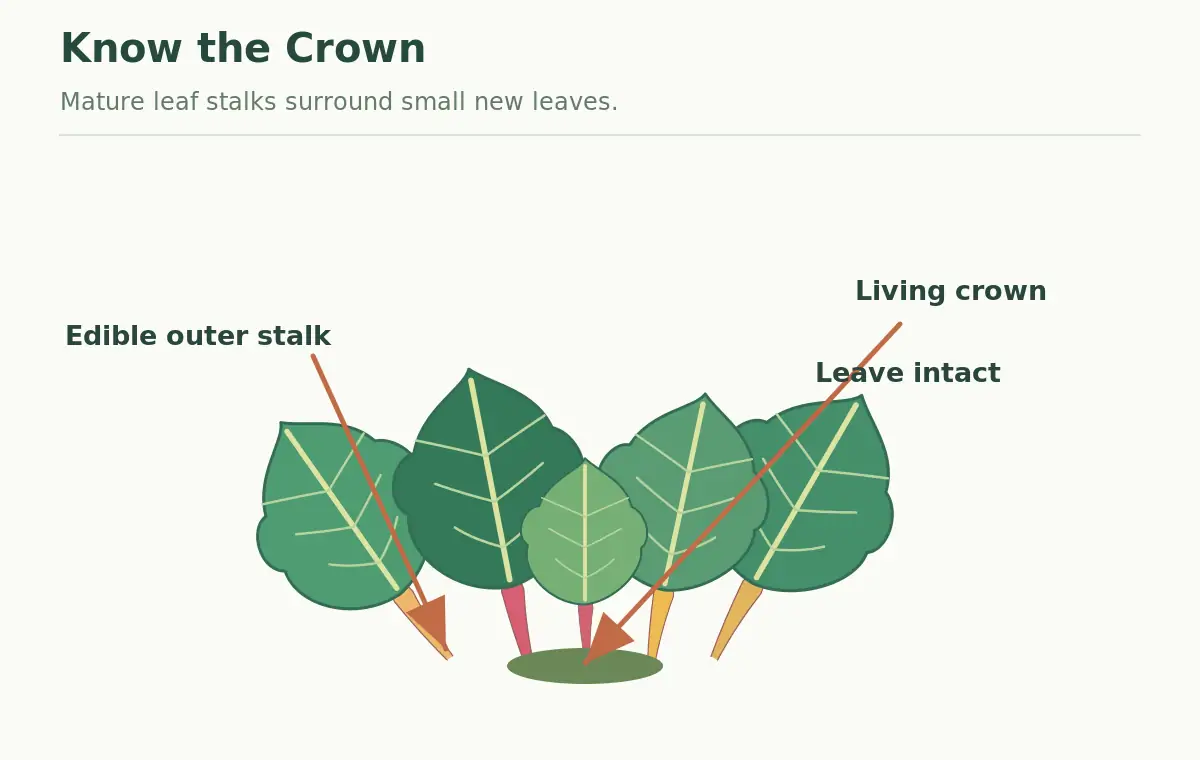
Swiss chard is a leafy form of Beta vulgaris, the same species as beets, but it is grown for generous blades and fleshy leaf stalks rather than a swollen storage root. Examine the base of a healthy rosette: broad older leaves radiate outward, while smaller folded leaves emerge tightly together in the center. That compact center is the growing crown. It is not a spare stem to trim away. A diagram of the plant from the side helps distinguish the edible outer stalks from the crown that supplies the next harvest. Keep the middle of the plant visible and unobstructed as you work, especially when many large leaves overlap.
Choose Mature Leaves While New Ones Unfold
Start with sound, usable leaves on the outer ring rather than stripping the plant bare. Illinois Extension describes tender harvest-size leaves around eight to twelve inches long; the precise best size depends on variety, weather and whether you want small salad leaves or larger cooking greens. A brightly colored stalk does not mean the leaf is mature: compare its position and blade size instead. Skip yellowed, severely torn or obviously infested blades for the kitchen. Very young center leaves have not yet done much photosynthesis, so leaving them in place supports continued growth. Harvest amounts should match plant vigor rather than an arbitrary number of leaves.
Make the Cut Beside the Base, Not Across It
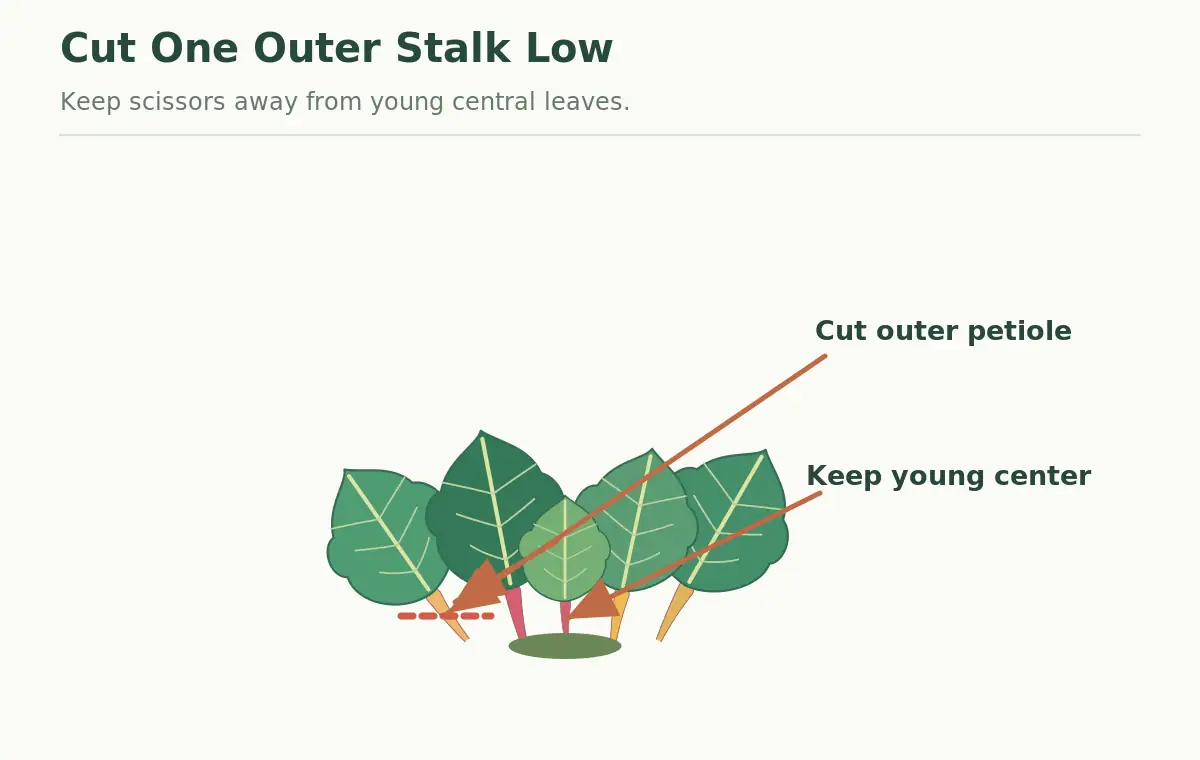
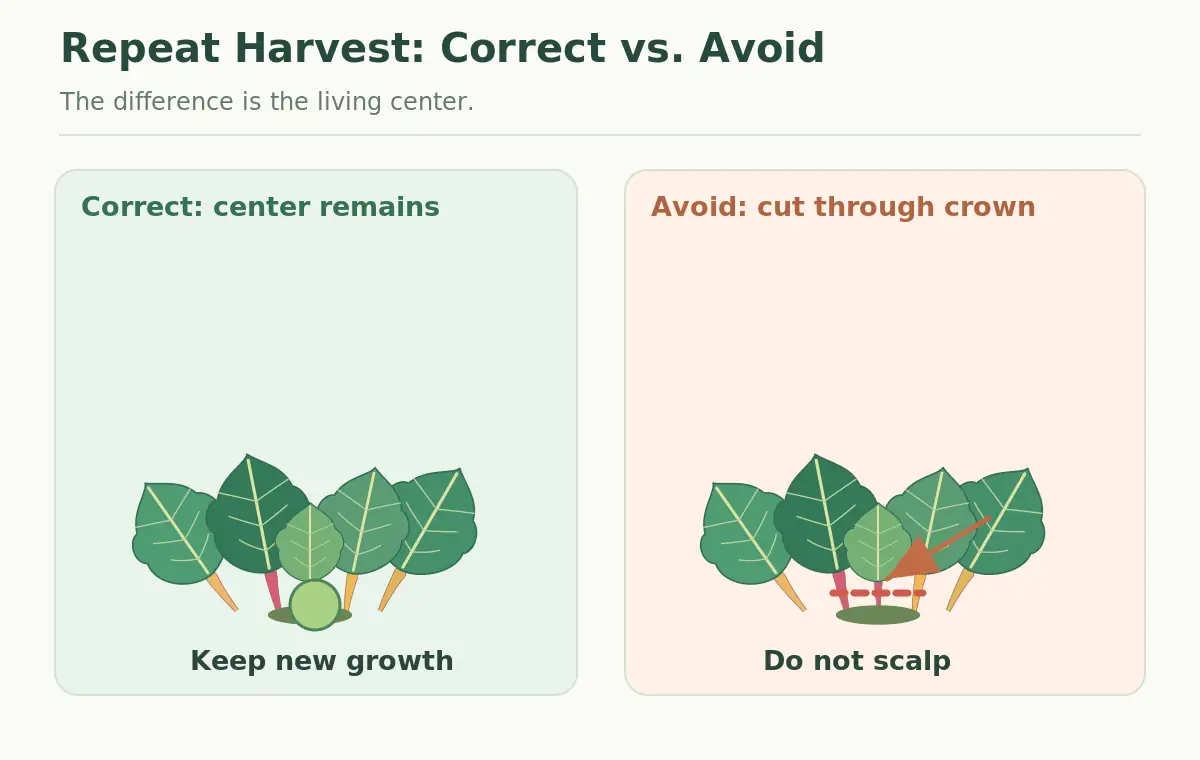
Follow one outer petiole, or leaf stalk, down to where it joins the crown. With clean snips, cut that individual stalk low, about one and a half inches above soil level as described by Illinois Extension. Keep the blade on the outside of the rosette, away from the tightly packed central bud and neighboring young petioles. Another option is to detach a mature outer stalk carefully by hand, but do not twist so forcefully that you pull the whole plant. Never slice straight across the middle at ground level if your purpose is to keep harvesting. The new leaves originate from that central growing tissue, not from the cut end of an old leaf.
Work Around the Plant in Short Passes
Take leaves from different sides of the rosette so you can still see the emerging growth. If the plant is small or slow, remove only a few mature leaves and come back after more have expanded. A large established plant with steady moisture may supply more. The goal is neither a cosmetic haircut nor complete defoliation; it is a measured harvest that leaves a functioning leafy center. Use a shallow basket instead of compressing the leaves into a hot pile, and avoid resting a heavy tool on the crown. Periodically step back: the remaining plant should still look like a small, intact rosette, not an empty cut stump.
Separate Baby-Leaf Harvesting From Repeat Picking
There are several legitimate ways to harvest chard, but they have different outcomes. Whole-plant or densely sown baby-leaf harvest can be appropriate when you are clearing a row. For a long-lived plant, regular individual-leaf harvest is the better match. University of Minnesota Extension notes that chard can continue producing new leaves after individual leaves are picked, while Illinois Extension emphasizes protection of the terminal bud. Do not apply a generic instruction to shear all greens at soil level to a single chard crown without checking how much living growth remains. The method you choose should reflect whether continued production from the same plant is your actual objective.
Keep Roots Moist and Soil Open After Cutting
Leaf removal does not replace ordinary plant care. Water consistently during dry spells without leaving roots in standing water, and keep weeds from competing immediately around the crown. Maryland Extension advises uniform moisture for good chard performance and mulch along rows for weed control. Leave a little breathing room right at the stem base rather than packing wet mulch into the growing point. Chard can grow through much of the cooler and milder parts of a growing season, but extreme heat, drought and cold can reduce quality or slow replacement leaves. Soil testing is a better guide to nutrients than inventing a fertilizer dose for every harvest.
Check Leaf Quality and Harvest at a Cooler Hour
Pick when plants are cool and blades are not limp from intense midday sun. Healthy chard blades can be smooth or slightly crinkled and have white, yellow, pink or red stalks, depending on the variety. Inspect undersides for pests and examine suspicious tunnels or blotches before taking a leaf inside. A very large blade may still be useful cooked even if the stalk takes longer to soften. Carry leaves gently to avoid bruising, and keep dirty garden tools separate from food containers. Rain-soaked or damaged leaves spoil faster, so adjust how quickly you use your harvest instead of expecting a fixed refrigerator life.
Store Leaves Promptly and Use Stalks Wisely
Chard is perishable. Chill harvested leaves promptly, ideally in a ventilated or loosely closed produce bag, and use them within a few days for best texture. University of Maryland notes that young and mature leaves have different culinary uses: smaller ones may be eaten fresh, while larger blades and ribs suit cooking. Wash produce with clean running water before eating, and separate thick ribs from tender blades if the recipe calls for different cooking times. Avoid leaving a basket of greens in direct sun while you complete other gardening chores. Frequent modest harvests usually provide a fresher supply than collecting one oversized heap.
Troubleshoot Slower Regrowth Without Damaging the Center
If new leaves stop appearing, first look at the center. A firm living crown with tiny unfolding leaves is different from a brown or decaying center. Check root-zone moisture, crowding, soil drainage and recent heat or frost, rather than assuming cutting alone caused the problem. If your previous cuts wounded the crown, protect what remains and avoid more harvesting until it recovers. Flowers and tall seed stalks also signal a shift in the plant’s life cycle, so leaf quality may change. In regions with a long cool season, new leaves may come over many pickings; in other climates you may need a replacement sowing as weather changes.
Use a Simple Three-Point Harvest Test
Before each visit to the kitchen, confirm three things on the living plant. First, there are expanded outer leaves you can remove without reaching across the tight center. Second, the central folded leaves and growing bud will remain untouched. Third, the plant has enough water and healthy foliage to continue developing. If all three are true, cut a few outside stalks and check your work. If not, give the plant more time or harvest it as a final crop rather than promising repeat growth. This inspection-based method is more reliable than a fixed weekly cutting schedule across all locations and cultivars.
Compare the Key On-Plant Decisions
| What you see | Action | Why it matters |
|---|---|---|
| Outer mature leaf | Cut or detach low at the outer base | Edible harvest without touching the center |
| Young center leaf | Leave attached | Protects the continuing rosette |
| Brown or damaged center | Stop harvesting and diagnose | Repeat regrowth is no longer assured |
Related Guides
- How to Harvest Swiss Chard Without Stopping New Growth
- How to Harvest Swiss Chard Seeds From Second-Year Brown Stalks
- Growing Swiss Chard: Thin Multigerm Seedlings and Pick Leaves
- How to Transplant Swiss Chard Seedlings Without Burying Their Crowns
How We Research and Verify These Steps
Sources checked on 2026-10-26: University or horticultural source 1; University or horticultural source 2; University or horticultural source 3. We compared those original recommendations with the specific crop, growth stage and real safety limitation before writing this guide. Site illustrations simplify the relevant botanical details, so always confirm the actual specimen and apply regional Extension advice when conditions differ. No pesticide or planting claim here should be taken as a replacement for a local label or growing guide.
Safety and Independent Editorial Disclosure
This article is independent educational gardening content, not paid sponsorship, and its internal links do not imply a vendor partnership. See the VegWin affiliate disclosure. Use clean tools, prevent injury to yourself and the plant, and wash food crops with clean water. Keep poisonous or irritating plant material out of reach of children and pets. For possible insecticide uses, follow current local registration and label directions; this guide does not provide treatment rates or off-label recipes.
Yes. Remove mature outside leaves while leaving the compact central growing crown and young leaves intact.
Follow one outer stalk toward its base and snip low, about 1½ inches above ground, without cutting the central bud.
A full harvest may clear a bed, but stripping the center undermines the repeated-leaf method described here.
Use the thick ribs in cooked dishes and leave younger center leaves to size up for future harvests.
Inspect the crown, moisture, weather and roots; drought, damage and seasonal stress can all slow new leaves.