
Swiss chard is often grown from seeds in the bed, but it can also be transplanted. The tricky part is not handling its broad leaves; it is preserving the compact root plug and the living center where new leaves arise. Unlike a tomato, a Swiss chard seedling should not simply be buried up the stem as a routine transplant technique. University of Minnesota and Utah State Extension both provide guidance for moving chard seedlings. Here is a step-by-step method for choosing the right plants, preparing the bed, keeping the crown open, and recognizing normal recovery rather than mistaking every floppy leaf for plant failure.
Select Seedlings With Healthy True Leaves
Choose stout, compact plants with several well-formed true leaves instead of crowded, threadlike seedlings. Utah State Extension notes that chard transplants are generally ready at about four to six leaves with a developed root system. Seed leaves may be smaller and simpler than the later broad wavy leaves. Seed of chard is often sold as a seed cluster, so several seedlings can emerge closely together. Do not assume every cluster is a single-rooted plant ready for rough separation.
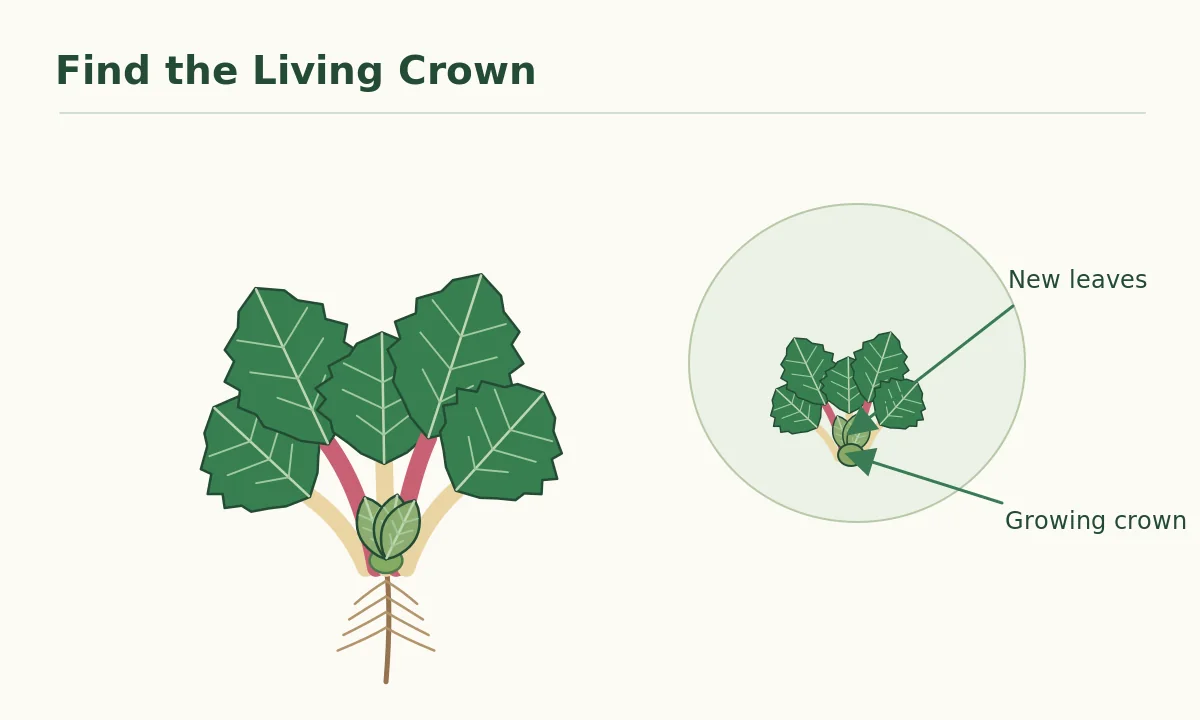
Look at the very base of the leaf stalks. The crown is the tightly packed growing region where new leaves unfold, and it should be healthy, firm and visible. The colorful stalks of rainbow chard may be white, red, yellow or orange depending on variety, but color alone does not determine transplant readiness. Remove plants with obvious rot or collapsed bases from consideration. If roots are densely entangled, consider snipping surplus seedlings rather than pulling them from the plug.
Acclimate Indoor Plants Before Planting
Young indoor-raised chard should not move straight from a calm bright window into harsh sun and wind. Minnesota Extension recommends hardening transplants by gradually reducing sheltered conditions before setting them outside. Over several days, increase exposure while checking leaf turgor and preventing desiccation. An overcast, calm planting day helps limit stress. Keep the plug moist, but avoid letting young plants stand in water for prolonged periods.
Chard prefers cooler growing conditions than tropical basil. Use local frost and seasonal guidance rather than treating USDA winter-hardiness zones as a planting calendar. Some outdoor conditions may still be too severe for tender nursery plants, even when mature chard can tolerate cool weather. If the forecast changes abruptly, delay transplanting rather than trying to rescue wilted foliage with an invented fertilizer treatment. A sturdy seedling moved at the right time usually adapts better than an oversized root-bound one.
Prepare Loose Soil and Enough Space
Choose fertile, free-draining soil that can hold moisture without remaining waterlogged. Clear weeds and loosen the planting zone so a rooted plug will fit without being squeezed. University of Minnesota Extension gives spacing guidance that can vary with whether you aim for baby leaves or a large mature plant. Use the seed packet and available space to decide final distances, rather than crowding a bed just because seedlings are small now.
Prepare the planting hole slightly wider than the plug, and moisten dry soil before you move seedlings. Place a small trowel and watering can next to the bed so the roots are not left exposed while you search for tools. If you use mulch later, leave the central growing point uncovered. Chard is a leaf crop, so the condition of the growing crown matters more to ongoing harvest than achieving a perfectly straight leaf stalk on planting day.

Lift the Root Plug and Match the Soil Line
Water the nursery cells beforehand enough to hold the potting medium together. Flex the cell or support the underside, then tip the seedling out without yanking a leaf stalk. Keep most fine roots inside their plug. Set the original media surface at the same height as the surrounding garden soil. A mound of soil over the center can interfere with new leaf growth; a root ball perched high can dry out faster than the bed.
Firm the soil gently around the sides and water in to close air spaces. Inspect from a low angle: leaves should rise from an open crown, and the original cell surface should meet the new surface. Do not bury the growing whorl because it looks like a tidy way to support a floppy transplant. If one stalk leans temporarily, a little soil along the plug edge is preferable to piling compost over the central bud. The middle image marks exactly which growing point remains uncovered.
Give New Roots Moisture and Light
During the first days, monitor moisture around the root zone. Chard can tolerate some dry weather once established, but newly disturbed roots cannot instantly support the same leaf area. University of Minnesota notes that drought slows new leaf growth in chard, while steady moisture supports recovery. Water the soil, not just a dry crust near the stem. Do not keep the area saturated all day if the soil has poor drainage.
A transplant may droop in the first warm afternoon even when planted correctly. Check whether it perks up as the sun weakens and whether new leaves emerge over the following days. Persistent collapse, mushy bases or sudden discoloration require closer inspection. Light temporary shade or a row cover may protect transplants while they adapt, but remove or vent protection as temperatures rise. Give plants airflow and room to expand; crowding is not a cure for wilting.
Harvest Outer Leaves After Establishment
Resist immediately stripping leaves from a newly transplanted plant. First allow it to form new foliage in the bed. Once established, take outer mature leaves near the base with clean hands or shears while leaving the youngest central leaves intact. Delaware Extension specifically describes outer-leaf harvesting for continued production. This supports repeat harvests without sacrificing the crown. Do not confuse a leaf blade tip with the actual central growing point at soil level.
If you want baby-leaf harvest, use appropriate spacing and take modest amounts so plants retain enough photosynthetic tissue. If a plant sends up a tall flowering stalk in heat or age, leaf quality may change; it does not mean a transplant failed weeks earlier. Remove diseased debris and keep the harvest clean. Chard belongs to Beta vulgaris, the same species as beet, but you are managing it chiefly for leafy stalks and blades, not for a swollen storage root.

Correct Crown Burial and Crowding Early
A good transplant displays fresh central leaves, an unburied crown and roots fully surrounded by soil. Compare that with a buried crown showing wet compost packed between leaf bases, or a plug that sits too high and dries at the shoulders. Adjust the soil level gently while the plant is young. The correct diagram does not tell gardeners to expose all the roots; it shows the crown open while the roots stay covered.
If several plants emerged from one seed cluster, decide which to keep before their roots knit together strongly. Snip unwanted seedlings at ground level when preserving one root system matters. If a transplant stalls, review root damage, water, temperature, depth and light before feeding. Later new leaves provide a more dependable signal of recovery than whether the oldest leaf remains perfectly upright. Keep the crown visible all the way through repeated harvests.
Related Guides
- How to Start Vegetable Seeds Indoors: Timing, Trays, and Transplant Care
- Growing Swiss Chard: Thin Multigerm Seedlings and Pick Leaves
- How to Harvest Swiss Chard Without Stopping New Growth
- How to Harvest Swiss Chard Seeds From Second-Year Brown Stalks
How We Research and Verify These Steps
The linked horticultural references were checked on 2026-10-27: extension.umn.edu — Minnesota Extension confirms chard can be transplanted and describes hardening, spacing, root care and new growth. extension.usu.edu — Utah State Extension gives transplant stage, spacing and suitable cool-weather conditions for chard. www.udel.edu — Delaware Extension describes chard crop morphology and harvesting outer leaves while retaining the central crown. Each guide separates confirmed growing practices from climate- and cultivar-dependent choices. A diagram illustrates the physical action, not a guarantee of identical results in every garden.
No paid product placement was used in preparing this article. For the site-wide policy, review the VegWin affiliate disclosure.
Yes. University of Minnesota and Utah State Extension both provide chard transplant methods.
Sturdy seedlings with several true leaves and a developed cohesive root system are preferable.
No. Keep the basal growing crown open at about its original soil level.
Temporary water stress can occur while roots establish, but persistent collapse requires inspecting moisture and crown health.
Take outer leaves, leaving the center and small developing leaves intact for more growth.