
Grow Watercress From Seed in a Moist Container Safely: the useful starting point is to identify the plant and the part that actually grows. This guide uses the botanical name, an observable plant-stage cue and a specific action rather than pretending every climate or cultivar follows one fixed date. The illustrated sequence highlights what belongs above or below the soil, which tissue should remain alive after cutting, and the difference between a normal developmental stage and a likely problem. Local weather, seed supplier information and careful observation still determine the final timing in your own garden.
Recognize true watercress before sowing
True watercress is Nasturtium officinale, a moisture-loving brassica, not garden nasturtium (Tropaeolum) and not the quick-growing garden cress (Lepidium sativum). This name distinction matters because an illustrated seed packet labeled only “cress” may describe a completely different plant and growing method. Check the Latin name before preparing a saturated container.
Look for trailing, branching green stems with fleshy-looking pinnate leaves. Each mature leaf includes several rounded or oval leaflets on a central axis, often with a larger terminal leaflet. Plants can form slender roots at low nodes when stems contact moisture. White flowers have four petals if the crop is allowed to bloom; tender leafy shoots are usually taken before flowering.

Prepare a pot and clean water tray
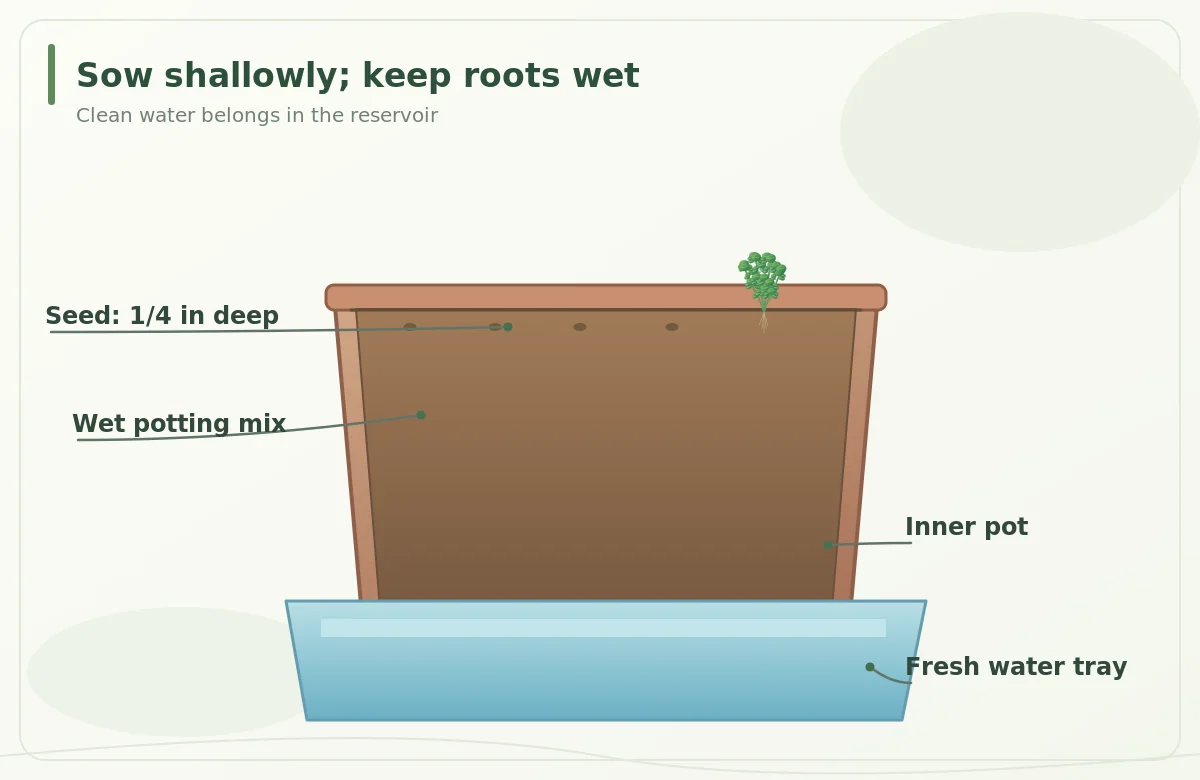
Start with a clean pot that has drainage holes and a water-holding outer tray or bucket. Fill the inner pot with suitable seed-starting or soilless mix, and moisten it thoroughly before sowing. The medium should stay wet but not wash away; plants are rooted in the mix rather than simply floating as loose cut leaves in standing water.
Utah State University Extension describes placing a potted crop in a bucket containing a shallow reservoir of water so the root zone stays wet. Keep the water level below the tops of most stems and leaves, and make it easy to empty and rinse the reservoir. Avoid improvised collection from ponds, drainage ditches, or wildlife-contaminated streams if you plan to eat the greens.
Sow the fine seeds shallowly
Sprinkle purchased, identified watercress seed across a level, already saturated medium. Utah State University Extension gives a sowing depth of about one-quarter inch, so apply a light covering instead of dropping seeds into deep planting holes. Press the cover gently to secure contact. Label the pot with plant name and sowing date before tiny seedlings appear.
Use a gentle spray or water from the tray below; a strong jet can displace seeds into one corner and defeat even spacing. Watercress germinates well in cool, wet conditions, but the exact speed depends on seed quality and local temperatures. Do not use a USDA hardiness zone number as a calendar date; check your season and frost risk.
Keep the rooted medium consistently wet
Inspect the reservoir at least daily during drying weather and replenish with clean water when needed. A wet pot is the point of this crop, but a stale container is not a substitute for care. Utah State Extension advises changing reservoir water once or twice a week; clean the outer tray as you replace the water and remove accumulated debris.
The roots need persistent contact with moist substrate, while the foliage should have good air exchange. If the medium shifts, algae builds heavily, or stems become mushy, investigate water quality, crowding and temperature rather than applying chemicals. Keep hands, shears and containers clean when growing a plant that may enter the kitchen.
Thin seedlings without pulling neighboring roots
When the plants show distinct compound true leaves, thin crowded patches carefully with clean scissors at the medium surface. This leaves the roots of retained seedlings undisturbed. A few vigorous rooted stems can fill the container over time. If you transplant, transfer a small intact root ball and keep it wet before, during and after the move.
Do not judge spacing by the number of cotyledons alone; first seed leaves look simpler than mature watercress foliage. Provide bright light while avoiding intense heat that stresses tender shoots. Where summers are hot, a cooler placement and shade during the strongest afternoon sun may help, but check that light remains sufficient for compact leafy growth.
Harvest shoots above living rooted nodes
Gather dark green, healthy young stems with clean scissors before the crop becomes very flowery. Locate a rooted lower node, then cut farther up on a leafy stem so the node and surrounding shoots remain alive. USU describes cutting established plants back to roughly four inches and allowing regrowth; do not strip every growing point at once.
Harvest only what you can use promptly. If a stem is slimy, foul smelling or growing in visibly questionable water, discard it rather than treating rinsing as a guarantee. Never assume wild watercress is food-safe merely because the stream looks clear: contaminants can be invisible, and safe cultivation depends on water and handling practices.

Diagnose bitter foliage and slow recovery
If older foliage tastes harsher after flowering or in very warm conditions, focus on tender new growth in cooler weather instead of waiting for a sweeter older leaf. University Extension notes that flavor and crop performance change as water warms. Spindly stems indicate inadequate light, whereas a scorched, stalled plant may need protection from intense midday heat.
Yellowing can reflect several causes, including nutrient shortage and stressed roots; neither a single photograph nor a universal feeding schedule diagnoses it. Check the condition of the root zone and water first. If disease is suspected, use local Extension diagnostic resources and sanitation before considering any product; food-use labels and safe handling matter.
Use a short pre-harvest safety checklist
Confirm that the plant is genuine watercress from a reputable source, not an unidentified stream plant. Check that container and watering tools are clean and that the water has not been shared with animals, runoff or untreated natural water. Then confirm that the harvested stems look sound, without rot, visible debris or a strong off odor.
These checks are not a microbiological test or a promise of pathogen-free produce. Wash harvested greens appropriately and follow current local food-safety advice, especially for anyone at higher risk from foodborne illness. If clean growing water cannot be maintained, do not harvest the crop for eating. Treat the water container as an actively managed garden system.
Related Guides
- How to Grow Watercress in a Container With Clean Water
- Vegetables in Pots: Match Crops, Container Volume, Sun, and Water
How We Research and Verify These Techniques
This guide was researched and fact-checked against extension.usu.edu, www.rhs.org.uk on October 29, 2026. We checked species names, germination or planting instructions, the plant stage used for cutting or harvest, and the cautions that apply to different growing conditions. The original illustrations are explanatory diagrams, not substitutes for observing a living plant. Where trusted sources describe different treatment for different seed lots, forms or regions, the difference is stated rather than silently averaged.
VegWin publishes independent growing information and does not imply sponsorship, approval or a partnership with cited institutions. This guide makes no affiliate product recommendation. Read our affiliate disclosure. Before using any pesticide or treating plant symptoms, identify the problem and follow current local Extension and product-label guidance; do not assume an illustration alone is a diagnosis.
No. True watercress is Nasturtium officinale; garden cress is Lepidium sativum and usually has a different growing routine.
No. Sow seeds shallowly in wet planting medium; keep the rooted pot wet using a clean water reservoir.
Utah State University Extension recommends about one-quarter inch beneath the surface.
No. Wild sites can carry pollutants or pathogens; the USU guide advises against collecting wild watercress for eating.
Leave living lower stems and rooted nodes intact, and maintain clean water and good light for regrowth.