
When a chive clump becomes crowded, splitting off random leaves will not make a new plant. Each successful division needs small basal bulblets and enough living roots to grow again. This guide follows the clump from lifting to replanting, showing where the crown belongs relative to soil and how to distinguish temporary transplant stress from failure.
Recognize a Mature Chive Clump
Common chives (Allium schoenoprasum) form bunches of slender, hollow cylindrical leaves above numerous small bulblets. Older clumps can develop a packed center that grows less vigorously than their younger edges. Division is often useful after several growing seasons rather than every time the plant blooms. Wisconsin Extension suggests dividing about every two to three years where a clump is crowded. Look at the whole root ball and foliage quality, not a strict clock: a healthy container may need attention sooner than a spacious garden planting. Make sure you are dealing with common chives rather than garlic chives, which have flat leaves and different flower heads. For the fuller picture, see our guide to growing chives.
Choose an Appropriate Cool-Weather Window
Early spring, when new growth is visible and temperatures are mild, is a practical time to divide hardy perennial chives. Minnesota Extension includes chives among herbs that can be propagated by spring division. In some climates, early fall works if enough mild weather remains for rooting before soil freezes; local Extension advice should guide that choice. Avoid lifting plants in extreme heat, saturated soil or drought unless a rescue is necessary. Water the clump beforehand if the soil is very dry, then allow it to drain so the root mass is workable rather than muddy. Division stresses roots; a mild day gives plants a better recovery window. For the basics, see our guide: When to Divide Rhubarb Crowns.

Understand What Makes a Viable Division
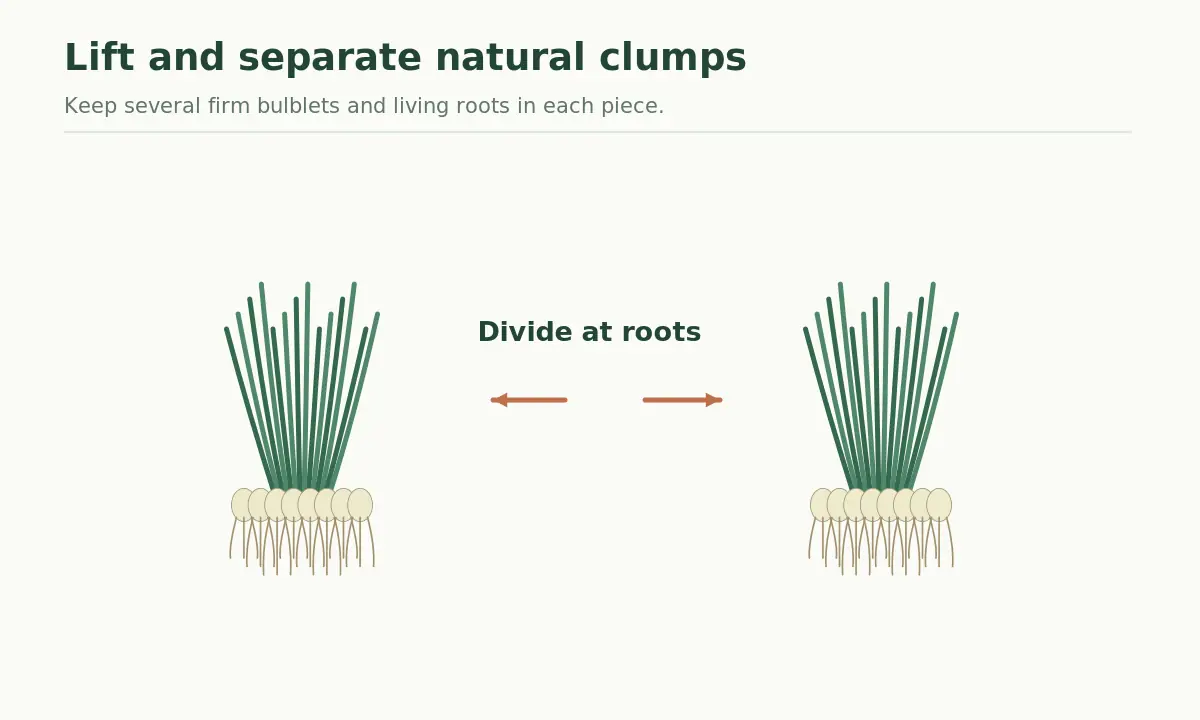
A chive clump is not one solid onion bulb. It is a cluster of many small basal bulblets, leaf shoots and fibrous roots growing together. A useful new division contains several attached bulblets and its own functioning roots. Wisconsin Extension recommends at least five bulblets for an established division. A bunch of chopped-off green tops with no roots is not equivalent to a rooted division and usually will not establish as a normal transplant. Examine the bases while separating the clump: pale bulblets should look firm, and roots should be flexible rather than slimy. Discard sections with obvious decay instead of moving them into a healthy new pot.
Lift the Plant Without Tearing Every Root
Use a narrow spade or hand fork to loosen soil around the perimeter, working far enough from the base to preserve most of the root mass. Lift the entire clump carefully onto a tray or a clean piece of cardboard. Knock away only as much loose soil as you need to inspect the bulblets. Tugging hard on leaf tips often breaks foliage without moving the densely knit root ball. If the clump is container-grown, tip the pot on its side and ease out the root mass; do not pull by the leaves. Sharp clean tools and a stable work surface prevent accidental crushing while you examine the underside of the clump.
Separate Bulblets Into Rooted Sections
Use your hands to tease apart natural groups of bulblets where possible. A clean knife can split a very woody or tightly tangled root mass, but aim to keep multiple live roots with each section. Make a few robust divisions rather than dozens of tiny weak fragments. Chive roots are relatively shallow; avoid repeatedly tearing them while deciding the final grouping. Trim visibly damaged root tips but leave functional fine roots attached. Keep divisions shaded and covered with a damp towel briefly if you cannot replant immediately, never sealed in stagnant water. Label pots if you grow several Allium types because their leaves look surprisingly similar after lifting.
| Division part | Healthy sign | Action |
|---|---|---|
| Bulblets | Several firm white bases | Keep groups together |
| Roots | Attached fine roots | Protect from drying |
| Crown | Firm junction near soil line | Do not bury deeply |
| Leaves | Hollow green shoots | Harvest lightly after recovery |
Set the Crown at Its Original Level
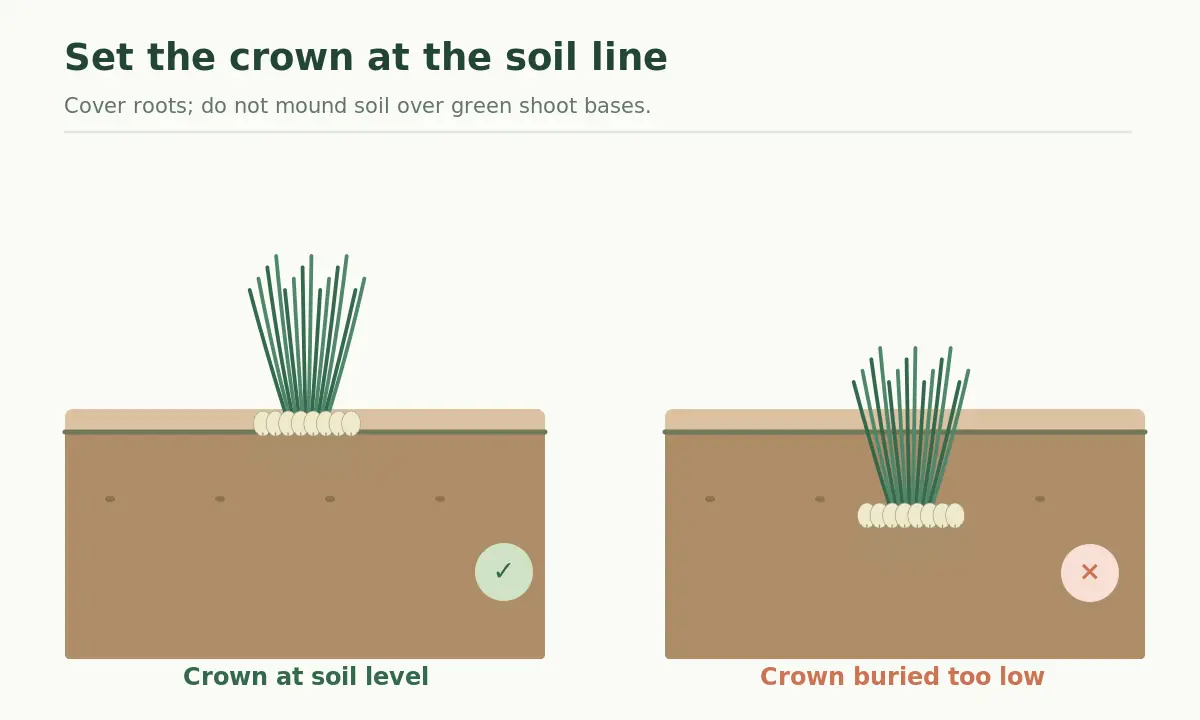
Replant each division with the junction between white bulblet bases and green shoots at approximately the original soil line. Bury the roots firmly enough to eliminate large air pockets, but do not mound soil up around the green leaf bases as if banking potatoes. A deeply buried crown may stay excessively wet. Place clumps far enough apart for their eventual spread; Wisconsin Extension describes roughly twelve to twenty inches between clumps for landscape growth. A small herb pot can be closer for short-term use, but a compact container still needs drainage and eventual renewal. Water gently after backfilling so the soil settles around the fibrous roots.
Choose a Pot or Bed That Drains
Chives perform well in garden soil or containers with regular moisture but do not benefit from roots sitting in stagnant water. Use a pot with open drainage holes and an appropriate potting substrate if growing indoors or on a patio. Outdoors, prepare a weed-free area with adequate light and room to expand. Do not fill the bottom of a pot with rocks and assume this replaces a drain hole. Indoors, place plants where they receive strong light; pale lanky leaves can signal inadequate conditions rather than a need for instant fertilizer. Keep the crown exposed at the same level regardless of whether the final location is a raised bed, border or container. For the fuller picture, see our guide “Grow Garlic Chives for Flat Leaves Without Letting the Plants Escape”.
Water In, Then Watch New Leaves
After transplanting, water thoroughly to settle soil around the roots and then let the surface begin to dry before the next irrigation. Keep moisture steady during establishment without creating standing water in a saucer. A few older leaf tips may yellow as divisions redirect growth to damaged roots. Do not mistake minor transplant stress for a reason to remove every leaf. Instead, look for firm new hollow leaves emerging near the center over the next weeks. In hot weather, temporary shelter from harsh afternoon sun can reduce wilting; return the plant to its normal brighter position once recovered. Consistent roots and new leaves are better success signs than instant top growth.
Harvest Moderately From Young Divisions
Freshly moved chives need green foliage to rebuild their root systems. Wait until vigorous new growth is underway before making a heavy harvest. For normal use, snip some leaves above the base instead of slicing into the bulblets. Wisconsin Extension describes using sharp tools to cut green leaves a short distance above the base and allowing leaves to regrow. Clean food-preparation tools before harvesting leaves for raw dishes. If many clumps are available, harvest from established ones first while new divisions settle. Repeatedly shaving a tiny transplant can stall establishment even if the original parent plant tolerated frequent trimming.
Prevent Crowding and Unwanted Seedlings
Mature common chives can produce round purple flower heads that attract pollinators. Deadhead before seed ripens if you want fewer volunteers; flowering itself does not mean the bulblet clump needs immediate division. Examine the center each spring and remove dead foliage to maintain visibility and airflow. If the plant becomes an impenetrable mass again after several years, repeat the same root-preserving method. Winter performance depends on region and whether the clump is insulated in ground soil or exposed in a small freezing pot. Rather than applying a fixed schedule everywhere, check the plant after seasonal dormancy and divide only when vigorous replacement roots can establish. Our walkthrough on how to grow garlic chives from seed and prevent unwanted self-seeding sets out each step.
Related Guides
How We Research and Check These Recommendations
This guide was reviewed on 2026-10-24 against horticultural guidance from Wisconsin Horticulture; University of Minnesota Extension; Maryland Herb Harvest Guide. We compare the advice with the precise crop, flowering habit, or pest life stage rather than copying a generic garden calendar. Timing and performance depend on region, season, cultivar, and plant condition; consult local Cooperative Extension for unusual disease or weather problems. This article is educational, not a substitute for product labels or local rules.
Sources, Transparency, and Practical Limitations
Source URLs and the claim each supports are recorded in the article metadata and linked above. We did not conduct a controlled trial in your garden, and no specific harvest yield, germination percentage or treatment success is guaranteed. VegWin does not claim a sponsorship or commission for the techniques mentioned here. See our affiliate disclosure for site-wide details.
Early spring is a reliable choice in many climates; mild fall timing may also work locally.
Wisconsin Extension suggests at least five bulblets along with living roots for strong divisions.
Loose severed leaves are not a substitute for divisions containing rooted basal bulblets.
Set the bulblet bases and crown near their previous soil level, covering the roots without burying leaf bases.
Let divisions establish and produce fresh leaves before taking a heavy harvest.