
A turnip patch offers two possible harvests: succulent roots, leafy tops, or some of each. The crucial decision is not a fixed number of days printed on a packet but whether the exposed root shoulder has reached the useful size for that cultivar. Roots left in hot, dry weather can become strong and stringy. This guide shows how to check turnip roots without tearing the bed apart, when to cut greens, how to lift an intact root, and why a turnip should not be treated like a long-season rutabaga.
Identify Turnips Before Using a Harvest Chart
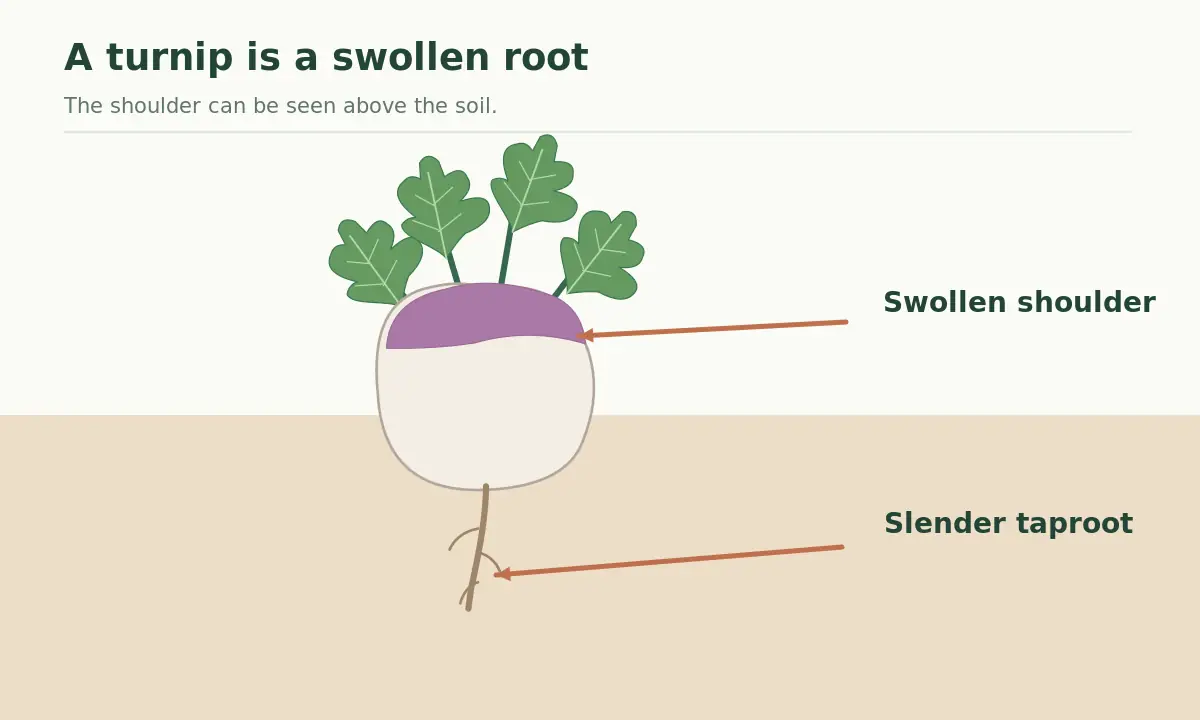
Turnips are Brassica rapa roots, usually round or flattened, with a recognizable swollen shoulder just above or at the soil line and a slender taproot below. Many have pale flesh and white or purple-topped skin, but varieties differ. A rutabaga is a different crop with a longer growing season, denser flesh and often a more pronounced neck. Do not use a rutabaga harvest calendar to delay a tender white turnip. Salad turnips are often picked even smaller than standard cooking types. Read the cultivar description before deciding that every root must reach the same diameter. A few early sample pulls help match a packet claim to your actual soil and weather. If you are starting from scratch, read When to Harvest Kohlrabi for Crisp, Tender Swollen Stems.
Look at the Shoulder Instead of Counting Days
Turnip shoulders swell where the leaves meet the upper storage root. Brush away only loose surface soil, without disturbing neighboring plants, and compare the exposed diameter with the cultivar description. Minnesota Extension gives roughly two to three inches as the usual size for many garden turnips. Small salad cultivars may be ready much earlier; root size is a better field check than a date alone. If all shoulders remain narrow, allow them more time with steady moisture. If a root is large, rough or cracked, harvest a test sample and taste the cooked or raw flesh before assuming that every similar root is still mild. Record what works in your garden.
Choose Between Greens and Swollen Roots
A dedicated greens planting can be harvested while plants are young, before substantial roots have formed. When the objective is a large, sound root, preserve a healthy leaf canopy: leaves supply energy to the swelling root. Removing nearly all leaves from a small root crop slows growth and can reduce quality. A limited outer-leaf harvest may be possible on vigorous plants, but it is not the same as harvesting a whole bunch of tops. Avoid tearing out the center growing point if you want a few leaves to regrow. Treat roots and greens as separate crop goals when planning a bed; that makes the harvest both predictable and easier to illustrate.
Keep Roots Tender Through Cool Conditions
Turnips are cool-weather brassicas. Heat and moisture stress can leave roots bitter, pithy or fibrous even when they are not especially large. Irrigate to maintain reasonably consistent soil moisture rather than alternating prolonged drought and soaking. Thin plants according to the seed packet so neighboring roots can expand without severe competition; do not assume thicker foliage signals bigger roots below. Cool fall weather often improves the eating quality of roots, yet plants should be collected before the ground freezes so hard that lifting damages them. USDA hardiness zones do not tell you an exact harvest date: sowing window, cultivar, weather and soil condition do. If you are starting from scratch, read When to Harvest Kohlrabi for Tender Stems, Not Woody Bulbs.
Lift a Test Root Without Snapping It
Loosen ground beside the swollen root with a hand fork when the soil is firm. Keep tines away from the center of the root to avoid puncturing the edible portion. Grasp foliage near the crown and lift steadily after the soil gives way; tugging dry compacted soil can tear tops off. Shake rather than bang off clinging soil. Check the root for sound, unbroken skin, and sample the flesh at the desired stage. Large roots often have a strong taste or coarser texture. By lifting a couple of trial roots in different sections of the bed, you can decide whether the remainder should be harvested now or left to enlarge.
| Harvest goal | Visible sign | Next step |
|---|---|---|
| Tender salad roots | Small firm shoulders | Lift and taste a sample |
| Cooking turnips | Usually 2–3-inch roots | Loosen soil and pull carefully |
| Greens | Young tender foliage | Pick leaves or whole young plants |

Use a Simple Size and Weather Decision Table
The same bed may carry marble-sized salad roots, two-inch cooking roots and a few overlarge roots. Group them by intended use before harvest rather than forcing them all into one grade. Salad types can be excellent young, while an ordinary cooking turnip is often desirable at medium size. When growth is rapid in cool weather, a second check in several days can prevent overripeness. When heat arrives, texture may worsen instead of improving with extra time. A split or woody specimen is a warning to inspect nearby roots promptly. Do not turn these descriptive sizes into a universal maturity standard for every heirloom or specialty cultivar. For the basics, see our guide: When to Harvest Rutabagas for Full-size Roots and Better Fall Flavor.
Separate Greens From Roots After Lifting
Trim leafy tops from harvested roots soon after picking so leaves do not draw water out of the storage tissue. Put roots and sound greens into separate clean bags or containers. Remove yellowing or pest-damaged leaves and thoroughly wash edible tops in clean water before use. Keep the produce cool and prevent crushing. For a small kitchen batch, refrigeration works better than leaving harvested turnips in the sun at the side of the bed. The greens are far more perishable than sound mature roots and should be used promptly. Do not wash and store muddy roots in standing water; drainage, cleanliness and moisture management matter. Our walkthrough on how to grow turnips for tender roots and edible greens sets out each step.
Avoid Confusing Root Cracks With Harvest Readiness
Long dry spells followed by sudden heavy rain can split expanding turnip roots. A crack is not a signal that the plant has reached the best culinary size; it can be a consequence of uneven water supply. Inspect any split root for decay and use sound harvests promptly rather than promising long storage. Small holes in greens may indicate flea beetles or other insects but do not prove the root is ruined. Conversely, internal root pest injury may not be evident from leaves alone. Sample several roots, inspect inside as needed, and consult local Extension identification guidance before applying any pesticide. Good diagnosis beats treating every cosmetic mark as the same problem.

Plan the Following Turnip Planting More Precisely
Turnips can be planted in sequences during suitable cool periods, but sowing dates should be based on local frost windows, expected heat and cultivar days to maturity. Maintain space for healthy roots and harvest a section before the bed becomes crowded. Where crops share soil with cabbage, kale and broccoli, rotation can reduce some brassica pest and disease pressure. Write down the actual harvest diameter and eating quality, not just the date. A late-summer sowing in a cool climate may behave very differently from a spring crop entering warm weather. These notes can improve later plantings without false calendar precision. Our walkthrough on how to grow rutabagas for a long, cool fall harvest sets out each step.
Make the Final Harvest Choice in the Garden
Stand at the bed with a ruler, a clean harvest container and the seed packet. Check a few exposed shoulders, loosen and lift one representative root, and look for firm unblemished flesh. If tender and sized for the kitchen, collect the rest of that group; leave smaller sound roots briefly if weather allows. Collect greens separately if that is the intended crop. Avoid overgrown roots whose texture is already fibrous. If the ground is becoming frozen, do not wait for an imagined frost-triggered improvement required of a different crop. Harvesting the turnip at an appropriate size is more dependable than chasing a universal number of days.
Related Guides
- How to Store Root Vegetables: Sort, Cool, and Prevent Spoilage
- How to Harvest Turnip Greens From Thinnings or Whole Plants
How We Research and Verify This Guidance
This article was checked on 2026-10-24 against plant-specific university Cooperative Extension and government guidance: University of Minnesota Extension; Virginia Cooperative Extension; Illinois Extension. We separated directly supported cultivation, pruning, and insect-life-cycle recommendations from choices that depend on local weather, crop genetics, and gardening goals. Illustrations are simplified teaching diagrams, not photographs or treatment labels. Consult your regional Extension office for local timing, pest identification, and regulations.
Sources, Disclosure, and Regional Limitations
Source links and their supported claims are preserved in the article metadata and linked above. No field trial was performed for this particular garden, and results are not guaranteed. This guide does not assert a paid partnership or endorse a pesticide product. Review VegWin’s affiliate disclosure for site-wide transparency.
Many standard turnips are harvested around two to three inches in diameter; smaller specialty varieties may be ready sooner.
A few outer leaves can be taken from vigorous plants, but heavy removal reduces the leaf area needed to swell roots.
Cool conditions support quality, but heat avoidance and cultivar matter; do not postpone harvest until frozen soil damages roots.
Color identifies the skin or cultivar, not reliable tenderness. Inspect shoulder size and test a root.
Separate edible tops promptly to prevent moisture loss and refrigerate clean greens and roots appropriately.