
Seedlings raised under grow lights are not automatically ready for a full day of wind and direct sunlight. Hardening off is the process of gradually acclimating healthy young plants to the outdoor conditions they will face after transplanting. It is a distinct step after germination and seedling care, not a substitute for them. The aim is controlled exposure followed by observation: start sheltered, extend time cautiously, and postpone transplanting if cold, damaging wind or intense sun make a particular day unsuitable. The familiar seven-to-fourteen-day range is a planning guide, not a rule that overrides real weather or differences between tomatoes, brassicas and other crops.
Check Seedlings and Local Weather Before Day One
Start with reasonably healthy transplants that have adequate roots and established foliage rather than freshly emerged seedlings. Inspect for wilting, disease, insect damage and drought stress before moving a tray. A weak plant may need improved indoor conditions instead of added outdoor stress. Look at your local short-term forecast for cold nights, strong winds, heavy rain and bright hot afternoons. University of Nebraska Extension recommends beginning on a mild or cloudy day with a short sheltered exposure rather than taking trays directly into full sun.
Some cool-season transplants tolerate cooler conditions than warm-season tomatoes, peppers or basil. The acceptable overnight temperature is crop-specific, and temporary acclimation never overrides the risk of frost injury to a tender crop. If the weather is too cold or stormy, keep plants inside or in an appropriately protected space and resume when conditions improve. Do not interpret hardening as a test of how much freezing a tomato seedling can survive. Label trays so different crop groups can follow different schedules.
Begin With a Short Sheltered Shade Session
On the first suitable day, place transplants in bright shade or dappled light, sheltered from gusts. Nebraska Extension describes a starting session of approximately two to three hours on a mild day; use that as a reference rather than a mandatory exposure time for a scorching or windy location. Avoid hot pavement that can heat containers and dry the root zone unexpectedly. After the session, move seedlings back to an appropriate indoor or protected position and look for scorch, drooping or damaged stems.
The purpose of the first session is a low-risk trial of ambient air, outdoor brightness and movement. Sudden direct sun may damage foliage developed in relatively weak indoor light. Wind can dry tender leaves and topple top-heavy transplants even when temperature is otherwise suitable. A shaded porch can be useful only if it is not a wind tunnel or reflective hot spot. Record the start and end of exposure and the plant response; those observations matter more than checking off an arbitrary number on a calendar.

Increase Light and Time Only When Plants Respond Well
Over following suitable days, extend outdoor exposure and introduce gentle morning sun, then more direct light as tolerated. Both Nebraska and Minnesota Extension describe a gradual progression over roughly one to two weeks. The exact schedule should respond to cloud cover, crop and local weather. On a sunny day after several cloudy sessions, a sudden several-hour exposure can still be excessive. A plant that stays upright and shows no new bleaching or wilting is providing reassuring, though not definitive, evidence that the current step is tolerable.
Increase wind exposure just as cautiously as sunlight. Heavy trays should not be placed where they can fall, and small pots can dry faster outdoors. Check moisture in the rooting mix, not only the visible tray surface. Do not deliberately wilt seedlings as a way of training them. Nebraska Extension discusses gradually reducing watering during acclimation without allowing transplants to wilt. Keep watering based on plant condition and medium, and avoid converting that statement into a universal withheld-water schedule.
Handle Cold Nights, Rain and Heat Interruptions
A ten-day weather window rarely follows a perfect chart. If a cold front or thunderstorm arrives, pause the progression and shelter seedlings. One or more protected days do not ruin the process; resume with exposure that matches their recent tolerance rather than assuming they are completely hardened. Bringing plants indoors overnight is appropriate while conditions remain unsuitable for that crop. Watch sheltered cold frames because direct sunlight can overheat an enclosure even on a cool day.
Rain may be gentle or damaging depending on intensity, pot drainage and tray placement. Do not leave cell trays submerged in standing water. During hot sunny weather, provide temporary shade and check root moisture more often while plants are adapting. Transplants can experience leaf scorch from sun and desiccation from wind at the same time, so do not diagnose every limp leaf as a fertilizer deficiency. Record what changed just before the symptom appeared. A successful progression is one the plant tolerates, not one that follows an inflexible numbered list.

Recognize Stress Before It Becomes a Setback
Look for pale or bleached patches on leaves after sudden sunshine, dry leaf margins after wind, stems knocked sideways, or sustained wilting despite reasonable moisture. These observations help identify the type of stress, but they do not prove one cause in isolation. Shift the tray back to shelter, examine root-zone moisture and recheck weather exposure. Leaves already scorched may not turn green again, so judge recovery partly by new healthy growth rather than demanding that injured tissue reverse.
If a tray contains multiple varieties, avoid assuming they acclimate identically. Large tomato seedlings can have more foliage exposed to wind than short young lettuce transplants. Crowded trays also shield plants unevenly; rotate positions only after observing their exposure pattern. Never spray pesticides, oils or homemade leaf coatings to treat presumed sunscald. For persistent collapse, stem lesions or a pest infestation, use a diagnostic Extension resource and postpone transplanting until you understand the problem.
| What happens | What it suggests | Next response |
|---|---|---|
| Leaves bleach after bright sun | Possible abrupt-light damage | Move to shade; resume exposure gently |
| Seedlings wilt in wind | Possible drying or mechanical stress | Shelter and assess root moisture |
| Cold nights forecast | Transplant risk for tender crops | Pause and protect; check crop tolerance |
| Tolerates outdoors, soil still cold | Hardening alone is not planting readiness | Follow regional soil and frost guidance |
Use a Transplant-Readiness Checklist
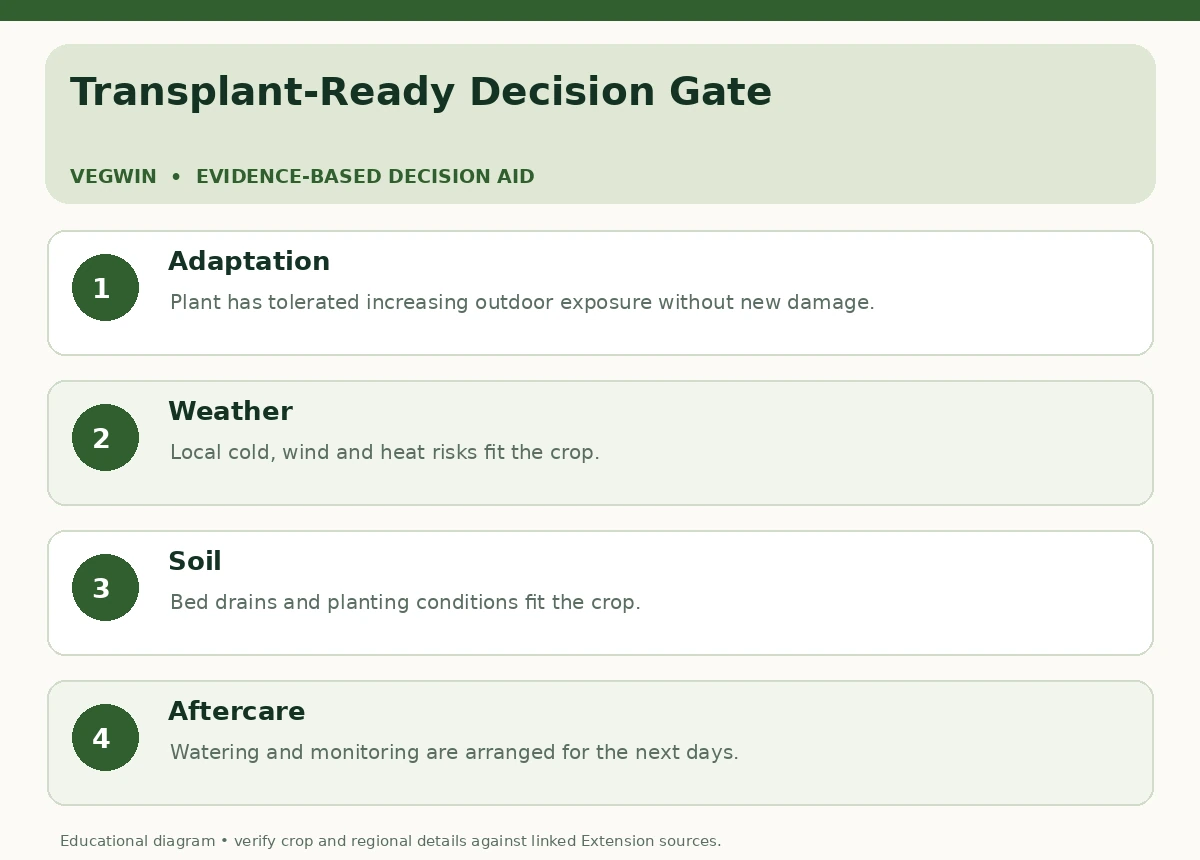
The final decision needs three conditions: the seedlings have tolerated extended outdoor daytime exposure, local weather is suitable for their crop, and the garden soil is ready. Hardening off does not itself guarantee that soil temperatures support root growth or that nighttime cold has passed. Check local Extension planting recommendations and the forecast for the days after transplanting. Select a cloudy or calm late-day planting window if feasible; Minnesota Extension recommends conditions that reduce immediate transplant stress.
Water transplants appropriately before handling, preserve root balls and avoid crushing stems. Set each crop at its recommended planting depth rather than treating tomato planting instructions as universal. After transplanting, check root-zone moisture and monitor leaves over the next several days. Temporary shade or an appropriately used row cover may reduce wind and sun stress, but must not overheat the crop or substitute for correct timing. If a severe cold snap is coming, it is better to delay planting than claim every hardened seedling is frost-hardy.
Keep This Step Separate From Indoor Seed Starting
Indoor seed-starting guides focus on germination, growing media, lighting and early seedling health; this page begins when functioning transplants are ready to practice outdoors. It also differs from a frost-cover guide: a cover protects established plants during a specific weather event, whereas hardening gradually changes exposure across multiple days before planting. Readers who have leggy seedlings should correct inadequate light first. Readers with forecast frost should deal with cold safety instead of pushing through an acclimation chart. If you want the full process, read how to harden off seedlings when spring weather keeps changing.
Maintain a reusable notebook with the crop, date of first exposure, conditions, progression and transplant outcome. If transplants consistently scorch on their first sunny day, restart with more shade next batch. If they repeatedly wilt in wind, shorten those sessions and inspect pot moisture. A practical record yields stronger lessons than a claim that every species can go outside on the same date. Keep the plant’s condition and the local weather at the center of each transition decision. If you want the full process, read how to harden off and transplant pepper seedlings at the right depth.
Related Guides
How We Research and Maintain This Guide
We checked the linked sources on October 19, 2026. Claims below are tied to specific university Extension or National Center for Home Food Preservation guidance, not to invented trials, a product endorsement, or universal regional conditions. These original graphics are simplified decision aids, not diagnostic photographs. The site owner should check local Extension recommendations, crop identity, packaging instructions and WordPress overlap before manually publishing. Timing is a flexible framework, not a cultivar-specific temperature prescription. Local cold tolerance and forecast should override the sample acclimation sequence.
Evidence and further reading: [1] University of Nebraska Extension [2] University of Minnesota Extension [3] University of Minnesota Extension
All three buttons lead to independent educational sources and are not paid recommendations. We checked sources including affiliate disclosure.
University Extension guides commonly describe gradual acclimation over roughly 7–14 days, but weather, crop and plant response determine the practical pace.
Avoid sudden full exposure. Start in sheltered shade for a short period and add sun gradually as the seedlings tolerate it.
Only when overnight conditions are safe for that crop and the plants have already adjusted. Bring tender seedlings inside during cold risk.
No. Some guides discuss gradually reducing watering without wilting, but you must maintain enough root-zone moisture for healthy transplants.
Hardening does not make frost-sensitive crops reliably frost tolerant. Check the actual forecast and local planting guidance before transplanting.