
A first vegetable garden is a set of small decisions about light, water, soil, access and what your household will actually eat. Buying a dozen tempting seedlings before you choose a workable location often creates the hardest problems later. Begin with one patch you can maintain and expand after learning how it behaves. This guide supplies a site-scoring and weekly-work plan for a first season; it is not an encyclopedic crop calendar or a second tutorial about raised-bed soil. Local last-frost dates, soil conditions and specific crops control planting time. The USDA hardiness-zone number alone does not tell you when an annual vegetable should go into the ground.
Measure Sun, Water Access and Drainage
Walk the yard during morning, midday and late afternoon before selecting the plot. University of Maryland Extension recommends at least six hours of direct sun for most vegetables, while more is usually useful for fruiting crops. Watch shade from buildings and deciduous trees; an apparently sunny spot in winter may be shaded during the main growing season. Choose a place where a hose can reach without being dragged through fragile seedlings. If access is difficult, watering is likely to become the task you skip when life gets busy.
After rain, check for standing water and runoff channels. Avoid low, poorly drained soil where roots may stay waterlogged, and consider a different growing method if the ground cannot be improved safely. Make sure you can reach the planting area without walking on growing soil. Check overhead shade, underground utilities and property constraints before digging. If an area near an old painted structure, roadway or industrial land may have contaminated soil, ask the local Extension or testing laboratory about appropriate testing before planting food crops.
Start With a Bed You Can Reach
A small in-ground bed, raised bed or several containers can all be valid beginner choices. Select the format that addresses your actual constraint: poor native drainage, compacted ground, physical access or lack of yard space. University of Maryland suggests starting small rather than treating a large plot as the expected beginner size. Sketch the usable shape and the paths before choosing crop count. A narrow bed reachable from either side is usually easier to weed and harvest than a wide planted rectangle with no access.
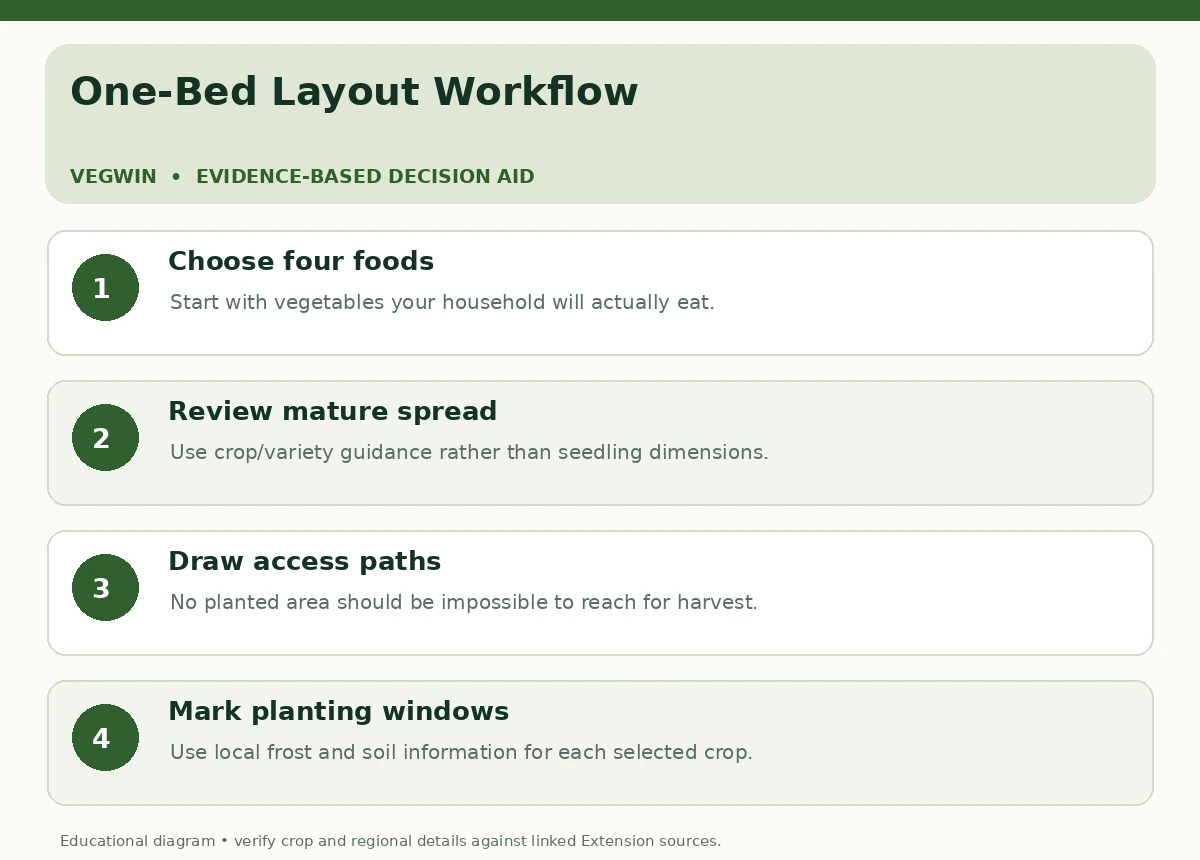
Draw each crop at its expected mature spread rather than at seedling size. Include an access route for harvesting and maintenance and put tall plants where they will not unnecessarily shade low-growing crops. Read plant labels for growth habit and recommended spacing, accounting for trellises, stakes or sprawling vines. Three healthy well-spaced plants can serve a beginner better than a crowded bed that is difficult to inspect. Containers also count as a garden, provided they have drainage and sufficient root volume for the specific crop.

Learn What the Soil Needs Before Adding Inputs
Send a representative soil sample to an appropriate testing service before deciding which nutrients or amendments to add. A soil test can describe pH and nutrient status; it cannot tell you everything about drainage or past contamination unless the relevant analyses are requested. University of Wisconsin Extension notes that compost improves many soils but soil testing should direct major fertility corrections. Avoid a guessed fertilizer rate, and do not apply lime simply because someone else’s garden needed it.
Remove established weeds or turf thoughtfully, protect existing utilities and disturb soil only as much as needed to prepare a stable seedbed. Do not work waterlogged soil into hard clods. Where soil quality or history is uncertain, a suitable raised bed or container medium may offer a more controllable starting point, but imported growing material should also be sourced responsibly. Mulch can help moderate weeds and moisture once plants are established. Treat a product label and local soil-testing recommendation as your authority for any nutrients.
Choose Crops for Food, Space and Season
Write down four vegetables you genuinely like to cook, then check their mature size, whether they should be direct sown or transplanted, and whether your local season supports them. Leafy greens and radishes can fit smaller spaces; tomatoes and vining crops may need stakes, growing room or a longer suitable season. These are starting points, not universal guarantees. A beginner should distinguish cool-season crops from warm-season crops and use local Extension schedules rather than planting all packets on the same weekend.
Review seed packets for maturity estimates, germination instructions and variety characteristics. Planting dates for lettuce, peppers or beans can differ markedly within the United States. A USDA plant-hardiness map concerns long-term winter cold for perennials; it does not replace local frost information, soil temperature, crop tolerance or a current weather forecast. Separate short crops from long-lived crops on the sketch so a quick harvest does not become trapped under a trellis or shaded by late-season foliage.
Build a Watering and Inspection Routine
Before planting, decide how you will check root-zone moisture instead of choosing a fixed watering frequency from a generic chart. Rainfall, wind, growing medium, mulch, root depth and container size alter water demand. A finger check near the root zone or other appropriate moisture assessment helps you avoid both drought and waterlogging. Water where roots are growing rather than merely misting leaves. Ask who will water during travel or heat waves; a garden is not self-maintaining during a week away.
Assign brief recurring tasks: notice new emergence, check leaf undersides for pests, pull small weeds, tie growing stems, and harvest crops when ready. Use the crop-specific Extension diagnosis before trying pesticides or home remedies. A paper log with dates, rainfall, watering, sowing and harvest notes is often more valuable than a complicated app. If weekly care is already a strain, reduce the crop count rather than adding fertilizer or assuming equipment will automatically fix the problem.
| First-bed decision | What to observe | Practical response |
|---|---|---|
| Sun | Direct light across the growing season | Favor sunny workable spot; adapt crops to actual light |
| Soil and site history | Drainage, weeds, potential contamination | Test as needed before changing soil |
| Layout | Access paths and mature crop spread | Start with few crops and reachable rows |
| Time and water | Who inspects and irrigates each week | Reduce planted area if routine is unrealistic |
Run a Seven-Day Site and Maintenance Trial
Before investing in plants, try a simple rehearsal: observe hours of useful light, carry water to the site, walk intended paths, and check how the soil behaves after rainfall. Note any animals that regularly visit. This trial cannot predict every season’s problem but can reveal a garden that looks attractive on paper and is inconvenient in practice. If the best sunny space is a small patio, use suitable containers rather than forcing a larger shaded garden bed.
Next draw one scaled plan, list the chosen crops and estimate who will do each task. Reconcile your crop wish list with realistic mature spacing and the time you have available. Stage purchases after the plan rather than trying to use every packet you already own. If a crop fails, document what occurred and change one factor next season. The outcome of a first garden should include a workable routine and knowledge of the site, not just a harvest photograph. Our guide “Square Foot Gardening” shows how to plan a bed without crowding your crops.

Know When to Expand or Change the Design
Evaluate at midseason: Can you reach every plant? Does water reach the root zone? Is one crop dominating your light or time? Are you harvesting foods your family uses? If the answer to several questions is no, redesign before enlarging. Add one new crop or one new bed only when existing plants are reasonably maintained. Keep in mind that a garden site may look different after nearby trees leaf out or summer heat changes watering needs. Our guide “Garden Layout Ideas That Work” shows how to plan sun, access, water, and crop height.
For deeper instructions, separate follow-up guides answer how to build raised-bed soil, grow tomatoes or start seeds indoors. This article is deliberately the upstream decision plan: choosing a site, selecting a manageable growing system, and committing to basic care. Do not mechanically duplicate those crop-specific tutorials under a new beginner title. Check whether your local Extension offers soil-testing, vegetable calendars and garden clinics, and treat its recommendations as the appropriate regional correction to this national starting framework. Our guide “No-Dig Gardening” shows how to start a mulched vegetable bed without tilling.
Related Guides
How We Research and Maintain This Guide
We checked the linked sources on October 19, 2026. Claims below are tied to specific university Extension or National Center for Home Food Preservation guidance, not to invented trials, a product endorsement, or universal regional conditions. These original graphics are simplified decision aids, not diagnostic photographs. The site owner should check local Extension recommendations, crop identity, packaging instructions and WordPress overlap before manually publishing. This is a US-wide first-bed workflow, not a crop planting-date table; soil safety and regional crop dates require local testing and Extension input. Live site taxonomy and cannibalization still require editor verification.
Evidence and further reading: [1] University of Maryland Extension [2] University of Wisconsin Extension [3] University of New Hampshire Extension
All three buttons lead to independent educational sources and are not paid recommendations. We checked sources including affiliate disclosure.
Small enough to reach, irrigate and maintain consistently. Maryland Extension suggests a modest starting plot, but the right area depends on your time, space and crops.
Choose based on drainage, available space, access, soil safety and crop root needs. None is automatically best for every site.
No. For annual vegetables use your local frost dates, soil temperature, crop tolerance and current weather with regional Extension guidance.
Do not assume so. Request a relevant soil test and follow its guidance along with crop needs and product labels.
Record light, moisture, temperature, soil and symptoms. Check Extension diagnoses and revise one likely limiting factor rather than trying several unverified treatments.