
Petunia seeds can look like grains of pepper and are easy to lose in ordinary potting mix. The mistake that causes many failed trays is treating them like a large vegetable seed: digging a hole and burying them where light cannot reach. Petunias need a moist surface and suitable light to germinate, so the first few days look different from starting beans or nasturtiums.
Growing petunias from seed is worthwhile when you want unusual colors or larger quantities, but it involves careful light, moisture, and timing. Start with a small labeled tray, not a whole garden bed of fine seed, and plan for enough weeks under lights to develop sturdy plants before outdoor weather is safe.
Count backward from the safe outdoor planting date
Petunias are tender bedding plants. Iowa State University Extension recommends starting seeds indoors about ten to twelve weeks before the anticipated outdoor planting period, while University of Minnesota lists petunias among flowers started well ahead of spring transplanting. Use your local final frost risk and the seed packet rather than a universal hardiness-zone date. Starting much earlier than you can provide good lighting often creates lanky, root-bound seedlings waiting inside for warm weather. Starting later may still succeed but naturally delays flowers. Keep your first tray modest enough that each seedling can eventually have its own cell. Set aside a clean fine-textured seed-starting mix, a leak-free watering area, a clear humidity dome, and an adjustable light. If you buy pelleted seeds, know that the coating simply makes the tiny seed easier to place; it does not change the species’ basic need for moisture and light. If you want the full process, read how to start petunias from seed indoors without burying tiny seeds.
Moisten the medium before placing the tiny seeds
Fill a shallow clean tray with a seed-starting medium that drains freely and has a smooth surface. Iowa State advises moistening the medium first, often by allowing the container to wick water from below, then letting excess liquid drain. This minimizes the chance that an overhead jet will wash your carefully placed seeds into one corner. Do not use chunky garden soil full of clods or untreated yard debris; the seed is too small to bridge coarse gaps reliably. Smooth gently without compacting the tray like a brick. Sprinkle seed sparsely or use a damp toothpick for individual seeds. Label immediately, since petunia seedlings will look similar to many other bedding plants at first. If the medium seems saturated or smells sour, allow it to drain before sowing. Your aim is contact between seed and moist surface, not a pool of water under a plastic lid.
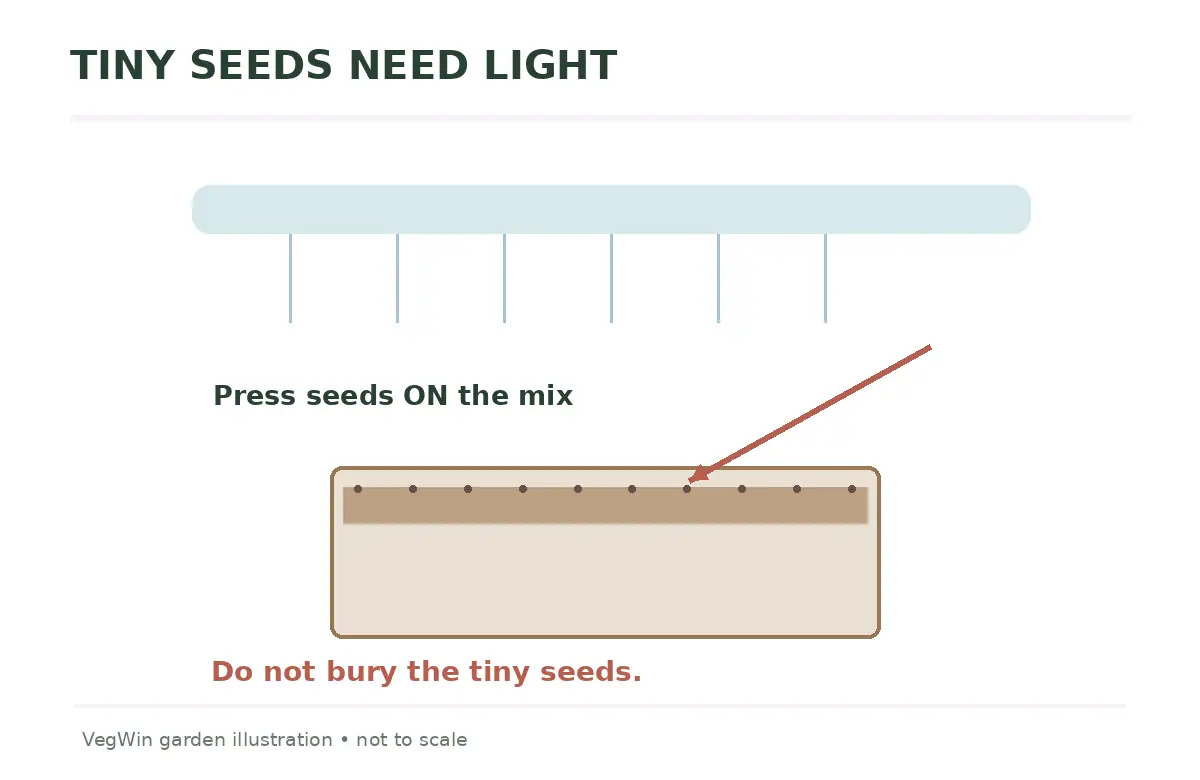
Press seeds onto the surface and keep light available
Iowa State and University of Maine Cooperative Extension both state that petunia seed requires light for germination. Press each seed lightly into the moistened surface; do not bury it under a normal layer of potting mix. Where a general seed-starting chart recommends covering seeds twice their width, the species-specific light requirement overrides that generic rule. A tiny dusting of translucent material may be used by experienced growers, but leaving the seed visible is the clearer home method. A clear dome or plastic cover helps retain surface moisture while seeds are germinating. Keep the container in bright light but away from direct sun that can overheat the enclosed tray. If you are using a heat mat, follow the seed packet and the equipment instructions; do not assume maximum heat is better. Check moisture frequently rather than trusting a sealed dome for weeks. If you want the full process, read how to sow sweet alyssum seeds indoors or outside.
Remove humidity cover promptly after emergence
Under favorable conditions, Iowa State reports that petunia seeds commonly germinate in about seven to ten days. Seed age, medium conditions, and cultivar differences can change that, so do not declare failure after a single quiet week. Once seedlings appear, remove the humidity covering rather than keeping them in saturated still air. Give seedlings strong supplemental light or an exceptionally bright suitable window, and provide normal air exchange. Iowa State recommends placing grow lights roughly four to six inches above young plants and providing twelve to sixteen hours of light daily; follow fixture safety instructions and adjust as plants grow. A normal dark period is healthy; permanent 24-hour illumination is not required. Water gently, allowing the medium to approach—but not reach—complete dryness between irrigations after seedlings are growing. Stretching toward a distant lamp is a cue to change lighting, not pour on fertilizer. Our walkthrough on how to start strawflower seeds indoors and transplant strong plants sets out each step.

Move seedlings when they have true leaves and real roots
The first seed leaves are not the same as the mature, species-typical leaves that appear afterward. Iowa State recommends transplanting petunias to cell packs or individual containers when seedlings have about three true leaves. Lift them with a small tool under the roots instead of tugging on delicate stems. Replant into a suitable moist potting mix and give them room for air circulation. A few days of careful observation matters more than forcing growth with a concentrated fertilizer. If you use a commercial mix containing slow-release fertilizer, avoid adding extra feed automatically; if it contains none, follow its manufacturer and Extension guidance for cautious diluted feeding. Retain the strongest plants, and avoid pulling tangled extras if doing so would uproot the one you want to keep. Label cultivars separately because trailing and mounding petunias eventually need different spacing.
Harden off plants before exposing them to outdoor weather
Seedlings grown under controlled indoor lights need time to adjust to outdoor sun, wind, and fluctuating temperature. Begin with short protected outdoor exposures during mild weather, then gradually increase time and light over several days according to current conditions. Bring them back inside when damaging cold or harsh wind is expected. This process is called hardening off and is recommended by Iowa State before final transplanting. Do not place a whole tray directly into midday sunshine for its first outing: tender leaves can scorch even when they looked dark green under lamps. Choose a final growing site that fits your petunia type and receives suitable sunlight and drainage. Water the transplants well at planting, then monitor root-zone moisture rather than merely wetting the top of the leaves. Slow acclimation is more reliable than trying to rush the final step after weeks of careful seed starting.

Troubleshoot the tray by the stage that failed
If nothing germinates, revisit surface light access, moisture, seed age, and whether the tray became too hot under clear plastic. If seedlings emerge and collapse at the soil line, inspect hygiene and dampness; damping-off and waterlogging are different from an ordinary slow germination problem. Also, if seedlings stay upright but stretch into pale threads, bring appropriate light closer and avoid warm, dim conditions. If plants stop growing after potting, check that roots were not torn and that the new mix drains freely. A bright but not scorching growing area and steady observation usually solve more problems than adding another input. Keep brief notes: sowing date, seed packet, emergence date, light placement, and when the dome came off. The next tray becomes dramatically easier to manage when the previous failure has a clear stage and likely cause.
How We Research and Compare These Gardening Instructions
This is a title-and-intent overlap review, not a line-by-line analysis of all previous WordPress articles. Conditions vary with plant species, cultivar, weather, and region; confirm local restrictions and follow your own Cooperative Extension for climate-specific questions. The diagrams are original not-to-scale educational illustrations. This page includes no paid recommendations or approved affiliate partnerships. Please consult our affiliate disclosure.
Sources checked on October 22, 2026: 1. yardandgarden.extension.iastate.edu — Species-specific surface sowing, germination environment and transplant stage. 2. extension.umaine.edu — Petunia light requirement and care when sowing very fine seeds. 3. extension.umn.edu — Indoor timing, lighting, hardening off and seedling handling.
No. They need light to germinate; press the tiny seeds onto the moist surface.
Iowa State reports roughly seven to ten days under favorable conditions; cooler or inconsistent conditions can extend this.
Remove the cover promptly when seedlings appear to improve air circulation and reduce saturated conditions.
Move them carefully into cells when several true leaves have developed, as recommended by Iowa State.
Insufficient light, excessive warmth, or overcrowding are common contributors; assess light distance and growing conditions.