
Petunia seeds are so small that they are easy to lose in a pinch of dry potting mix. They also require light for reliable germination. Unlike a bean seed, a petunia seed belongs on a pre-moistened surface, gently pressed into contact, not covered by an opaque layer of soil. Many commercial packets contain pelleted seed coated to make handling easier; the coating changes size, not the embryo’s light requirement. Good drainage, steady moisture, prompt removal of a humidity cover and strong light after emergence are the main steps.
Recognize an ordinary seed versus a pellet
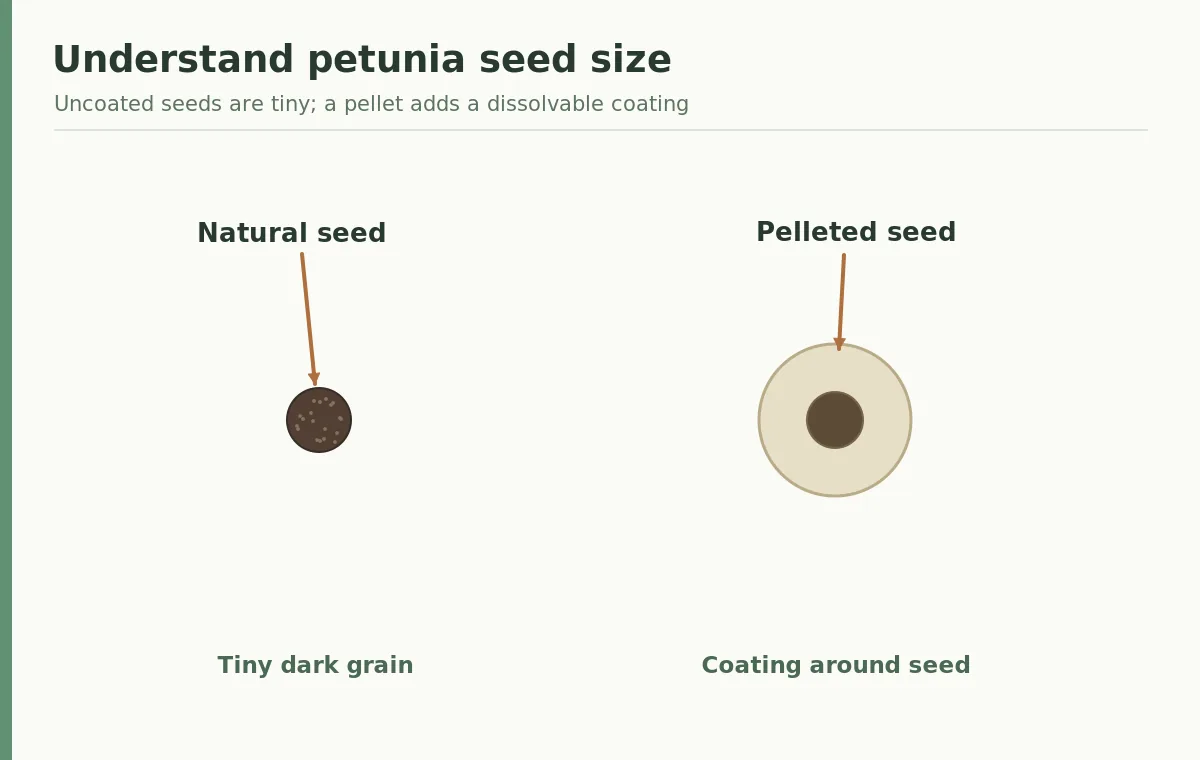
Natural petunia seed is extremely small, resembling a dark speck rather than a pea or a marigold seed. Pelleted seed is a rounder, larger bead with a dissolvable coating around a much smaller embryo. Neither should be mistaken for a young seedling. Petunia plants later have branching, softly hairy green stems, oval leaves and recognizable funnel-shaped five-lobed flowers, often in purple, pink, white or patterned colors. A seedling first shows simple cotyledons; the mature bloom is not present in the germination tray. Use the packet label to confirm what you have.
Count backward from a local planting window
Iowa State Extension suggests sowing roughly ten weeks before the planned outdoor planting date in its region, after the danger of frost has passed. That is an example, not a promise that every location should use the same month. Check local frost history, shelter and the space you have for growing seedlings indoors. Sowing too early can yield cramped, weak plants waiting for warm soil. Choose a calendar that gives seedlings time to grow several true leaves and be hardened off gradually before permanent planting. Keep the variety label with the tray.
Prepare a clean draining seed-starting tray
Use fresh, fine-textured seed-starting mix in clean cells or a shallow tray with drainage holes. Coarse bark chunks can swallow seeds at this scale; garden soil may form a hard crust. Moisten the medium before sowing, preferably from below or with a fine mist, and let excess water drain. Smooth the top gently without creating a compressed surface. The seed should contact damp medium and still be exposed to light. A sealed, saturated tray lacks the air roots need once germination begins. Clean equipment reduces preventable damping-off problems.
Press petunia seeds onto the surface
Scatter tiny uncoated seeds thinly or place pellets individually on the pre-moistened medium. Press them gently into contact with a flat tool, but do not push them below an opaque soil layer. Iowa State Extension explicitly says petunia seeds need light to germinate and should not be buried. The useful diagram shows seeds at the top line and growing roots below that line only after germination. If a pellet has not dissolved, wet it delicately without blasting it sideways. Avoid sprinkling vermiculite thickly enough to block light.
Keep light and humidity in balance
The Extension guide describes warm conditions near 75–80°F for germination, with bright light and uniform moisture. A clear dome can help retain humidity briefly, but sunlight beating on a closed dome can overheat the tray. Remove the cover when sprouts appear so seedlings have air movement. Check that the surface stays evenly damp without standing water. Cold mix, dry pellets, excessive depth or old seed may all explain gaps. Do not keep a second layer of opaque plastic over light-requiring seed. Record the actual medium temperature if emergence is poor.

Move seedlings under bright overhead light
After the first small seedlings unfold, give them close, even light rather than leaving them on a dim windowsill. Iowa State describes supplemental light about four to six inches above young plants; adjust to the manufacturer’s safe distance and heat output. A light source far to one side encourages leaning. Compact new growth is a better goal than rapid vertical stretching. Allow air circulation and monitor moisture because tiny cells dry faster once domes are removed. Never leave a hot lamp pressed against foliage or an unsecured fixture over wet trays.
Wait for true leaves before potting up
Petunia cotyledons are the first small seed leaves. Later true leaves are visibly different, more oval and plant-specific, and their appearance provides a better signal for handling. Iowa State recommends transplanting when approximately three true leaves are present. Hold seedlings by a leaf if necessary rather than squeezing the delicate stem, and lift each root ball with a small tool. Set the plant at its original media level. Do not bury the growing tip to rescue a leggy stem, and do not tear apart dense roots just to fill more cells.
Harden off young plants before outdoor planting
Indoor seedlings have not yet faced wind, strong direct sunlight or cold nights. Introduce them gradually to sheltered outdoor conditions as the local climate allows, bringing them back under cover if conditions become harsh. Do not assume a USDA zone number identifies the safe planting date. Petunias are generally grown as warm-season annual displays where freezing temperatures may damage them. Confirm nighttime conditions rather than using the first sunny afternoon as a signal to move all flats outdoors. Keep plants watered while roots settle into their new containers or beds.

Troubleshoot thin stems and seedling collapse
Tall, pale or leaning petunia seedlings usually call for checking light intensity and spacing first. Sudden pinched stems at the medium surface can signal damping-off, especially where air is stagnant and media stays soaked. If seeds never germinate, check freshness, whether light reached them and whether pellets received enough moisture to dissolve. Do not respond to every symptom with fertilizer or pesticides. Correcting the environment is often the first useful change. Remove unhealthy seedlings and clean trays; consult local Extension advice if an infectious problem persists.
Choose the right stage to enjoy flowers
Petunias come in upright, mounding and trailing forms, with flowers of various sizes and colors. Your selected cultivar’s habit determines spacing and container choice. Keep the young plant actively growing with good light, drainage and moderate care rather than forcing flowers on a weak root system. Photograph the first true leaves, then compare later compact growth with any stretched seedlings. A note on light distance, sowing date and seed coating helps refine next year’s process. Successful seed starting is about producing a sturdy transplant, not just getting a green speck to emerge.
Related Guides
How We Research and Check Botanical Details
This VegWin guide was prepared by comparing the plant parts and growing steps with specific horticultural resources: yardandgarden.extension.iastate.edu, yardandgarden.extension.iastate.edu, extension.umn.edu. Source recommendations reflect their regions and publication contexts. We checked these pages on October 28, 2026 and distinguished plant structure from local timing and cultivar-specific details. Use site and packet guidance for your own climate; USDA hardiness zones do not determine a universal planting date.
No product partnership or paid placement is claimed. Our affiliate disclosure explains the site policy. For unexplained pest or disease damage, verify the cause before using any control, and follow local Extension integrated pest management and current labels. Illustrations clarify anatomy and the intended action, not exact proportions for every cultivar.
Yes. Iowa State Extension advises surface sowing and pressing seed onto moist medium without covering.
No. Pelleting improves handling but does not remove the light requirement; keep pellets at the surface.
Around ten weeks before locally safe outdoor planting is one Iowa State reference, but adjust to your region.
After true leaves have developed, often around three true leaves as Iowa State advises.
Check inadequate overhead light, crowded cells, high heat and other stressful growing conditions.