
Egyptian walking onions do not behave like the bulb onions sold as dry sets each spring. Their tall, hollow leaves carry a cluster of small onion-like bulbs, called topsets or bulbils, at the end of a stalk. When the stalk bends, some of these tiny bulbs root where they touch the earth. That is the “walking” habit. To establish a planned patch instead of letting the plants wander, collect sound topsets and set each one into prepared ground with its point upward. The aim is to anchor a living bulbil and give it a chance to root, not to bury an entire leaf-and-stalk cluster in a deep trench.
Recognize a Topset Instead of a True Seed
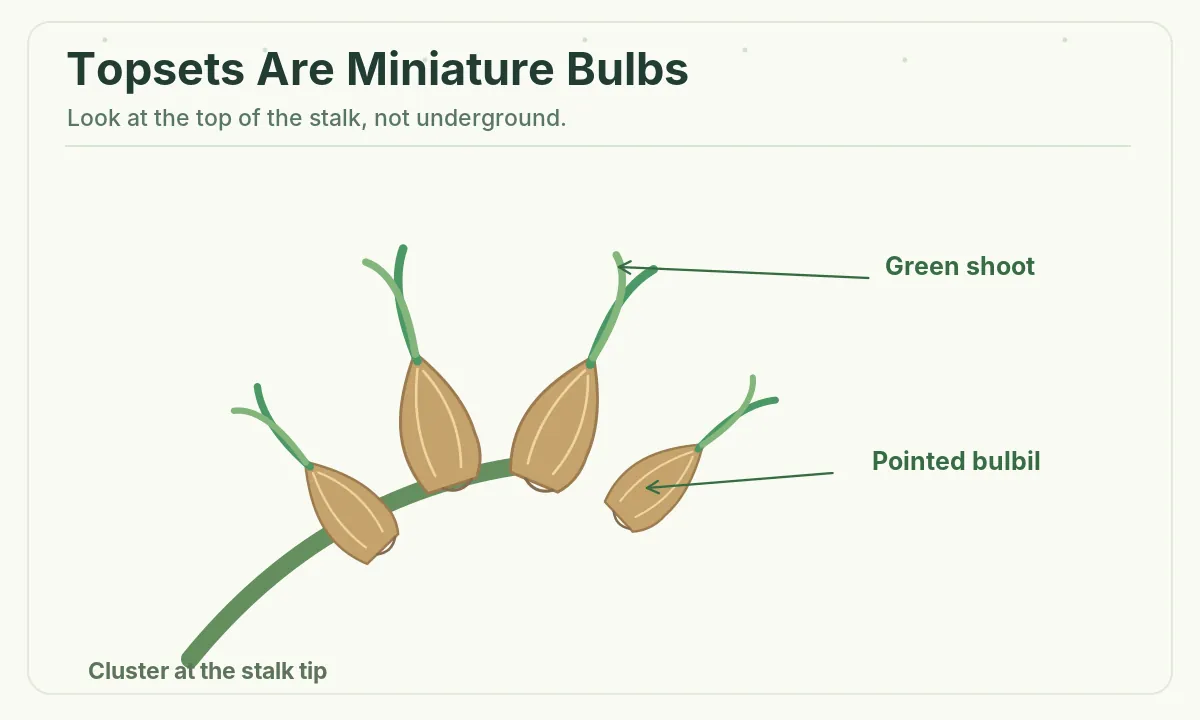
Trace the tall stem of a mature Egyptian walking onion upward. Where another onion might form a round flower head, this plant often develops a cluster of small tear-shaped bulbils, sometimes with narrow shoots already emerging. Each bulbil is a miniature vegetative onion with a pointed shoot end and a basal plate that can produce roots. It is not a dry black onion seed, and it is not the big underground bulb of the parent plant. Gently separate bulbils from the cluster if you need several planting positions.
Choose firm, clean topsets and reject any that are soft, collapsing, or visibly decayed. Tiny rooted shoots are useful clues that they are alive; do not mistake a green sprout for a reason to cut it off. If a stalk has already fallen, examine the place where it touches the soil for newly rooting bulbils. Lift them with any attached young roots protected. Because cultivar and season affect bulbil size, judge condition by firmness and growth rather than demanding one exact diameter.
Choose the Late-Summer Planting Window
In many temperate gardens the easiest time to plant is when mature topsets become available in late summer. University of Minnesota Extension recommends planting soon after collecting them; Illinois Extension also describes late-summer planting of winter onion sets. Roots can establish before winter, with new growth often apparent the following spring. The appropriate calendar still depends on your climate, drainage, and when your particular plants actually develop topsets.
A newly acquired dry topset is not the same as a stored packet of true onion seed. Do not postpone planting unnecessarily while it shrivels on a windowsill. If ground is frozen, waterlogged, or otherwise unworkable, hold healthy bulbils briefly in a cool, airy location and plant when conditions allow. In a very mild climate, check local Extension guidance for perennial onion management rather than translating a Minnesota date or USDA hardiness zone into a universal planting schedule.
Set the Point Up and Cover the Basal Plate
Prepare a sunny, weed-free patch with loose soil that drains after rain. Identify the pointed shoot end and the flatter root-bearing base of each bulbil. Push or plant with the point facing up. Minnesota guidance gives roughly one to two inches planting depth and six inches between bulbils; Wisconsin Horticulture recommends no more than an inch deep and four to five inches apart. These references reflect somewhat different methods, not a requirement to force all bulbils to identical depth.
For an easy home-garden approach, anchor the small bulbil under a light covering of soil, with its narrow green shoot above the surface if it has already sprouted. Do not bury a long growing shoot, nor leave the basal plate exposed and unable to root. Water gently so soil meets the bulbils without compacting into a hard crust. Keep their planting position visible because young foliage can resemble grass and may be pulled accidentally during weeding.
Leave Room for the Bending Topset Stalk
Choose the edge of a perennial bed where the onions can stay for multiple years. Walking onions do not travel underground like runners; the tall stalk bends until its top cluster touches soil and starts new clumps. Over time this can make a widening patch if you allow every fallen cluster to root. Sketch where each mother clump stands and where new bulbils might land, especially near paths, beds of annual vegetables, or neighboring plants.
If you want a tidy patch, harvest spare topsets before they fall, or lift and replant them deliberately. Wisconsin Extension also notes that established clumps can be divided in spring. Cutting all leaves or lifting the underground bulbs soon after planting sets the colony back. University of Minnesota recommends letting first-year plants establish before harvesting greens regularly; begin modest leaf harvesting on healthy established plants in the second season.

Water for Rooting Without Keeping Bulbs Wet
New bulbils need contact with moist soil to initiate roots. After planting, water once thoroughly enough to settle the surrounding soil. Then check with a finger before watering again rather than sprinkling every day by habit. The area should not remain saturated; standing water encourages basal softening and rot in onions. Remove weeds by hand while the new shoots are small, taking care not to disturb shallow roots.
Mulch can moderate fluctuations where winters are cold, but it should not create a permanently damp blanket pushed against the tender shoot tip. Minnesota Extension suggests a light straw cover for winter. Apply this locally appropriate protection after planting where needed, and uncover any smothered shoots as spring growth begins. If a bulbil fails, lift it gently to inspect for dryness, rot, or missing roots before changing the watering regime for the entire patch.
Distinguish Topsets From Underground Bulbs
There are two very different onion-like structures on an established plant. The small bulbils at the end of a flowering-height stalk are the normal starting material for a new walking-onion colony. The bulbs underground anchor the parent and can also be divided, but digging them removes that established plant. A diagram should place the topset cluster high above the leaves, not among roots at ground level.
Avoid the common mistake of assuming that the tallest green leaves must be pulled out to harvest a topset. Grip the mature top cluster gently or cut its supporting stalk without tearing out the entire clump. The top bulbil can already be sprouting; that is normal. For seed swaps, label the planting material as bulbils rather than “seeds,” because a recipient who sows them as tiny black seeds may place them incorrectly.

Check Establishment and Control Future Spread
Healthy newly rooted topsets form slender green leaves and a firm anchorage in the soil. Their first-season progress may be modest; keep them weed-free rather than expecting a large kitchen onion bulb. Record which individuals sprouted and where stalks fell. The next season, the appearance of bulb clusters high on stalks confirms the distinctive walking-onion cycle.
Inspect nearby garden beds in late summer before accidental daughter clumps become difficult to separate. Collect mature topsets to share, plant in a deliberately labeled row, or use edible ones only when correctly identified and grown safely. Discard suspiciously rotted bulbils rather than mixing them with healthy planting stock. This perennial is best managed as a living patch with repeated observation, not as an annual onion crop harvested and replanted from true seed.
Related Guides
- Onion Gardening: Choose Day Length, Start Bulbs, and Cure the Harvest
- Egyptian Walking Onions: Plant Topsets and Control the Patch
- Why Onion Plants Flower: Diagnose Bolting and Save the Harvest
- Starting Onion Seeds Indoors: A Tray-to-Transplant Checklist
- Planting Onion Sets: Sort Small Bulbs for Storage and Greens
How We Research This Gardening Guide
For this guide, we cross-checked the crop-specific guidance in the following institutional resources on October 27, 2026: University of Minnesota Extension (University of Minnesota Extension explains walking onion topsets and planting one to two inches deep, point up, with six-inch spacing.); Wisconsin Horticulture (Wisconsin Horticulture explains bulbils, their establishment when stalks bend down, shallow planting, and perennial clump division.); University of Illinois Extension (University of Illinois Extension distinguishes winter onion topsets from seed and describes late-summer planting.). Recommendations are interpreted for gardeners and may need adjustment to local conditions, cultivar differences, and extension advice.
No paid product placement or affiliate recommendation is included in this article. See the VegWin affiliate disclosure. If disease symptoms or food-safety decisions are involved, seek local Extension guidance before making a treatment or food-processing decision.
No. They are vegetative bulbils formed at the top of a stalk and are planted as tiny bulbs.
Place the pointed shoot end up and the flatter basal root end down.
University guidance ranges from a shallow cover to about one or two inches; use the method appropriate to bulbil size and local soil, without burying sprouts.
Yes. A small green sprout may develop while the bulbil is still attached; protect it when planting.
The topset-bearing stem bends to the ground, where its bulbils take root and establish new clumps.