
Canna flowers look tropical, but their seeds resemble tiny hard beads. A mature seed is typically black or very dark brown, rounded and remarkably resistant to water. That armor protects the embryo, yet it can delay germination until the coat is worn or softened. You can try a small, controlled scuff of the coat, or use the warm-water soaking approach described by the Royal Horticultural Society. These are alternative treatments, not an invitation to cut deeply into the seed. The guide below explains how to recognize a mature seed, limit injury, sow after treatment and tell a young canna from a broadleaf vegetable seedling.
Recognize the True Canna Seed and Pod
Cannas make colorful, asymmetrical flower clusters above large paddle-shaped leaves. Some cultivars set rough or spiny-looking capsules that mature and open to reveal very hard, rounded brown-black seeds. Not every ornamental hybrid sets viable seed, and the offspring of hybrid plants may differ markedly in flower color or growth habit. RHS explains that seed-grown cannas may not come true to the parent. If a named cultivar must be reproduced faithfully, rhizome division is the more reliable method.
The seed is round and dark, not winged and papery like a parsnip seed or curved like a pea. Use clean, mature seed from a correctly identified plant. Do not label an immature green capsule as if it were the seed itself: the hard bead is enclosed until the fruit ripens.
Decide Between Soaking and Scarifying
RHS describes either soaking canna seeds in warm water for an extended period or making a small nick in the hard seed coat. Iowa State recommends soaking for a day before sowing, while Oklahoma State discusses mechanical scarification. These are legitimate approaches, and they should be presented as options with varying success, not as a mandatory sequence of boiling, cutting and chemical treatment. For a beginner concerned about slipping with tools, soaking is the safer starting point.
Set aside a few labeled seeds for each method if your supply allows. Record what you did, so differences in emergence mean something. Avoid placing seeds in boiling water or using acids; those approaches are not needed for this home-garden guide.

Scuff Only the Outer Seed Coat
If you choose scarification, hold the dry seed steady against a non-slip surface and lightly rub a tiny patch with fine sandpaper or a small file. Stop when the dark outer coat becomes visibly lighter; do not drive a blade through the center or gouge out a chunk of the white inner material. Oklahoma State notes the seed coat is extremely hard and requires a small opening so moisture can penetrate. Wear eye protection if working with files, keep fingers clear and do not allow children to handle sharp tools unsupervised.
In a diagram, an arrow should point to a small shallow spot on the round seed, with an intact seed beside it for comparison. The white embryo must not be depicted spilling out. Discard any seed accidentally crushed through its center rather than treating injury as a shortcut.
Sow in Warm, Free-Draining Medium
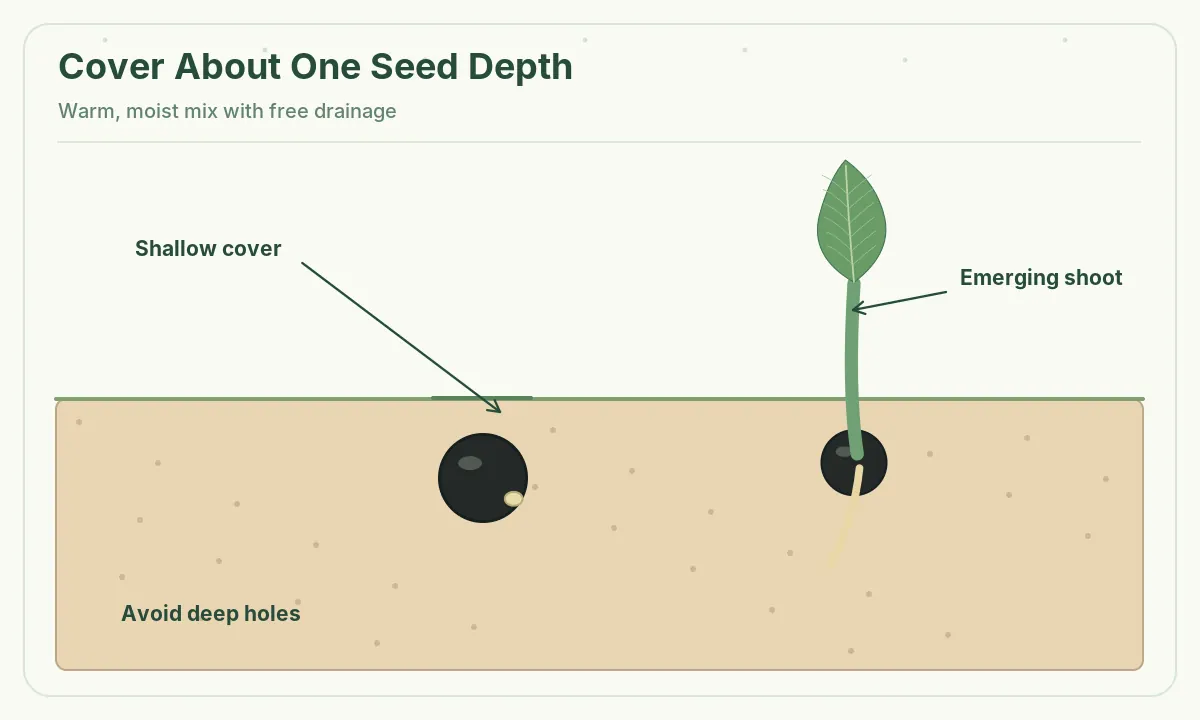
Use clean seed-starting mix in small pots or cells with proper drainage holes. After your selected seed treatment, place each seed in the medium and cover lightly according to the RHS depth rule of approximately the seed’s own thickness. Firm gently and water enough to moisten the planting zone; allow excess water to escape. RHS recommends about 70°F for germination, while Iowa State notes a warm growing environment. A thermostatically controlled seed tray can be useful in a cool room, but avoid overheating a sealed pot in harsh sun.
The cross-section should show a single round seed under shallow media, not a canna rhizome or a seed set several inches down. Keep records of the treatment and sowing date on the outside of the container, never as technical text inside the final illustration.
Keep Moisture Consistent Until Emergence
Check the moisture under the surface rather than repeatedly flooding the pot. Hard seed coats need water, yet the embryo and growing roots still need oxygen. Keep the medium comfortably damp and well drained; a transparent cover can reduce evaporation while germination proceeds, but allow necessary airflow and remove it as soon as seedlings emerge. Wet stagnant conditions encourage molds and other problems. Do not mistake an external film of water on a seed for evidence that the interior has hydrated.
Seed emergence varies with treatment, temperature, freshness and plant type. Iowa State gives a germination range under favorable conditions, but a particular seed may still take longer. Avoid excavating each pot every few days, which can break the first delicate root.
Identify the First Canna Shoot Correctly
A germinating canna develops a root and an upright, narrow first shoot or cotyledonary sheath; broad foliage appears as the seedling establishes. Oklahoma State describes the early root and cotyledonary sheath before the first expanding leaves. A newly emerged canna is therefore not a fully formed fan of three giant leaves. Early leaves unfurl from a rolled growing center, eventually becoming broad, entire and often pointed. Their long central veins distinguish them from a lobed vegetable seedling.
Provide bright growing light after emergence and protect tender seedlings from scorching transitions. Rotate pots if plants lean strongly toward one window. Keep the young growing point above the medium, and never cut it off as though it were an expendable sprout.

Move Seedlings Into Individual Pots Carefully
When roots hold together enough potting mix to move without tearing, transplant seedlings into individual, drained pots. Iowa State recommends potting them on once large enough to handle. Lift each plug from below, support the root ball and position it at the existing soil level. Avoid bending the main roots or burying the newest central leaf. A potting diagram can show a vertical young shoot and roots inside a cohesive plug without inventing a giant underground tuber on day one.
Cannas are frost-sensitive ornamentals. Harden them off gradually and place outside only when local conditions are suitable and frost danger has passed. Later, established plants form fleshy rhizomes; these are not the original seeds. Do not promise that a seedling will flower in its first summer.
Troubleshoot Seed Treatment and Seedling Failure
If pots stay empty, check whether the seed was mature and viable, whether the seed coat was only lightly abraded, whether temperatures were appropriate and whether the mix stayed consistently moist without saturation. A seed cut entirely in half is not better prepared; its embryo has likely been destroyed. Very old or sterile hybrid seed may fail even with correct conditions. Test several seeds before changing every variable, and avoid dangerous household chemical experiments to force germination.
Once seedlings grow, monitor for yellowing due to waterlogged media or insufficient light. A single pale leaf is not a diagnosis of disease by itself. Consult local Extension advice for confirmed problems, and do not spray unverified treatments on vulnerable young leaves. The key skill remains separating the hard seed-coat barrier from normal seedling-care needs.
Related Guides
- When to Divide Canna Rhizomes and Keep a Growing Eye on Every Piece
- When to Plant Canna Rhizomes and How to Set the Growing Points
How We Research This Guide
We reviewed specialist sources on October 27, 2026, including www.rhs.org.uk (RHS explains that canna seeds benefit from warm-water soaking or a small seed-coat nick and that seed offspring can vary.); yardandgarden.extension.iastate.edu (Iowa State Extension describes soaking hard canna seeds, warm sowing and moving young seedlings into separate pots.); extension.okstate.edu (Oklahoma State Extension describes hard black canna seed coats, scarification, germination and seedling morphology.); ask.ifas.ufl.edu (University of Florida IFAS explains hard seed coat dormancy and scarification in golden canna as a related species.). These references describe typical botany and cultivation, not a promise that every cultivar and climate will perform identically. Check current regional Extension recommendations where applicable.
No affiliate products or paid placements are recommended in this article. Review our affiliate disclosure for site-wide policy. Follow any local regulations and applicable label directions before using gardening treatments.
No. RHS also describes warm-water soaking; gentle scarification is an alternative that can help water enter very hard seed coats.
Only a tiny superficial patch of the hard outer coat; avoid cutting into the embryo or splitting the seed.
Not reliably. Hybrid seed offspring can differ, whereas rhizome division better preserves a named cultivar.
RHS advises covering it by about its own thickness in seed-starting compost.
They are tender; hardiness and rhizome protection depend on climate, and seedlings should be kept from frost.