
See how to sow lima bean seeds after soil warms, identify the first root and seed leaves, and prevent the wet conditions that can rot large seeds. The following diagrams show identifiable plant structures and decision points rather than a universal calendar. Check the label for your actual cultivar and adapt timing to local conditions.
Recognize the Large Lima Seed and Its Growing Embryo
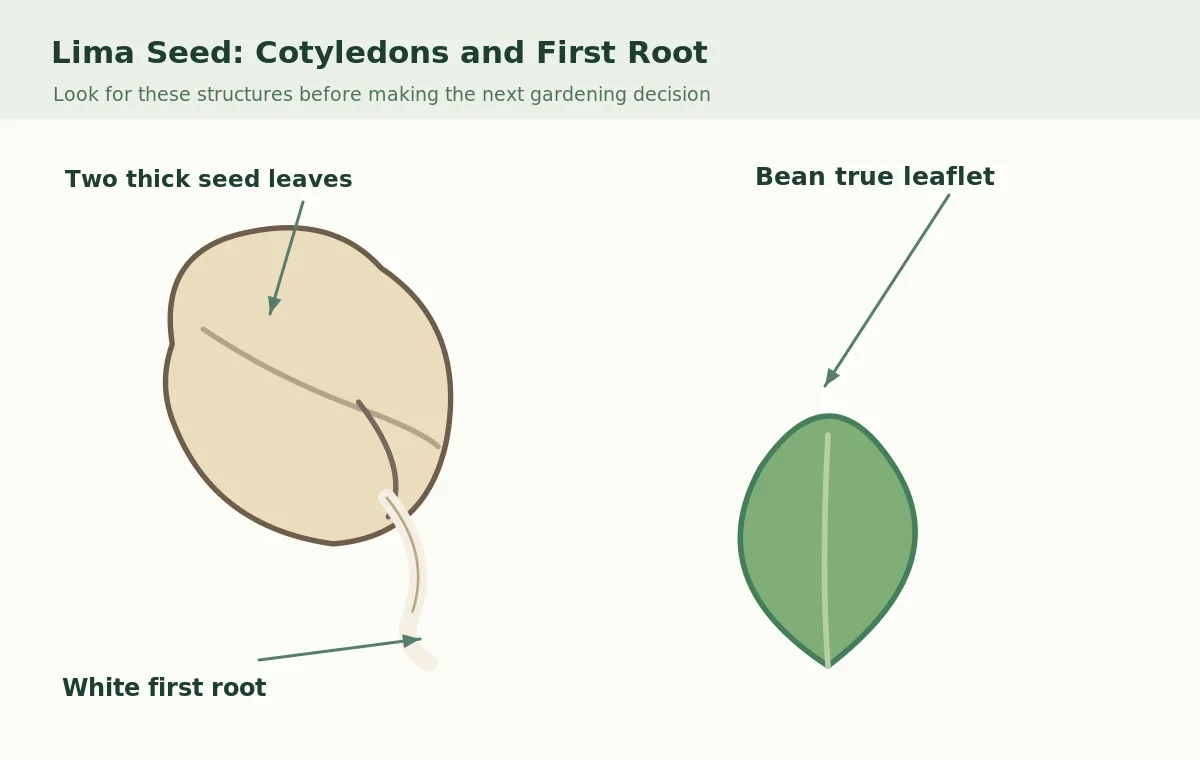
Lima beans are Phaseolus lunatus, a different bean species from the common garden snap bean Phaseolus vulgaris. A dry lima seed is broad and flattened, often pale cream or mottled depending on variety. Its two thick seed leaves, called cotyledons, store the energy needed for the first seedling growth. Between them sits the tiny embryo that sends out a primary root and then a shoot. The detail drawing shows that emerging white root clearly; it should never be cut or rubbed away.
Choose intact, undamaged seed intended for planting, not split food beans. Bush and pole types differ in space requirements and time to harvest, but both have similar needs while germinating. UMass Extension notes that lima beans are less forgiving of cool early plantings than snap beans. A good-looking large seed can still fail if the first uptake of water happens in chilled ground, so seed size alone is no guarantee of a vigorous start.
Check Soil Warmth Before Starting, Not Just the Calendar
Wait for soil to warm consistently before sowing. Virginia Tech states that lima beans germinate well after sustained soil temperatures around 65°F, and University of California ANR reports better large-lima emergence in still warmer seed-zone conditions. These are guides, not a universally reliable date for every landscape. Measure soil at the intended sowing depth in the morning over several days when possible. A sunny afternoon surface can look warm even while the lower seed zone remains chilled.
Nightly frost risk matters because fragile emerging shoots cannot tolerate freezing. Compare a local frost-free forecast with actual soil warmth; the two are related but not identical. If a wet cold front is expected immediately after planting, delaying a few days can save more time than waiting for replacements to emerge from decayed seed. Growers in cool regions may use an appropriate greenhouse start, but the larger the seedling, the more carefully roots must be transferred.
Prepare a Draining Seed Zone Without a Wet Pocket
Select a sunny bed with good drainage and reasonably loose soil. Large lima seeds need moisture to rehydrate, yet their seed coats and carbohydrate-rich interior can be invaded by disease organisms in cold, oxygen-poor conditions. Avoid planting in compacted holes that hold water like cups. Rake the seedbed level, remove large clods and confirm drainage before sowing. If a hard crust forms after watering, shoots may struggle to emerge; add gentle organic surface cover only if appropriate for the bed.
The action panel contrasts a seed in evenly moist, aerated soil with a waterlogged pocket. Water moves through both, but roots also need air. Do not saturate soil every day just because you cannot yet see a shoot. Push a finger or small probe into a separate patch to check moisture below the surface, then water only as conditions require. Problems caused by poor drainage cannot be fixed simply by using more seed, stronger fertilizer or repeated soaking.

Plant Whole Seeds at the Correct Local Depth
Use the depth and spacing printed for your bush or pole variety and adapted local growing guide. Large bean seeds are buried deeper than tiny salad seeds, but heavy and sandy soils may call for different depths. Sow each dry intact bean into gently moist soil and cover loosely without crushing it. There is usually no need to identify a magic “up” side: the sprout can orient itself. The diagram distinguishes the bean shell from the emerging root and its proper place in the soil.
Pre-soaking is often promoted as a universal speed trick, but very dry lima seed can be sensitive to rapid water uptake and abrupt temperature changes. For home sowing, warm moist soil and intact seed are usually the simpler approach unless a specific seed supplier gives different instructions. Do not scarify with a knife or split the cotyledons. Mark the row so that you do not dig it up repeatedly while checking progress; digging can break a healthy new root.
Follow the Root First and Watch the First Seed Leaves
After imbibition, the radicle—the first white root—extends into the soil, while the shoot grows upward. A split seed coat is a normal change; a missing embryonic root is not. Depending on the bean and its germination pattern, large seed leaves may remain low while the first true leaves open above them. Later the young lima plant forms compound leaves, usually with three leaflets. This distinctive trifoliate foliage helps separate an established bean seedling from common small weeds.
Examine seedlings at the soil surface without tugging on them. Strong plants become upright and expand green leaves; pale stretched plants often need better light. If only a few seeds fail in a cold patch, wait until soil warmth is adequate and replant sound seed rather than trying to rescue rotten ones with homemade chemicals. A newly rooted seedling is delicate when removed from its tray; moving the whole growing plug is safer than grasping the white root.
Recognize Seed Rot Rather Than Calling Every Delay Failure
Slow emergence alone does not prove rot. Soil temperature, seed depth, crusting and seed age all affect timing. If a test seed is genuinely decayed, it may be soft, discolored, smell unpleasant or have a missing or brown developing root. Do not confuse the normal pale swollen bean cotyledon with fuzzy mold, and do not dig up the entire row to inspect each seed. The diagnostic panel compares an intact cream-colored germinating bean with a dark collapsed seed in soaked soil.
If rot is suspected, correct drainage and season choice before re-sowing. Avoid repeating beans in the same diseased spot without an appropriate rotation; university production guides emphasize field history and root disease risk. Seed treatment and inoculants, when relevant, have crop-specific uses, so no generic DIY disinfectant or pesticide recipe belongs here. If young plants collapse, identify the underlying disease locally rather than assuming it is always one fungus.

Choose Bush or Pole Support Only After Seedlings Establish
Healthy seedlings eventually need room to make pods. Bush lima beans stay shorter, while pole types twine or climb and benefit from a sturdy support installed before vines become tangled. Set a trellis without stabbing seed locations or established primary roots. Give both forms enough light and airflow. Excessive heat or cold during bloom can affect pod set even after excellent germination, which means vigorous seedlings do not guarantee an identical harvest in every climate.
Use the final comparison of young plants to distinguish successful establishment from a failed seed: the strong seedling has three-part mature leaves and an intact root system, while the failed example remains a discolored bean in wet ground. The immediate decision for germination is still simple—warmth, viable undamaged seed and freely draining moist soil. Adjust sowing timing before purchasing extra supplies. Do not taste uncooked lima beans from any stage; they must be properly cooked before eating.
Related Guides
How We Research and Verify the Botanical Details
Sources checked on 2026-10-27: www.pubs.ext.vt.edu: Virginia Tech Extension describes lima bean warm-soil requirements, seed susceptibility to fungal rots, and careful pre-germination handling. www.umass.edu: UMass Extension distinguishes bush and pole limas and notes poor emergence below sufficiently warm soil temperatures. ucanr.edu: University of California ANR reports sharply improved large-lima germination in warmer soil and increased risks in cool, wet seedbeds. Diagrams are explanatory botanical drawings. Plant size and coloration may vary with cultivar and season.
This article is informational, with no paid sponsorship or affiliate product links. Review our affiliate disclosure. Follow local Cooperative Extension recommendations for problems involving pests or climate and the full legally approved label before using any pesticide.
Poorly. Their emergence and seed health are much better when the seed zone has warmed consistently.
No routine cutting is needed. Follow the seed supplier and use sound whole seed in warm, moist soil.
The radicle, or primary root, extends before the leafy shoot emerges from the surface.
Look for a soft discolored collapsing seed and a damaged root in wet ground, rather than judging only by delayed emergence.
They can be moved carefully if begun indoors, but preserve the entire plug and avoid disturbing the main root.