
When and How to Prune Group 3 Clematis Above Healthy Bud Pairs starts with recognizing the right plant parts, not with rushing to cut or treat. An image showing those parts can keep a simple gardening job from becoming a costly mistake. This guide focuses on one distinct task and explains what to examine, which action to take, and when to delay. Conditions vary by cultivar, season and region, so always compare the instructions with the plant in front of you. The university and horticultural sources linked below inform the specific steps; they are not evidence that every garden will respond on the same schedule. Follow the diagrams together with the text, and stop if the living plant does not match the identification described.
Confirm the Plant Really Belongs to Group Three
Clematis pruning groups describe where flowers form, not the color of the flower. Group 3 includes many late-summer-flowering climbers such as Clematis viticella and selected cultivars that bloom on shoots made during the current year. Check the plant label when possible. The Royal Horticultural Society distinguishes Group 1 early bloomers on older stems, Group 2 large-flowered types with older wood contributions, and Group 3 late bloomers on new growth. A hard February cut can be appropriate for Group 3 but remove most of the upcoming flowers on a spring-blooming Group 1 vine. Never assign a pruning group merely by petal color, plant height or a photograph.
Watch Bloom Timing If the Label Is Missing
When the cultivar name is lost, observe the plant for a season before using an aggressive pruning method. RHS advises that clematis flowering before early summer generally should not receive the same winter cut as those flowering from late June onward. There are exceptions and varieties that can be managed as Group 2 or 3, so do not call this an infallible identification test. Make notes about when the first flowers appear and whether fresh long current-year shoots carry them. If you are unsure, remove dead wood conservatively and wait for flowering evidence. Preventing an irreversible pruning mistake is more valuable than tidying every stem immediately.
Choose Late Winter or Early Spring Before Vigorous Growth
For established Group 3 vines, the Royal Horticultural Society recommends cutting back in late winter or early spring, commonly February or March in the UK. Use the plant’s bud development and your local winter pattern rather than transferring that calendar date unchanged across the United States. In a colder continental location, dormant buds may wake later than in a mild coastal area. The aim is to remove last year’s long growth before the new season’s shoots extend far enough to be easily broken. Avoid major pruning during an extreme freeze or when brittle growth cannot be handled safely. Small frost damage can be assessed when living buds are easier to distinguish.
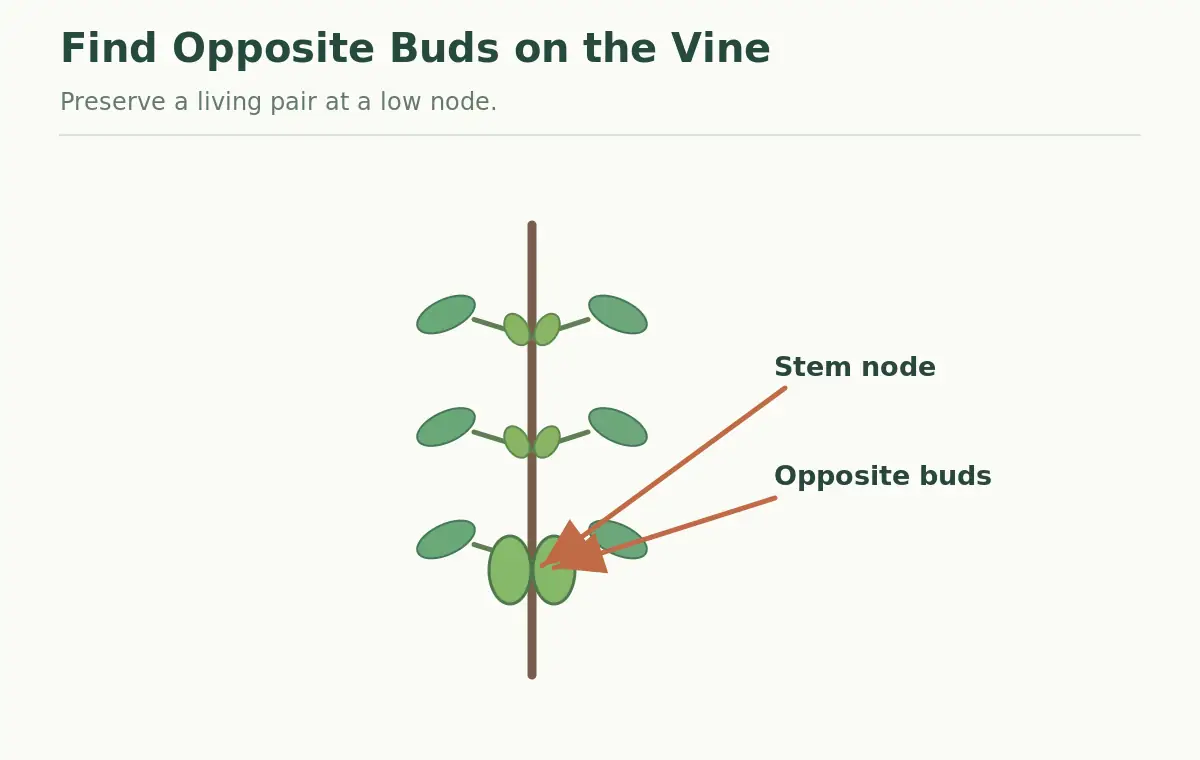
Locate the Lowest Strong Pair of Living Buds
A climbing clematis stem commonly carries opposite buds at nodes. Examine old stems from the base upward to find a sound pair that is firm or just beginning to swell. Buds that are dry, hollow or blackened may not be viable. RHS advises pruning Group 3 vines to the lowest healthy pair, often about six to twelve inches above ground for established plants. You are preserving a functioning basal section, not cutting through the crown or below every visible bud. Branches can vary, so inspect each cane instead of drawing one fixed horizontal line across the entire plant. A close-up drawing of the bud pair is the key reference.
Make a Clean Cut Just Above That Bud Pair
Use sharp clean bypass pruners on stems that fit the tool. Support a brittle vine with one hand and make a single cut above the selected healthy node, leaving the pair below the blade. Do not slice through either bud or leave a long dead snag that can die back. The amount of old stem removed may look dramatic, but Group 3 flowers on replacement growth. RHS recommends taking established growth back hard each season to keep flowering lower on the plant. Gently remove cut vines from the support instead of pulling them through a tangle; leaf stalks can wrap around wires and new shoots can be damaged if yanked.
Keep the Root Crown and Emerging Shoots Safe
The crown is the permanent base from which replacement shoots can emerge. Avoid placing the pruner point into a cluster of new basal growth, especially after a mild winter. Clear dead leaves around the base with care, but do not dig into the root system just to find a perfect-looking stem junction. Group 3 cuts are deliberately low, yet they still leave viable buds, and the surrounding soil line is a guide rather than a demand to cut flush with the ground. If the plant has multiple crowns or a mix of old and young shoots, work one stem at a time to keep your bearings.

Train New Growth While Stems Remain Flexible
After pruning, the plant will invest in fresh shoots. Clematis climbs mainly by wrapping leaf stalks around narrow supports, so fine trellis strands or loosely positioned ties are often more useful than a large smooth post. RHS recommends spreading new shoots across their support during spring and summer. Guide them gently while supple and avoid compressing stems with wire. A support should already be secure before a heavy flower display arrives. Do not expect hard pruning to substitute for water, adequate root space or protection from damage at the soil line. Monitor for wilted or broken emerging shoots as growth picks up.
Contrast Group Three With Earlier-Flowering Groups
Group 1 clematis generally produces its spring flowers on wood made the previous season and often needs little routine pruning beyond post-flowering management. Group 2 retains some of its older framework because early-season blooms can rely on it. Group 3 differs because late-season flowers develop on fresh shoots. RHS explains this distinction clearly across its pruning guides. If several different clematis are growing together, label their bases and prune separately. Cutting all nearby vines down to one height because their stems are intertwined can sacrifice flowers and make cultivar identification harder next year. When in doubt, map the stems before removing them.
Adjust for Newly Planted or Herbaceous Clematis
RHS advises an initial pruning of many newly planted climbing clematis during their first spring to encourage branching, with exceptions if several strong basal stems already exist. That establishment instruction is not exactly the same as maintaining a mature Group 3 vine. Herbaceous clematis such as C. integrifolia can die back differently and may be cut near ground level under guidance appropriate to those types. The plant label is therefore worth keeping. Do not use a general six-inch cut on every clematis sold in a garden center, and do not assume old brown stems mean the crown underneath is dead.

Check Recovery and Future Flower Position
After the cut, watch for shoots emerging from retained nodes and the base as the weather warms. Slow regrowth can reflect cold soil or a weak plant; it does not immediately justify deeper cutting. Check for damaged support ties, root-zone moisture and signs of disease. If vigorous new stems develop but flowers remain sparse later, revisit light levels, plant identity and seasonal stresses rather than blaming a single bud pair. Keep an annual note showing flowering month and approximate pruning height. This record will help maintain flowers within view without converting all clematis into one pruning rule.
Compare the Key On-Plant Decisions
| What you see | Action | Why it matters |
|---|---|---|
| Group 1 | Spring flowers on old growth | Avoid routine hard winter pruning |
| Group 2 | Early bloom on older growth; possible rebloom | Keep framework and prune selectively |
| Group 3 | Late flowers on this year’s shoots | Cut above low healthy bud pair |
Related Guides
How We Research and Verify These Steps
Sources checked on 2026-10-26: University or horticultural source 1; University or horticultural source 2; University or horticultural source 3. We compared those original recommendations with the specific crop, growth stage and real safety limitation before writing this guide. Site illustrations simplify the relevant botanical details, so always confirm the actual specimen and apply regional Extension advice when conditions differ. No pesticide or planting claim here should be taken as a replacement for a local label or growing guide.
Safety and Independent Editorial Disclosure
This article is independent educational gardening content, not paid sponsorship, and its internal links do not imply a vendor partnership. See the VegWin affiliate disclosure. Use clean tools, prevent injury to yourself and the plant, and wash food crops with clean water. Keep poisonous or irritating plant material out of reach of children and pets. For possible insecticide uses, follow current local registration and label directions; this guide does not provide treatment rates or off-label recipes.
Many late-summer bloomers that flower on current-season growth, including C. viticella and several named hybrids.
RHS commonly advises above the lowest healthy pair of buds about 6–12 inches above the soil.
Late winter or early spring before vigorous new shoots grow; adjust the month for your climate.
You can remove stems carrying next spring’s flower potential, resulting in fewer blooms.
No. Preserve a sound pair of buds below each cut so that replacement shoots can develop.